Auto-User Provisioning via Okta API
User auto-provisioning integrates an external user directory with your Axis Cloud. Through Continuous Policy Enforcement, if policy criteria change during a session (for example, restricting access to an IP range that does not include a user's current IP address), the new policy is enforced in real-time and the user’s connection is blocked.
Before you begin, you must configure an Okta as an Identity Provider.
Choosing the User Provisioning Method
The following auto-provisioning methods are available:
- SCIM (Recommended): Use SCIM, a standard protocol for users and groups provisioning, to push your directory changes into Axis. To learn more about user provisioning with Okta Custom SCIM click User Provisioning with Axis Security Application in Okta.
- Okta API: Use Okta API integration to enable user auto-provisioning through Okta API without using SCIM. The API pulls directory changes. The Okta API pulls changes in an interval determined by Axis Security, therefore changes to users or permissions only take effect after the next scheduled information pull.
The Okta API is an alternative to SCIM that does not require additional licenses. If you do not have an Okta Lifecycle Management license, use the Okta API.
Note:
Axis Support configures the provisioning frequency based on the amount of data provisioned and the directory size.
Prerequisites
- An Okta IdP deployment. Click Okta Integration to learn more about creating an Okta IdP integration.
- Okta IdP integration with SCIM disabled. To disable SCIM, refer to the Troubleshooting section at the end of this article.
Step 1: Editing the Axis Application User Profile in Okta
To create an Okta API, ensure that the Axis Application user profile includes the following attributes:
- Display Name
- First Name
- Last Name
- Department
- Division
To view and edit the Axis Application user profile in Okta:
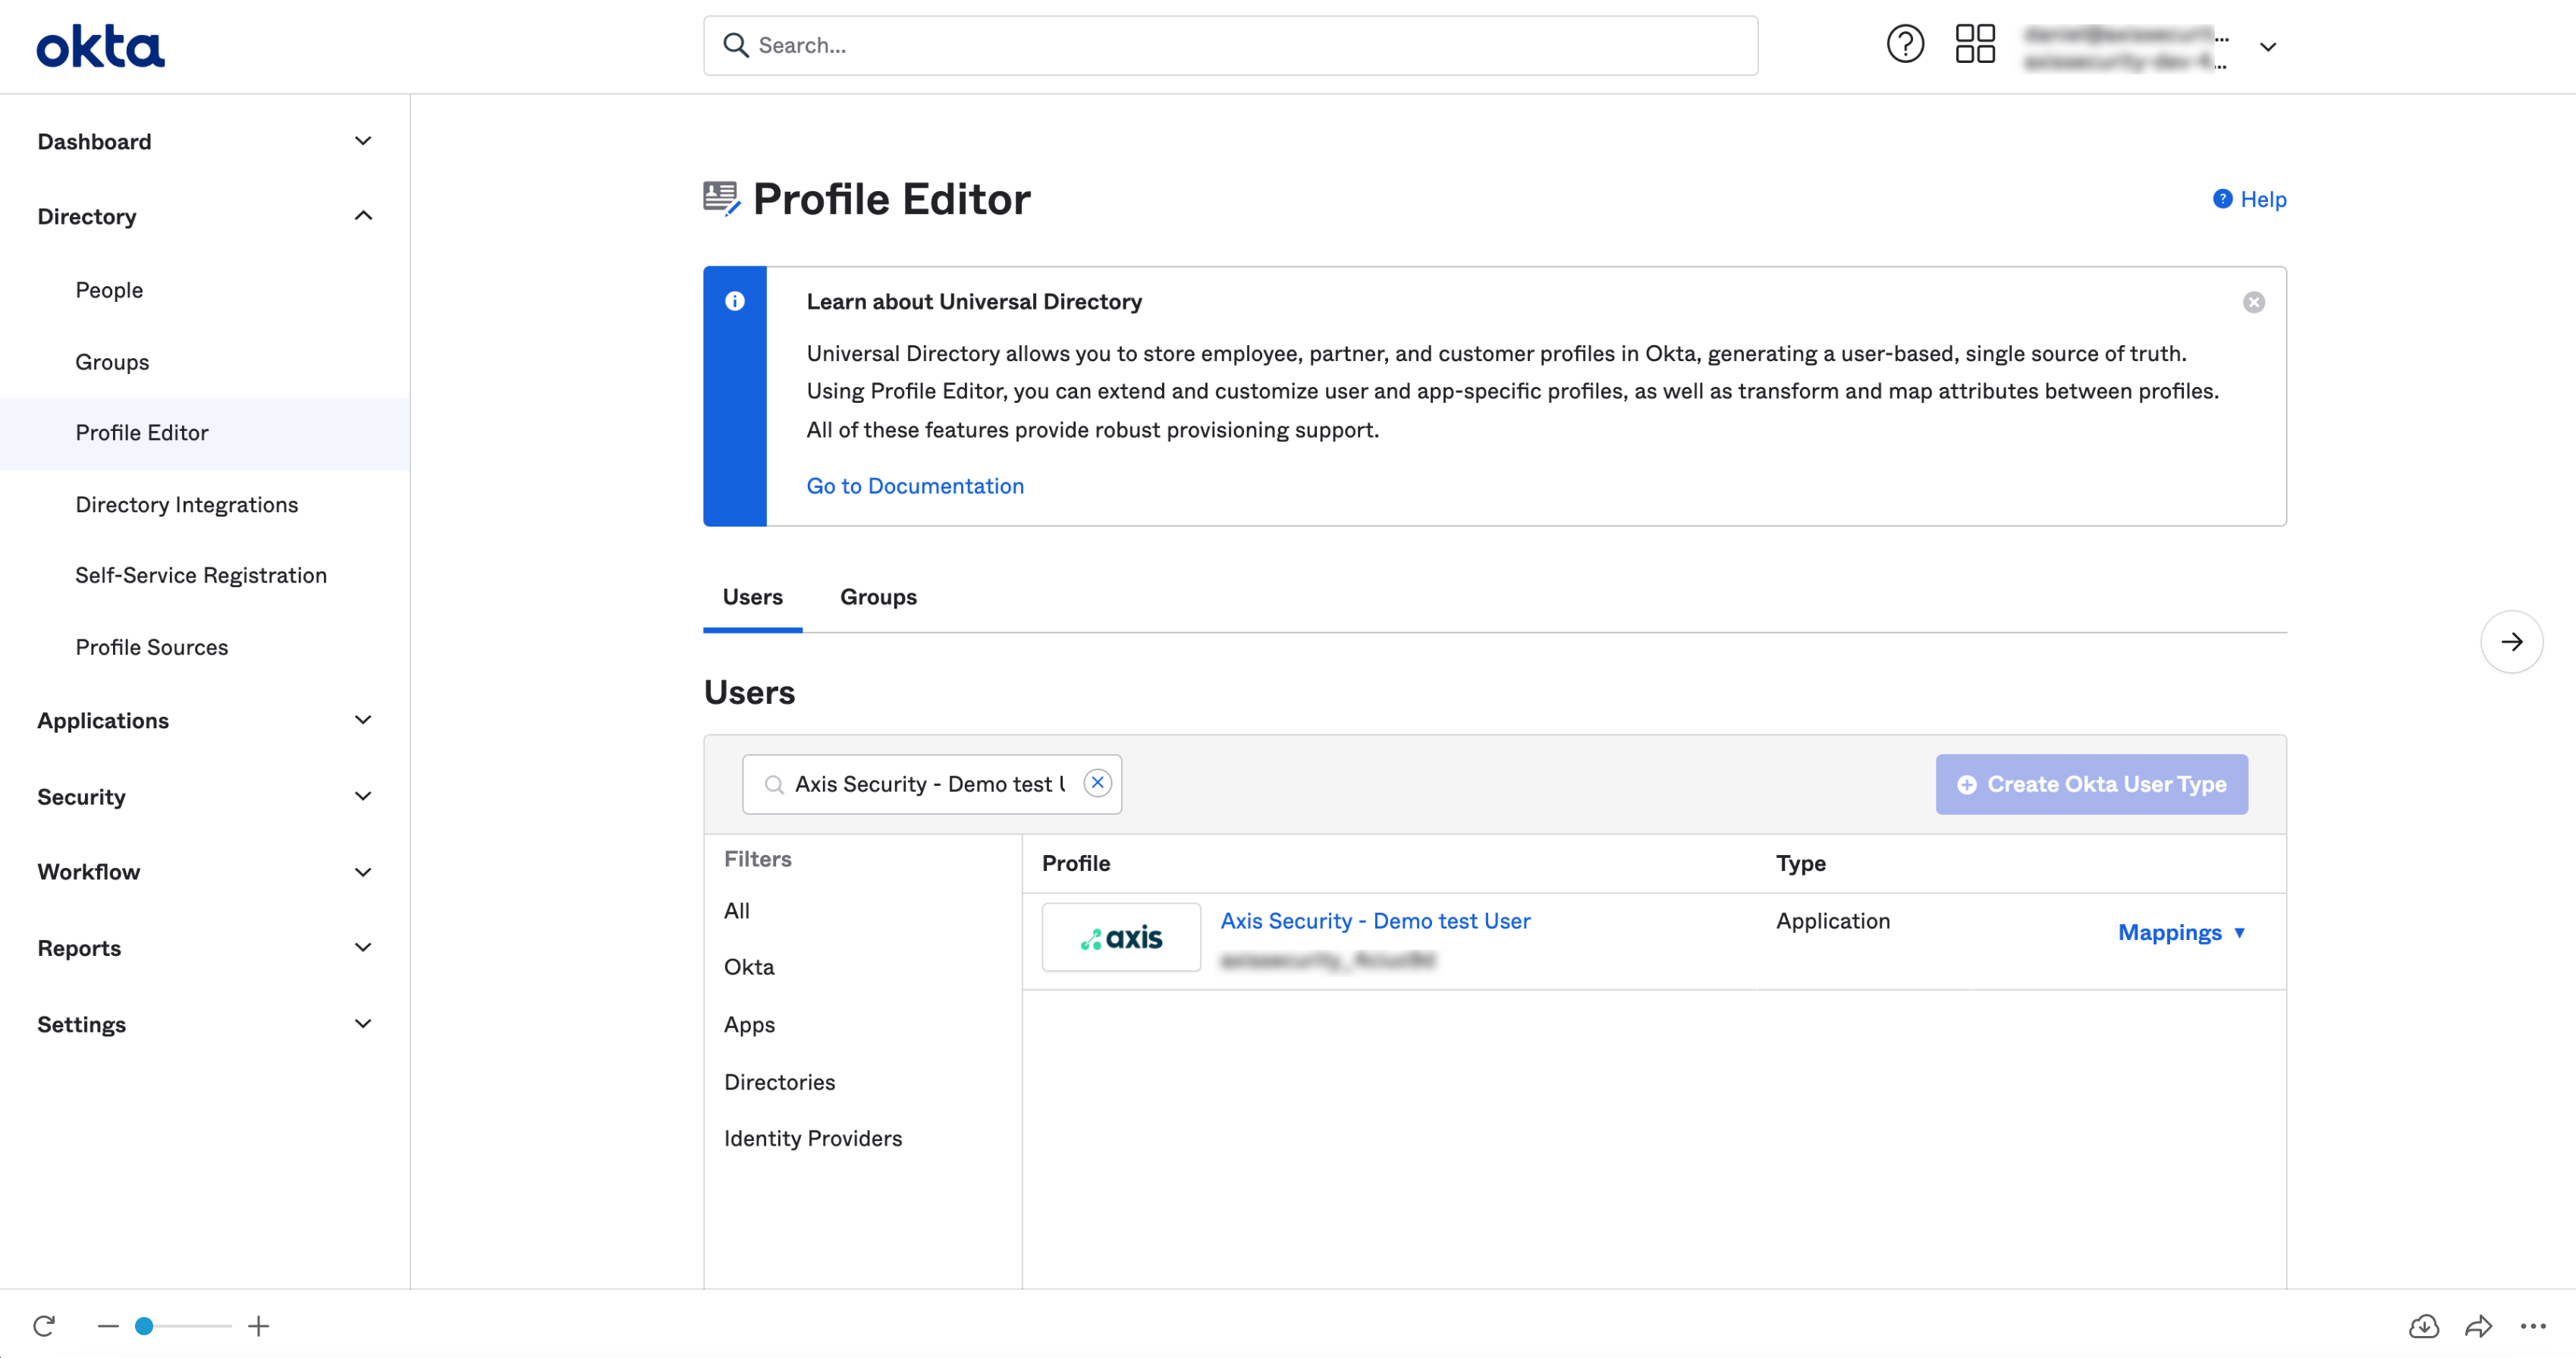
- In the Okta Admin Console, navigate to Directory -> Profile Editor.
- Under Users, select your Axis application user profile (the name format is “ User”).
The Profile Editor window appears.
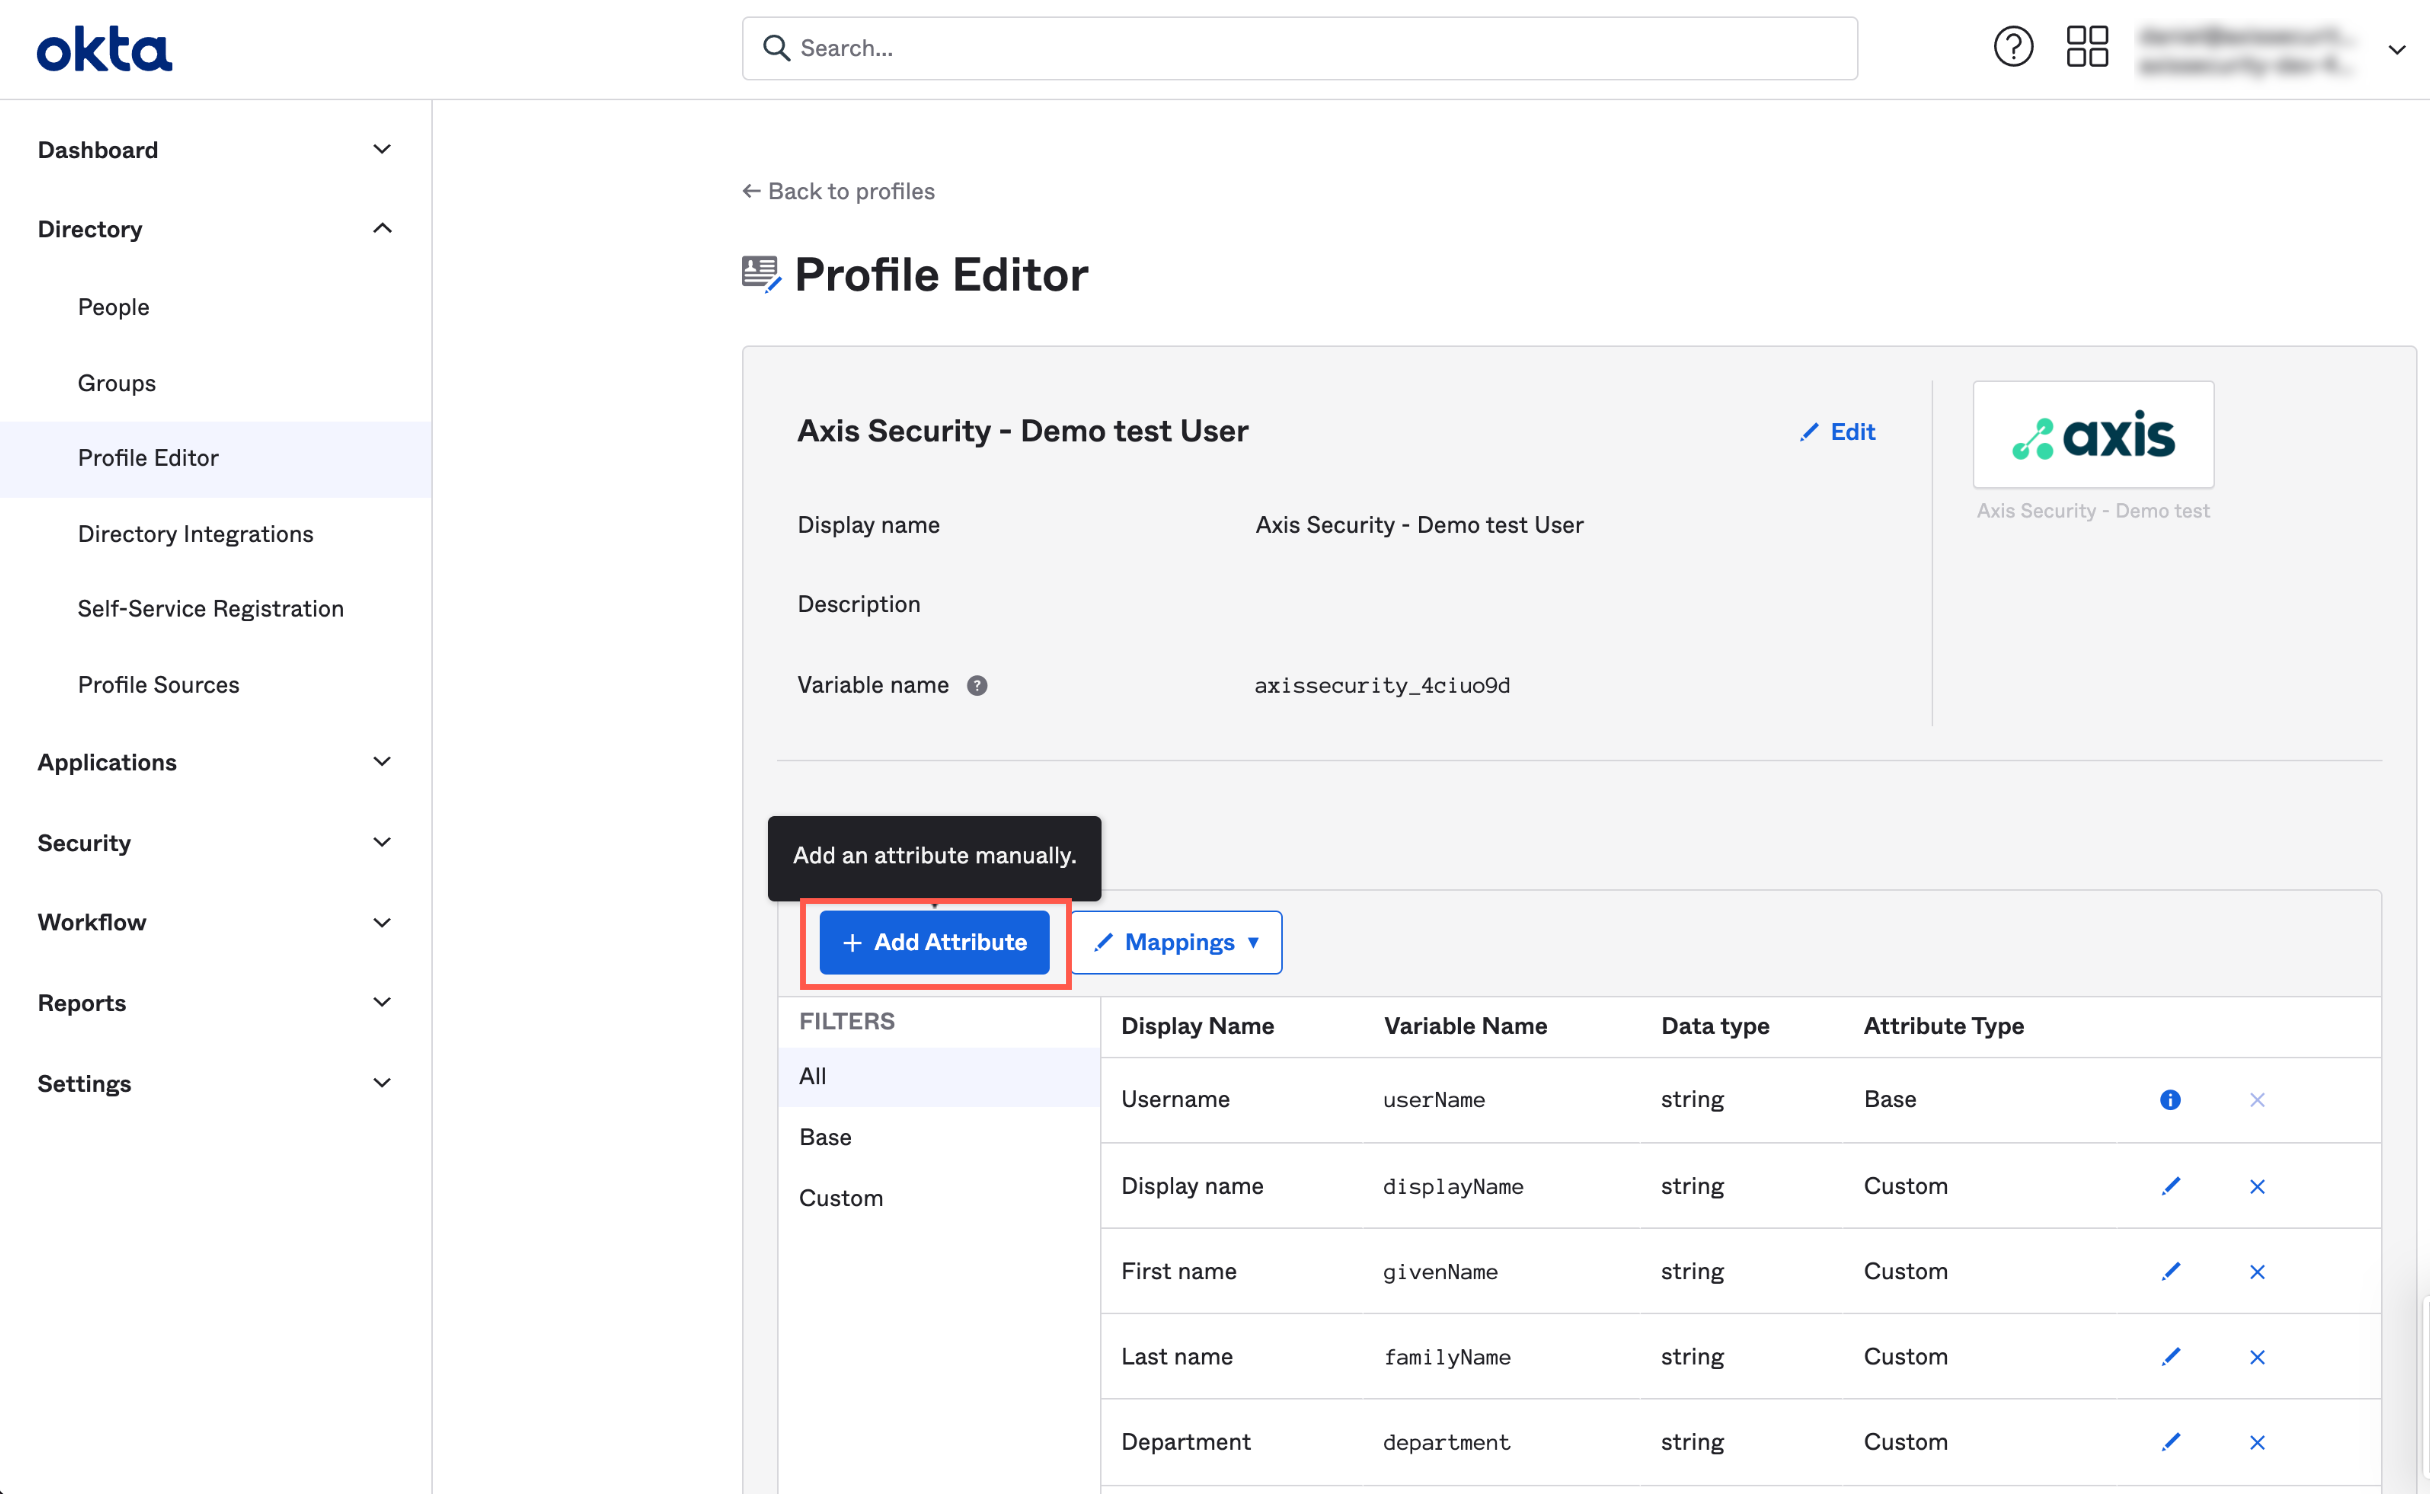
- In the Axis application screen in the Profile Editor, select Add Attribute to create a new attribute.
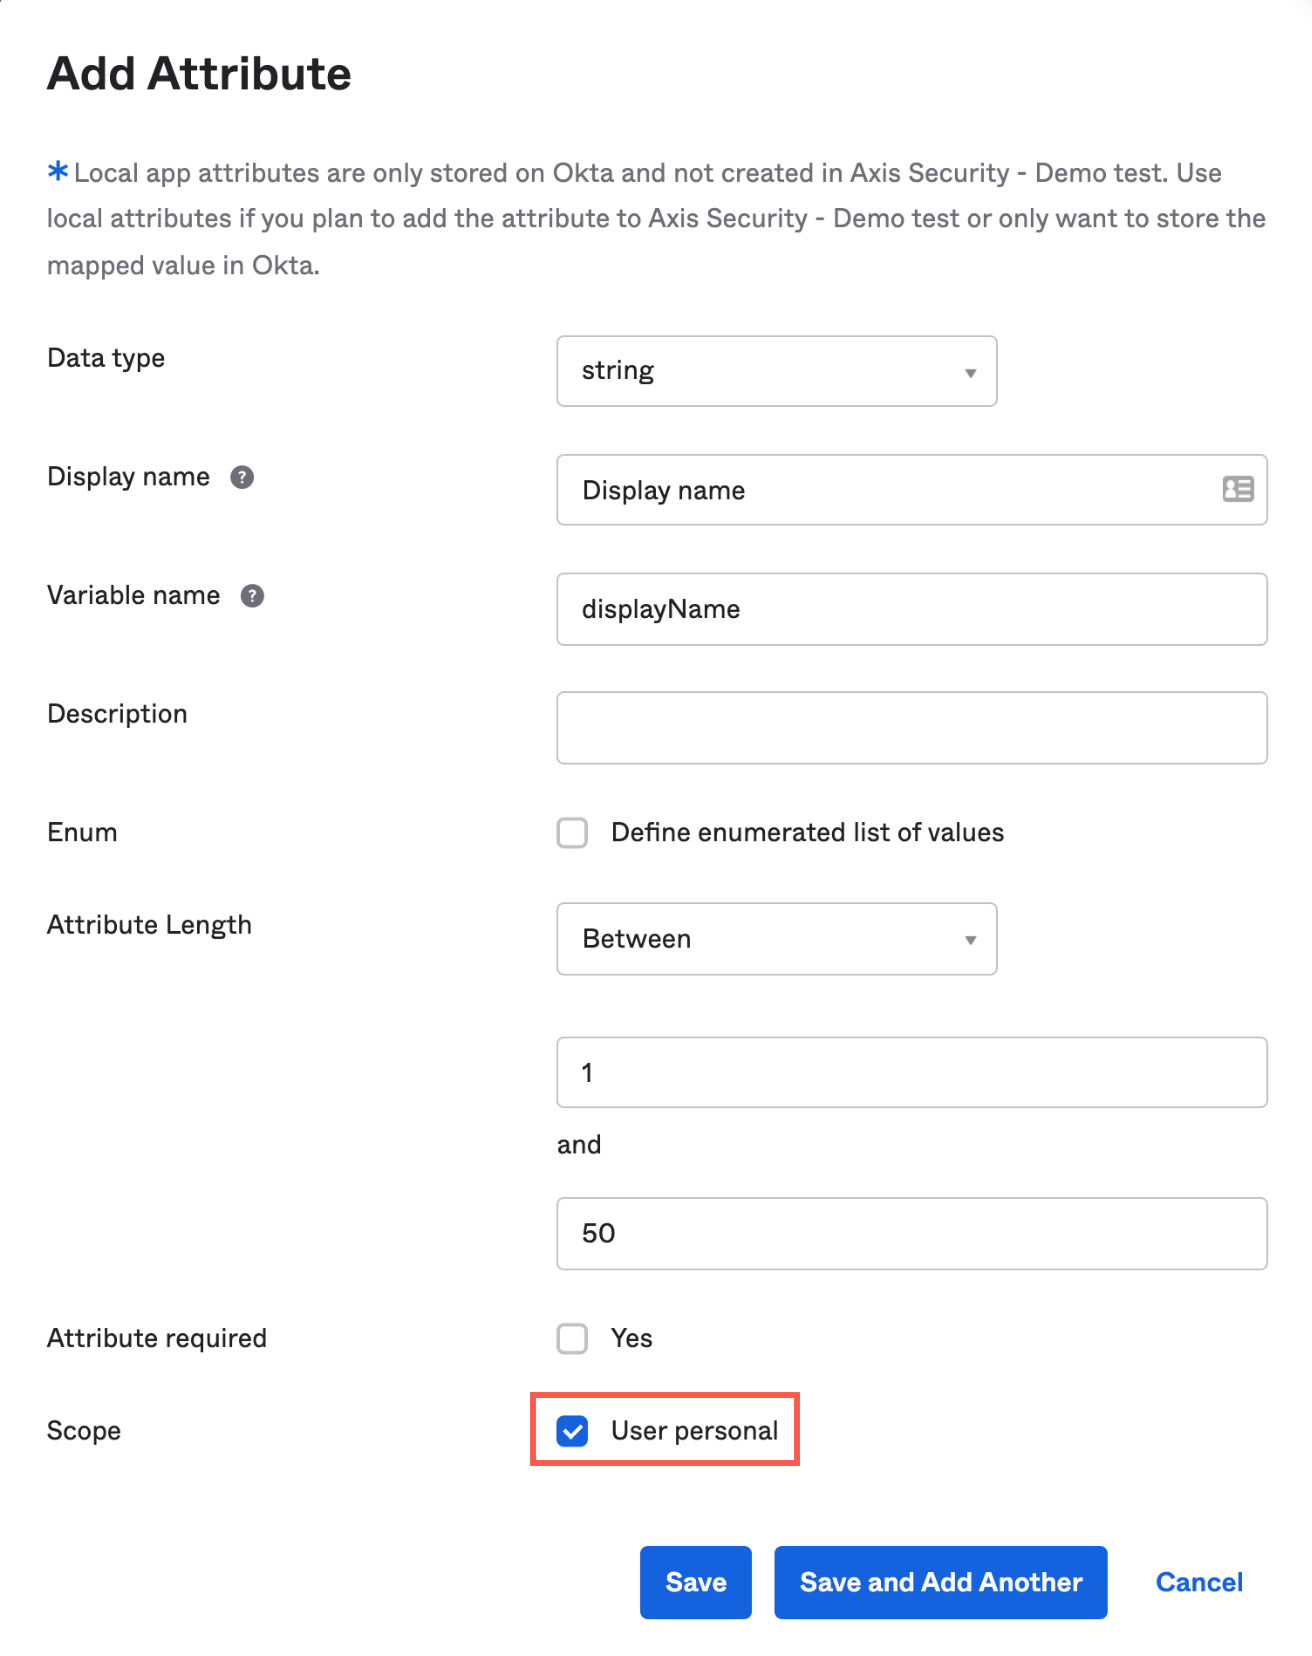
- Create the following attributes, and for each attribute select User personal:
| Display Name | Variable Name | Attribute Length | Required | Scope |
|---|---|---|---|---|
| Display name | displayName | Between 1 and 50 | Yes | User personal |
| First name | givenName | Between 1 and 50 | No | User personal |
| Last name | familyName | Between 1 and 50 | No | User personal |
| Department | department | Between 1 and 50 | No | User personal |
| Division | division | Between 1 and 50 | No | User personal |
| Between 1 and 50 | No | User personal |
- Click Save.
- Go to Directory-> Profile Editor-> -> Mappings-> Configure User mappings.
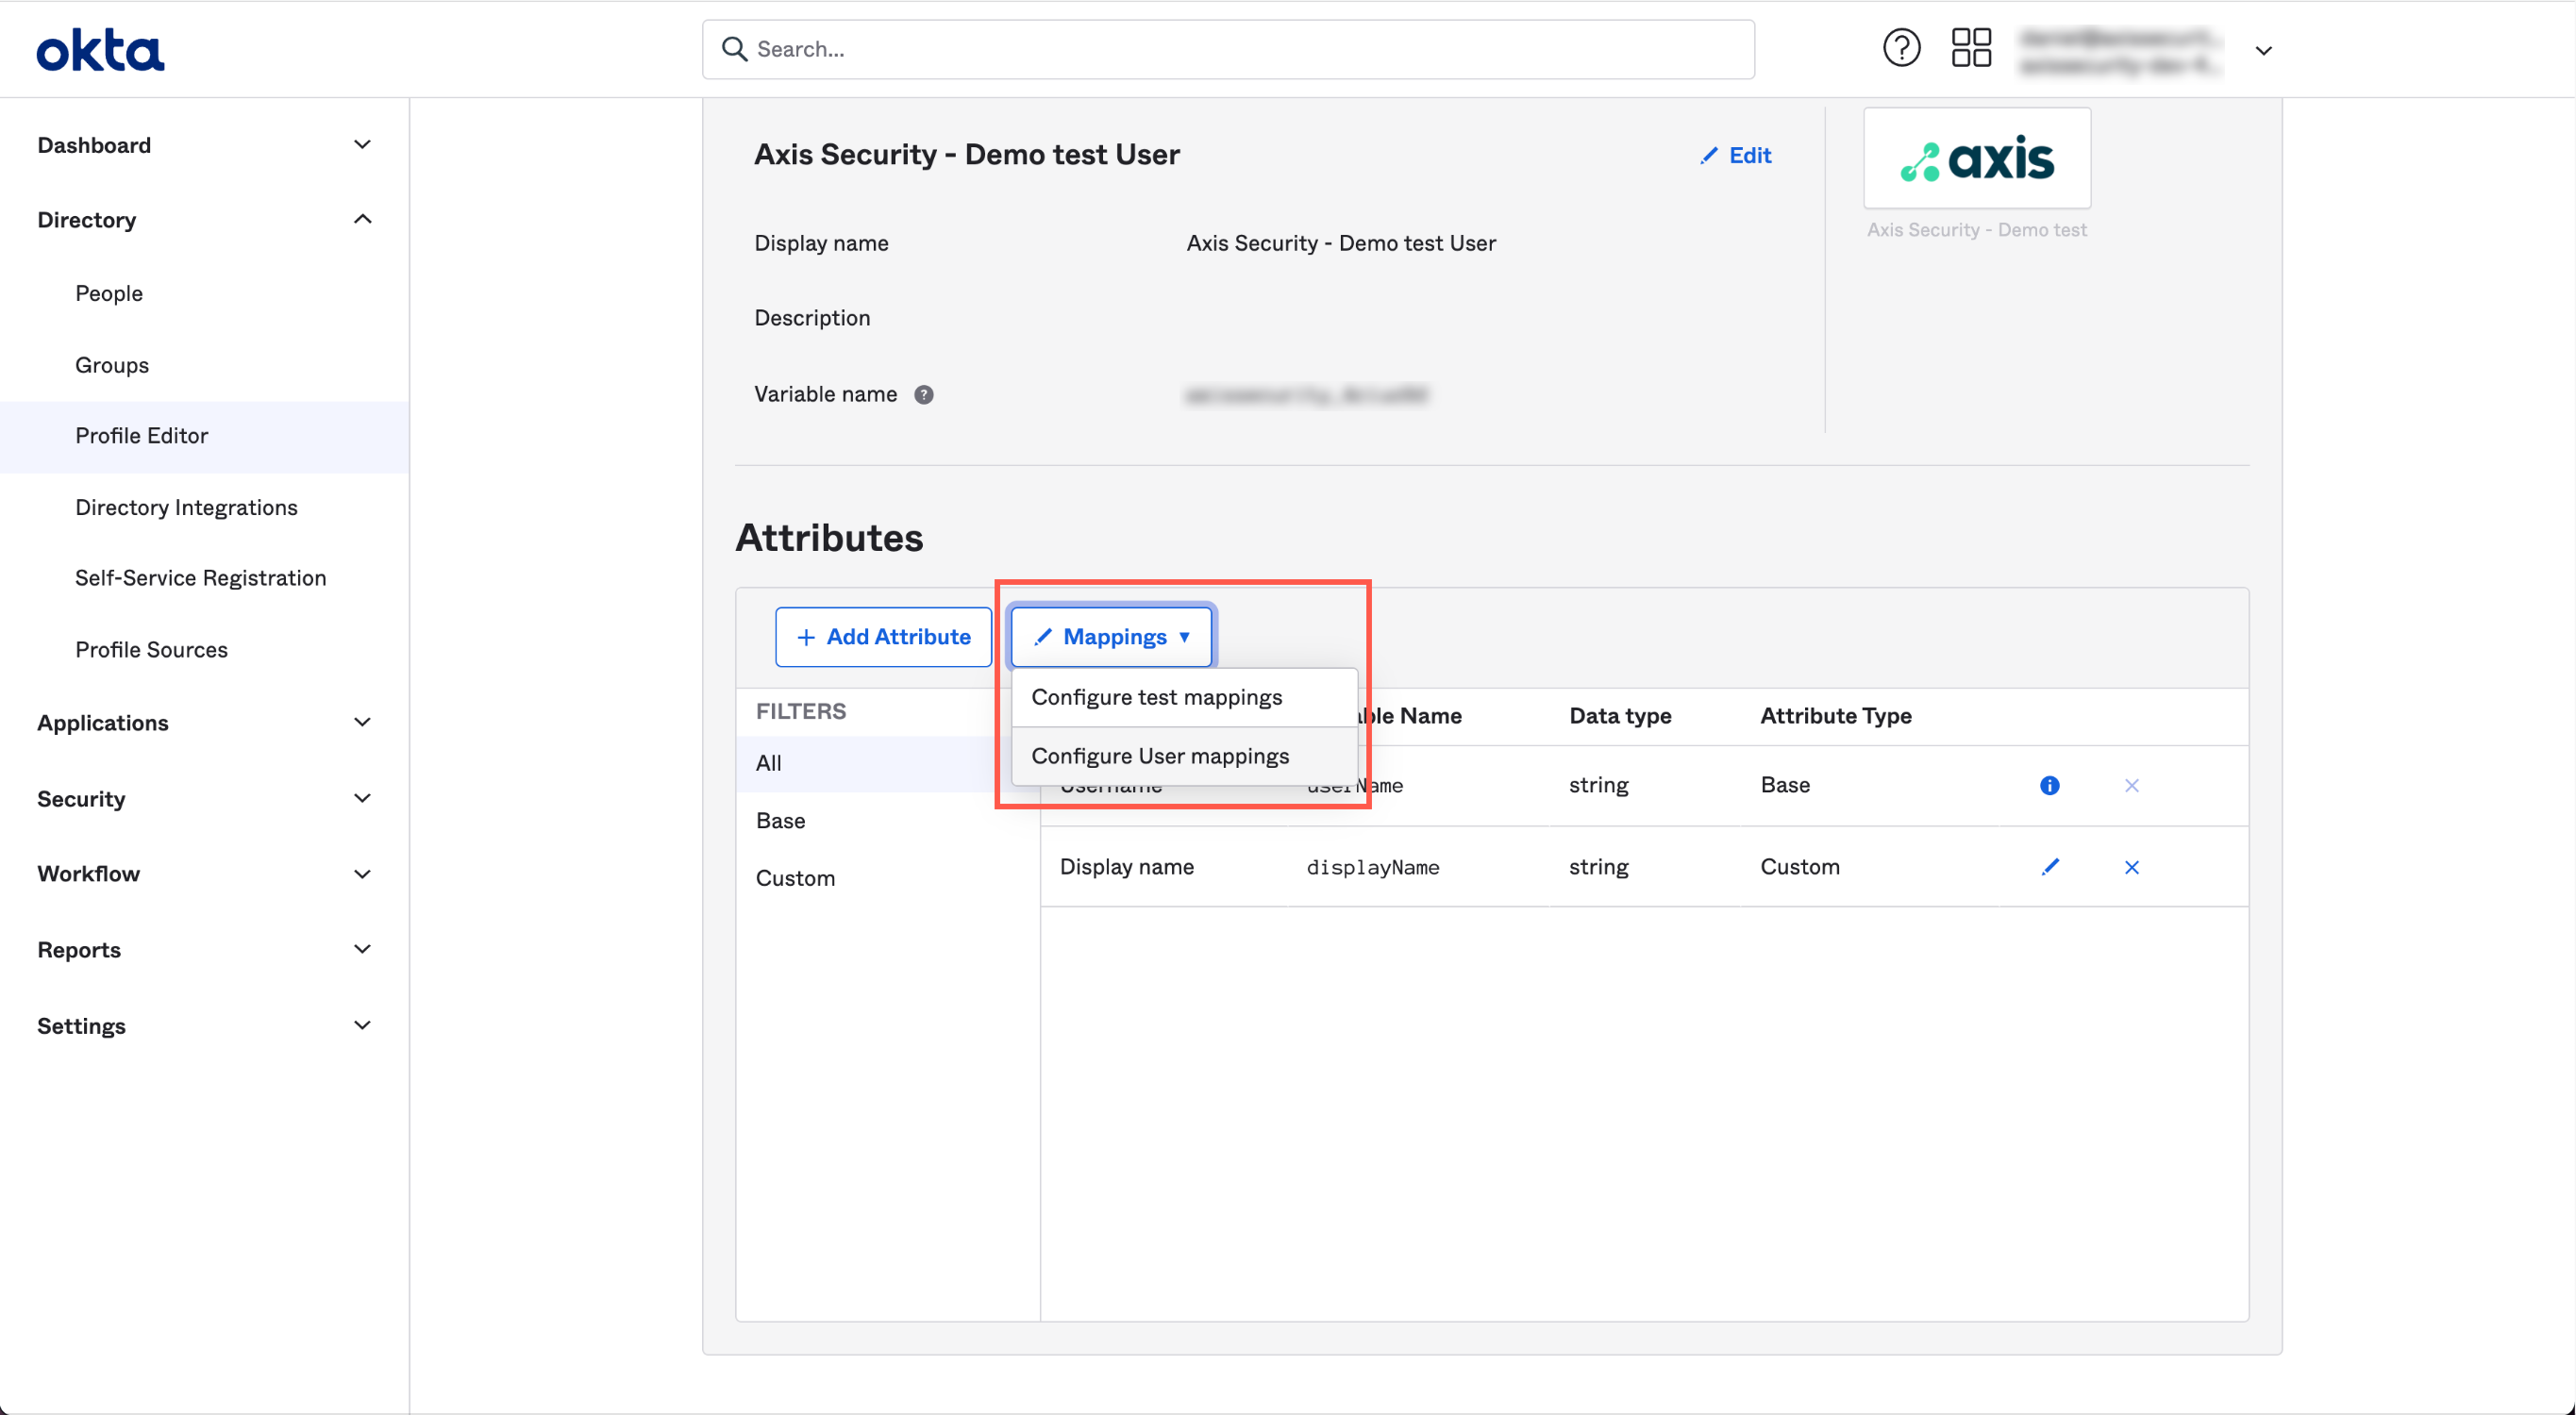
- In the User Profile Mapping screen, click to Okta User.
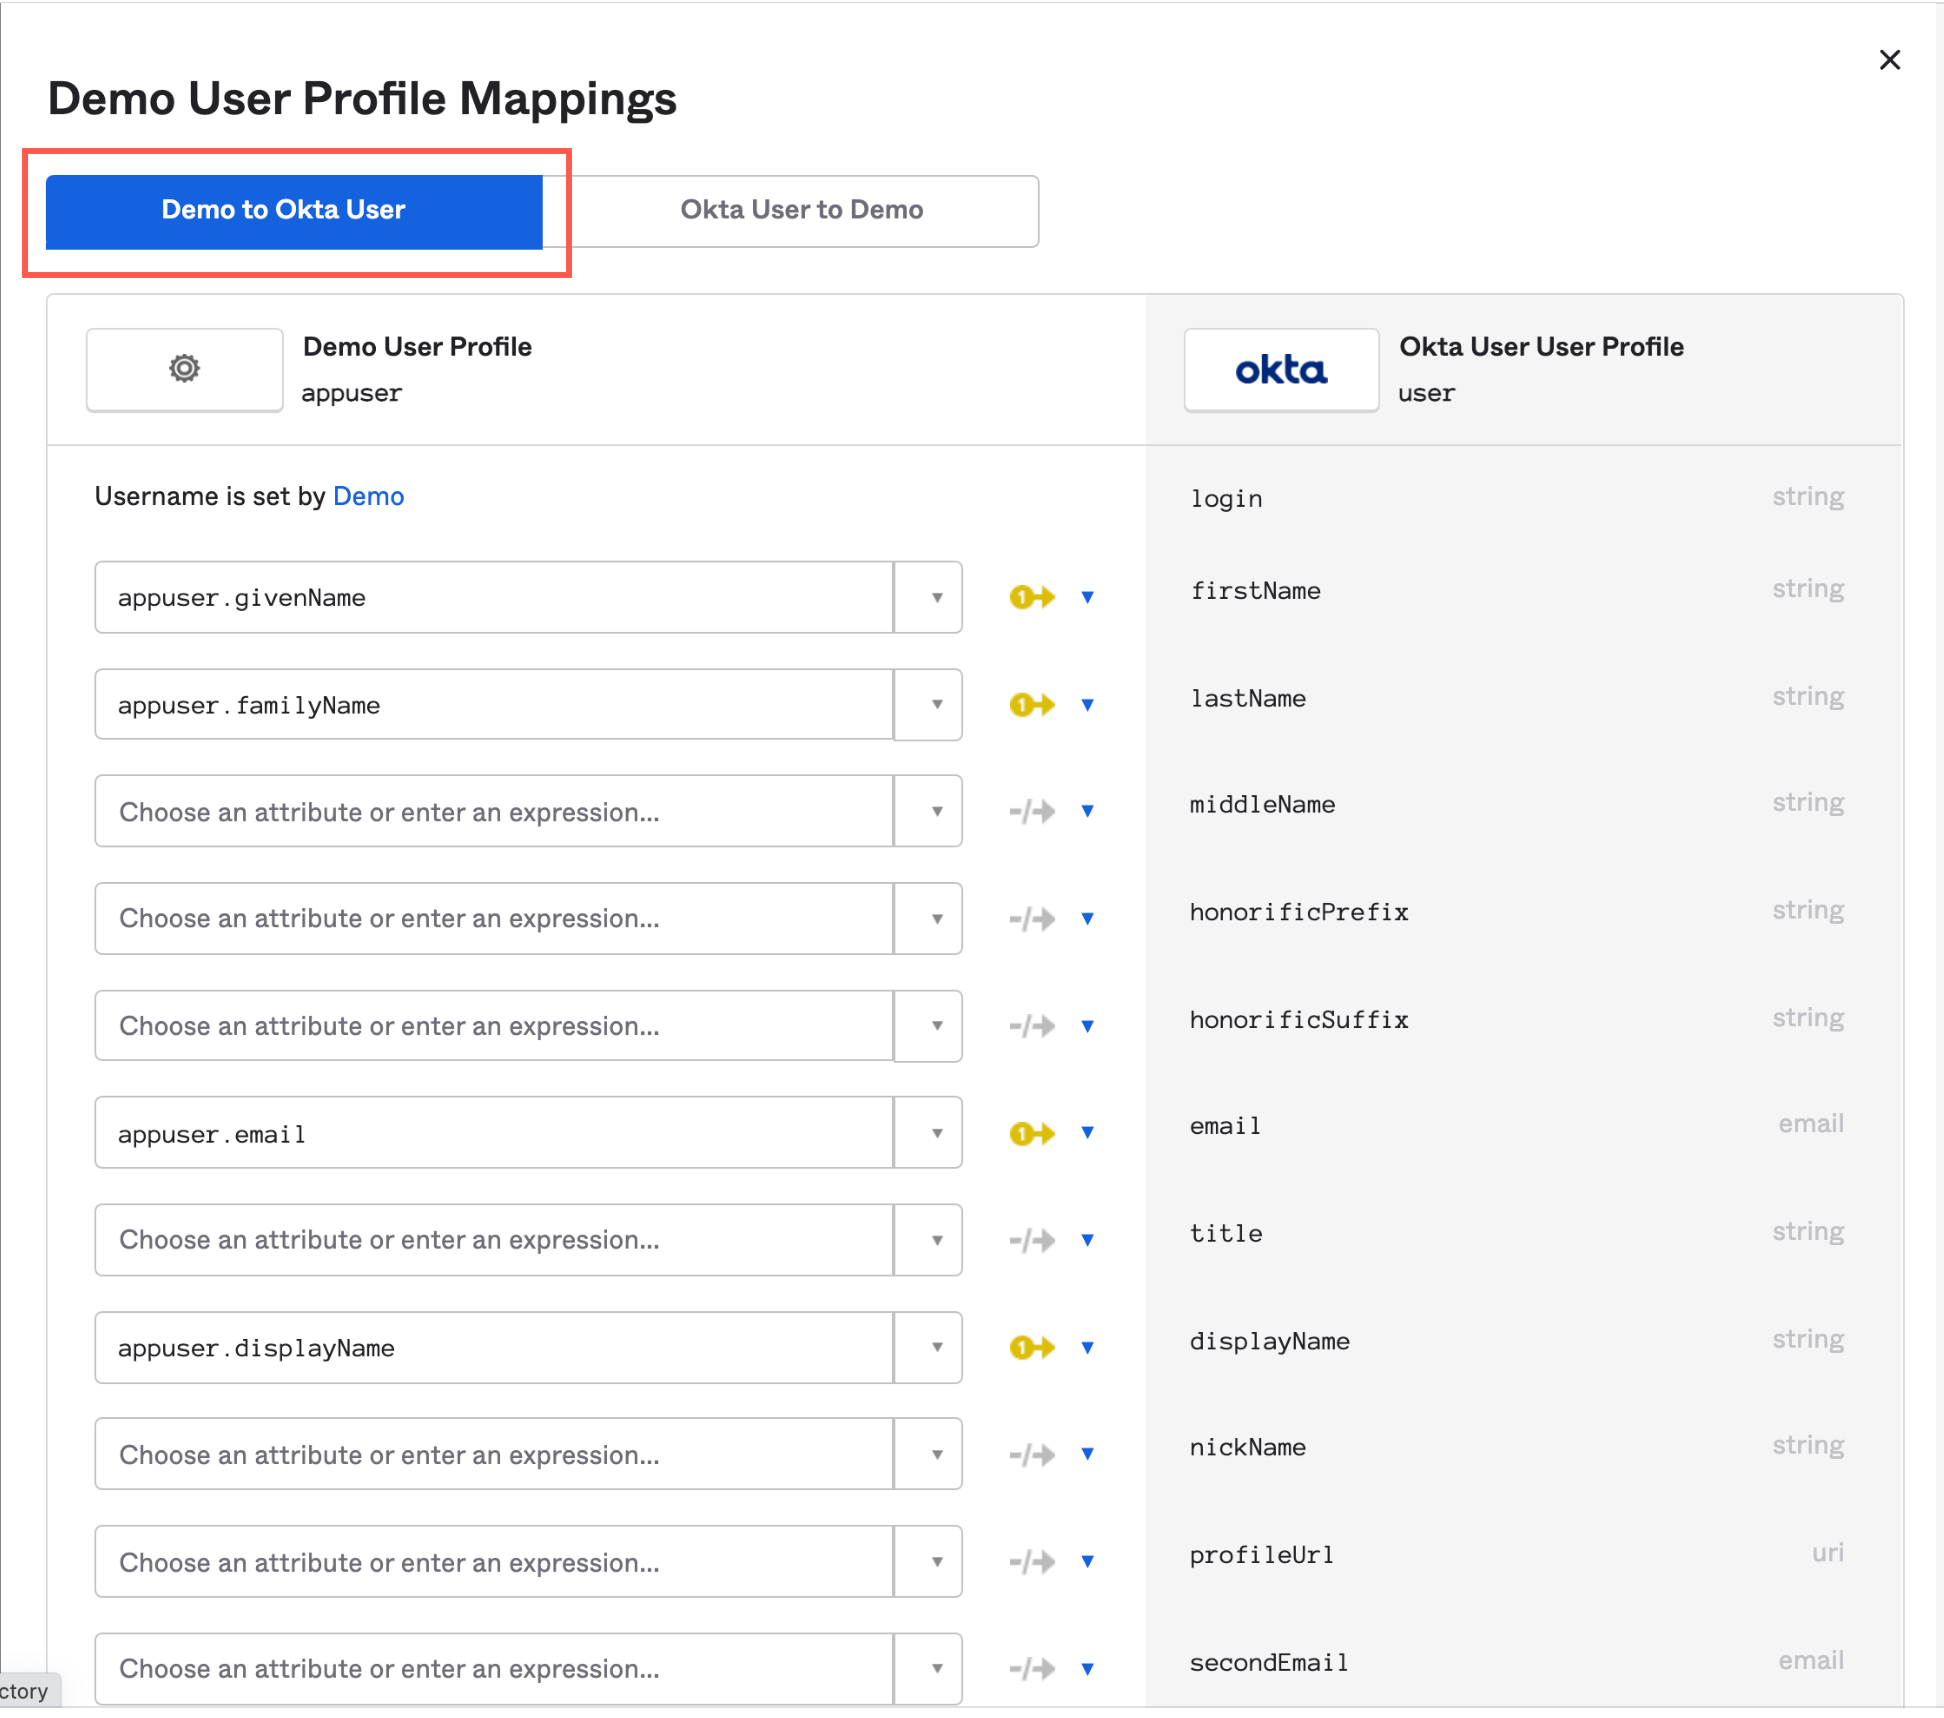
- Map the following user profile attributes (from Axis to Okta) using these expressions:
| Attribute | Expression |
|---|---|
| firstName | appuser.givenName |
| lastName | appuser.familyName |
| appuser.email | |
| displayName | appuser.displayName |
| division | appuser.division |
| department | appuser.department |
- Click Save Mappings.
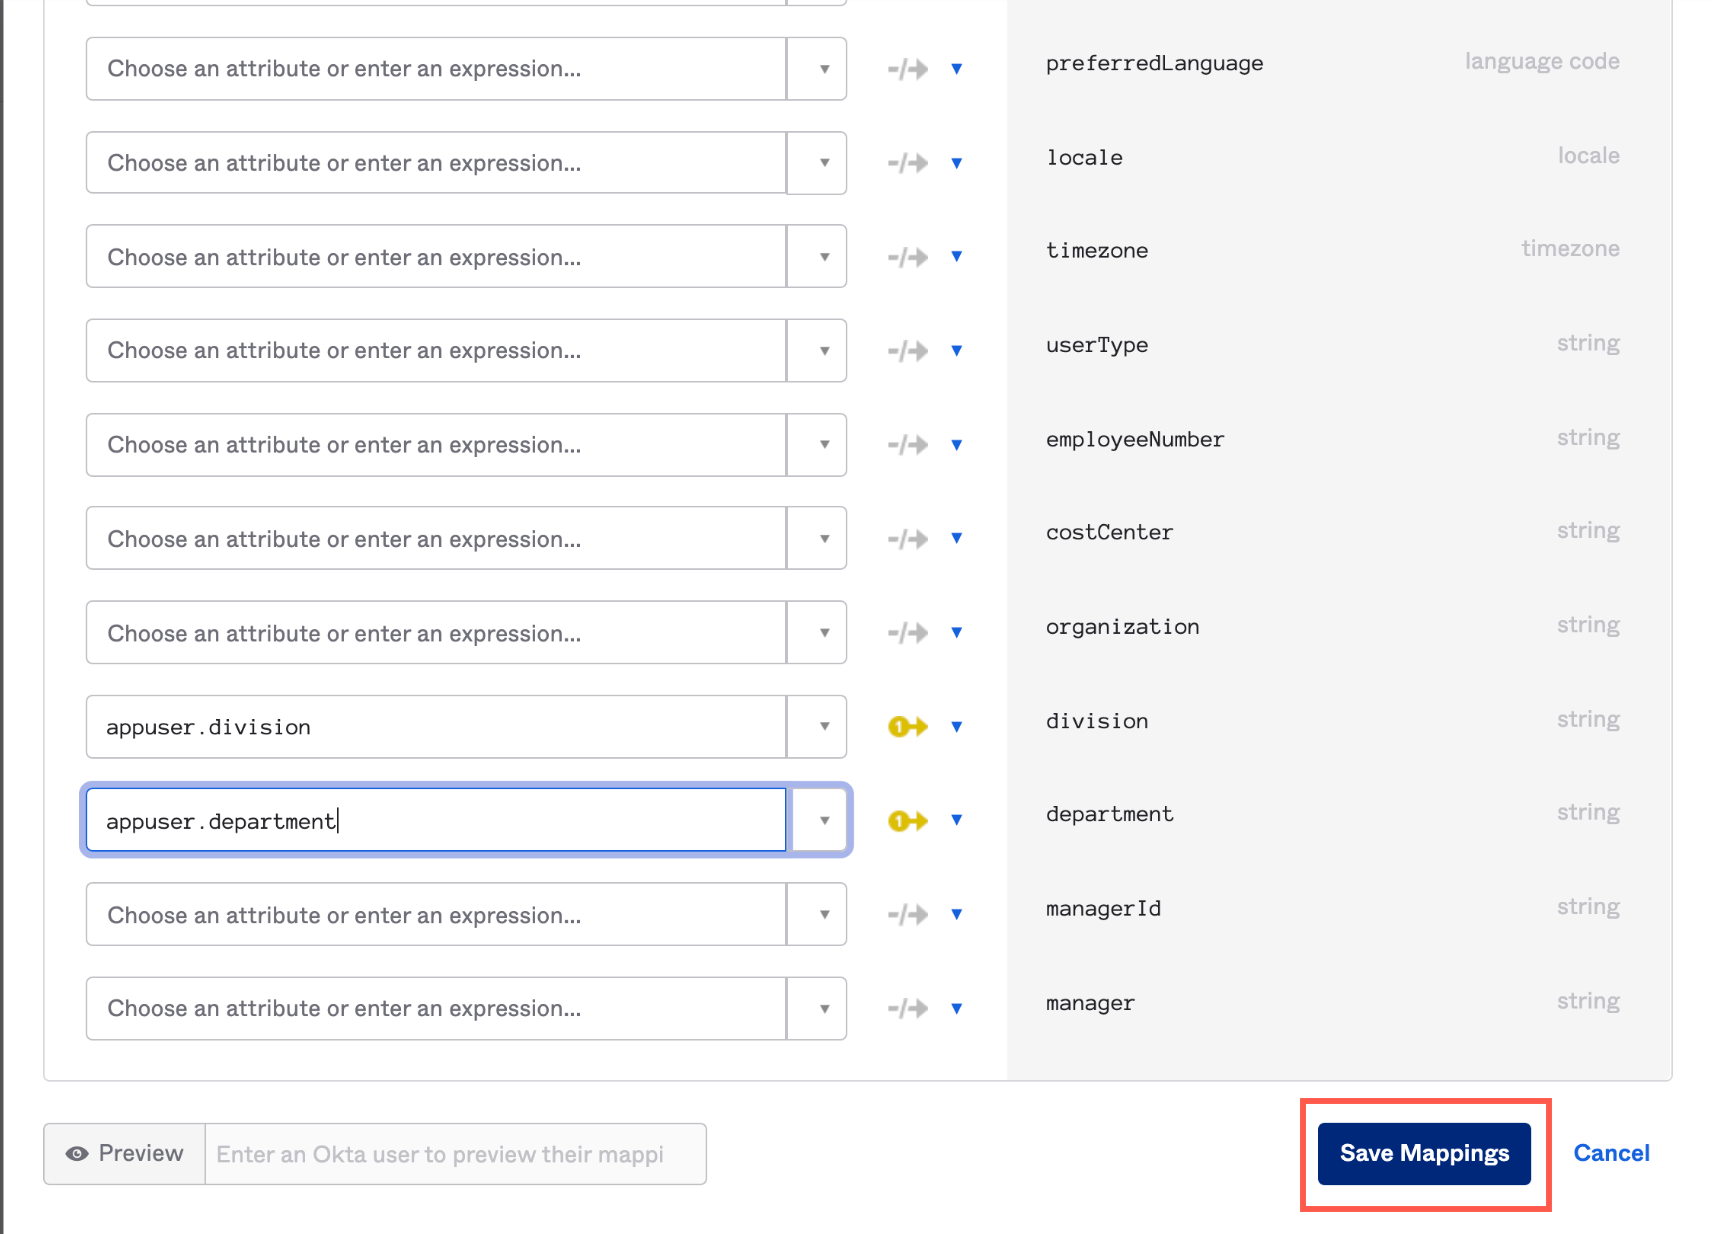
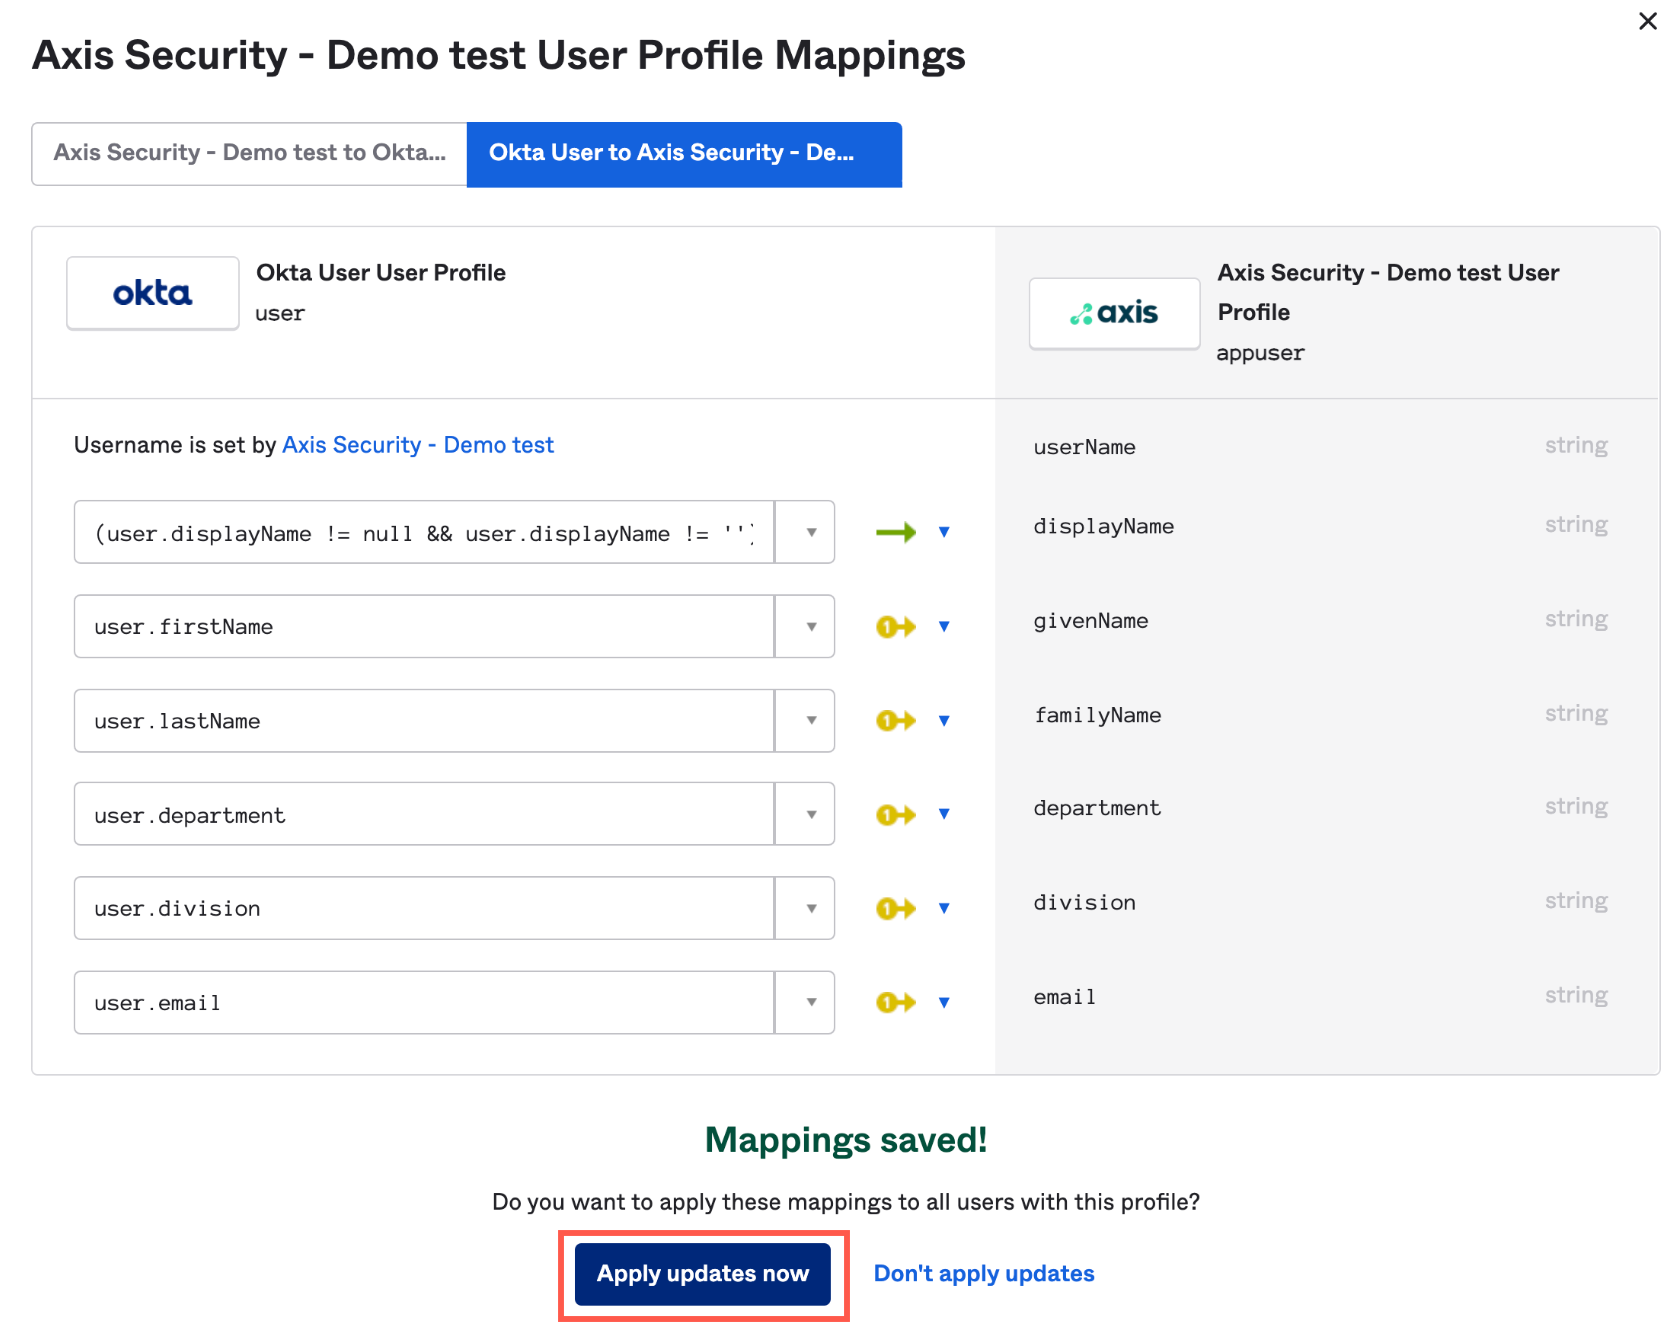
- In the User Profile Mapping screen, click Okta User to .
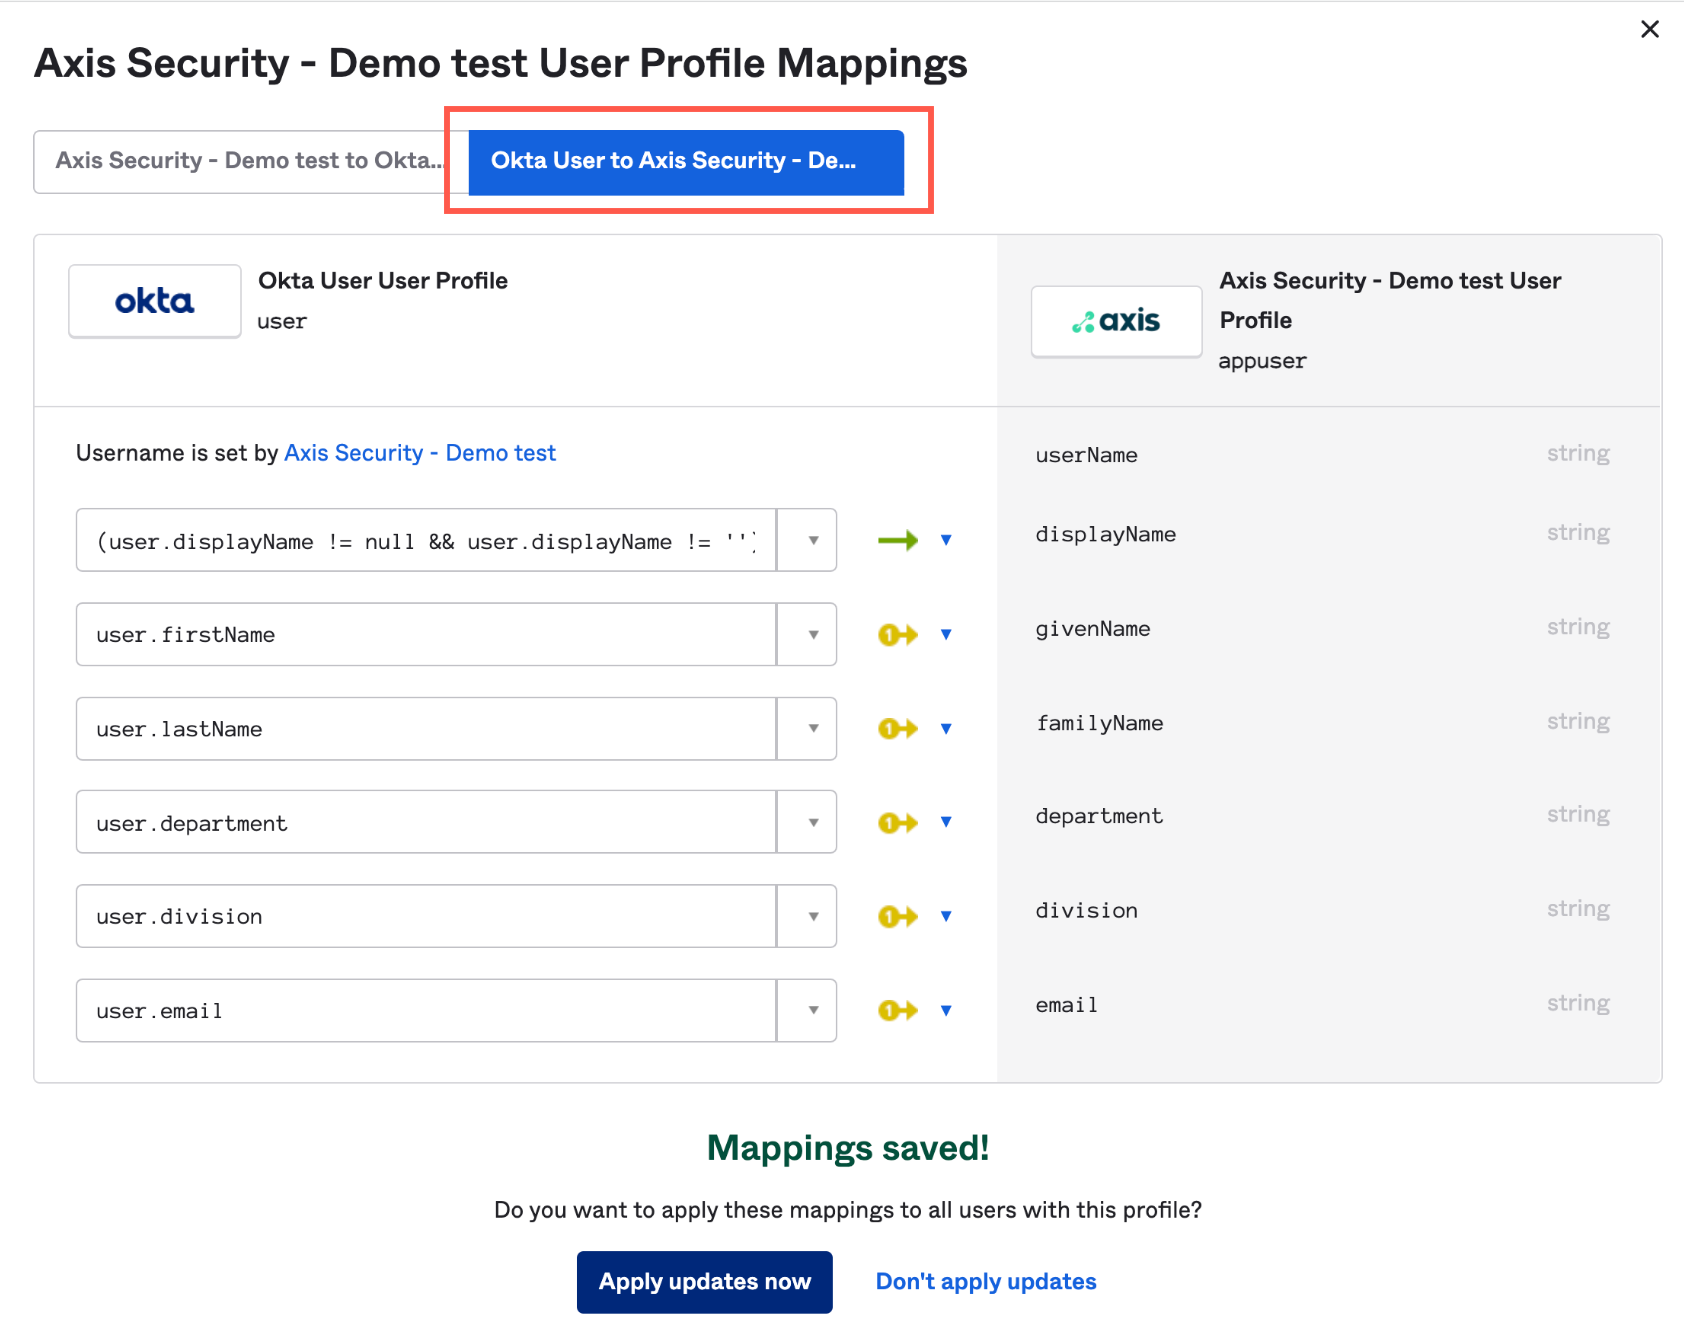
- Click the User Mapping drop-down menu next to the attribute and select Apply mapping on user create and update.
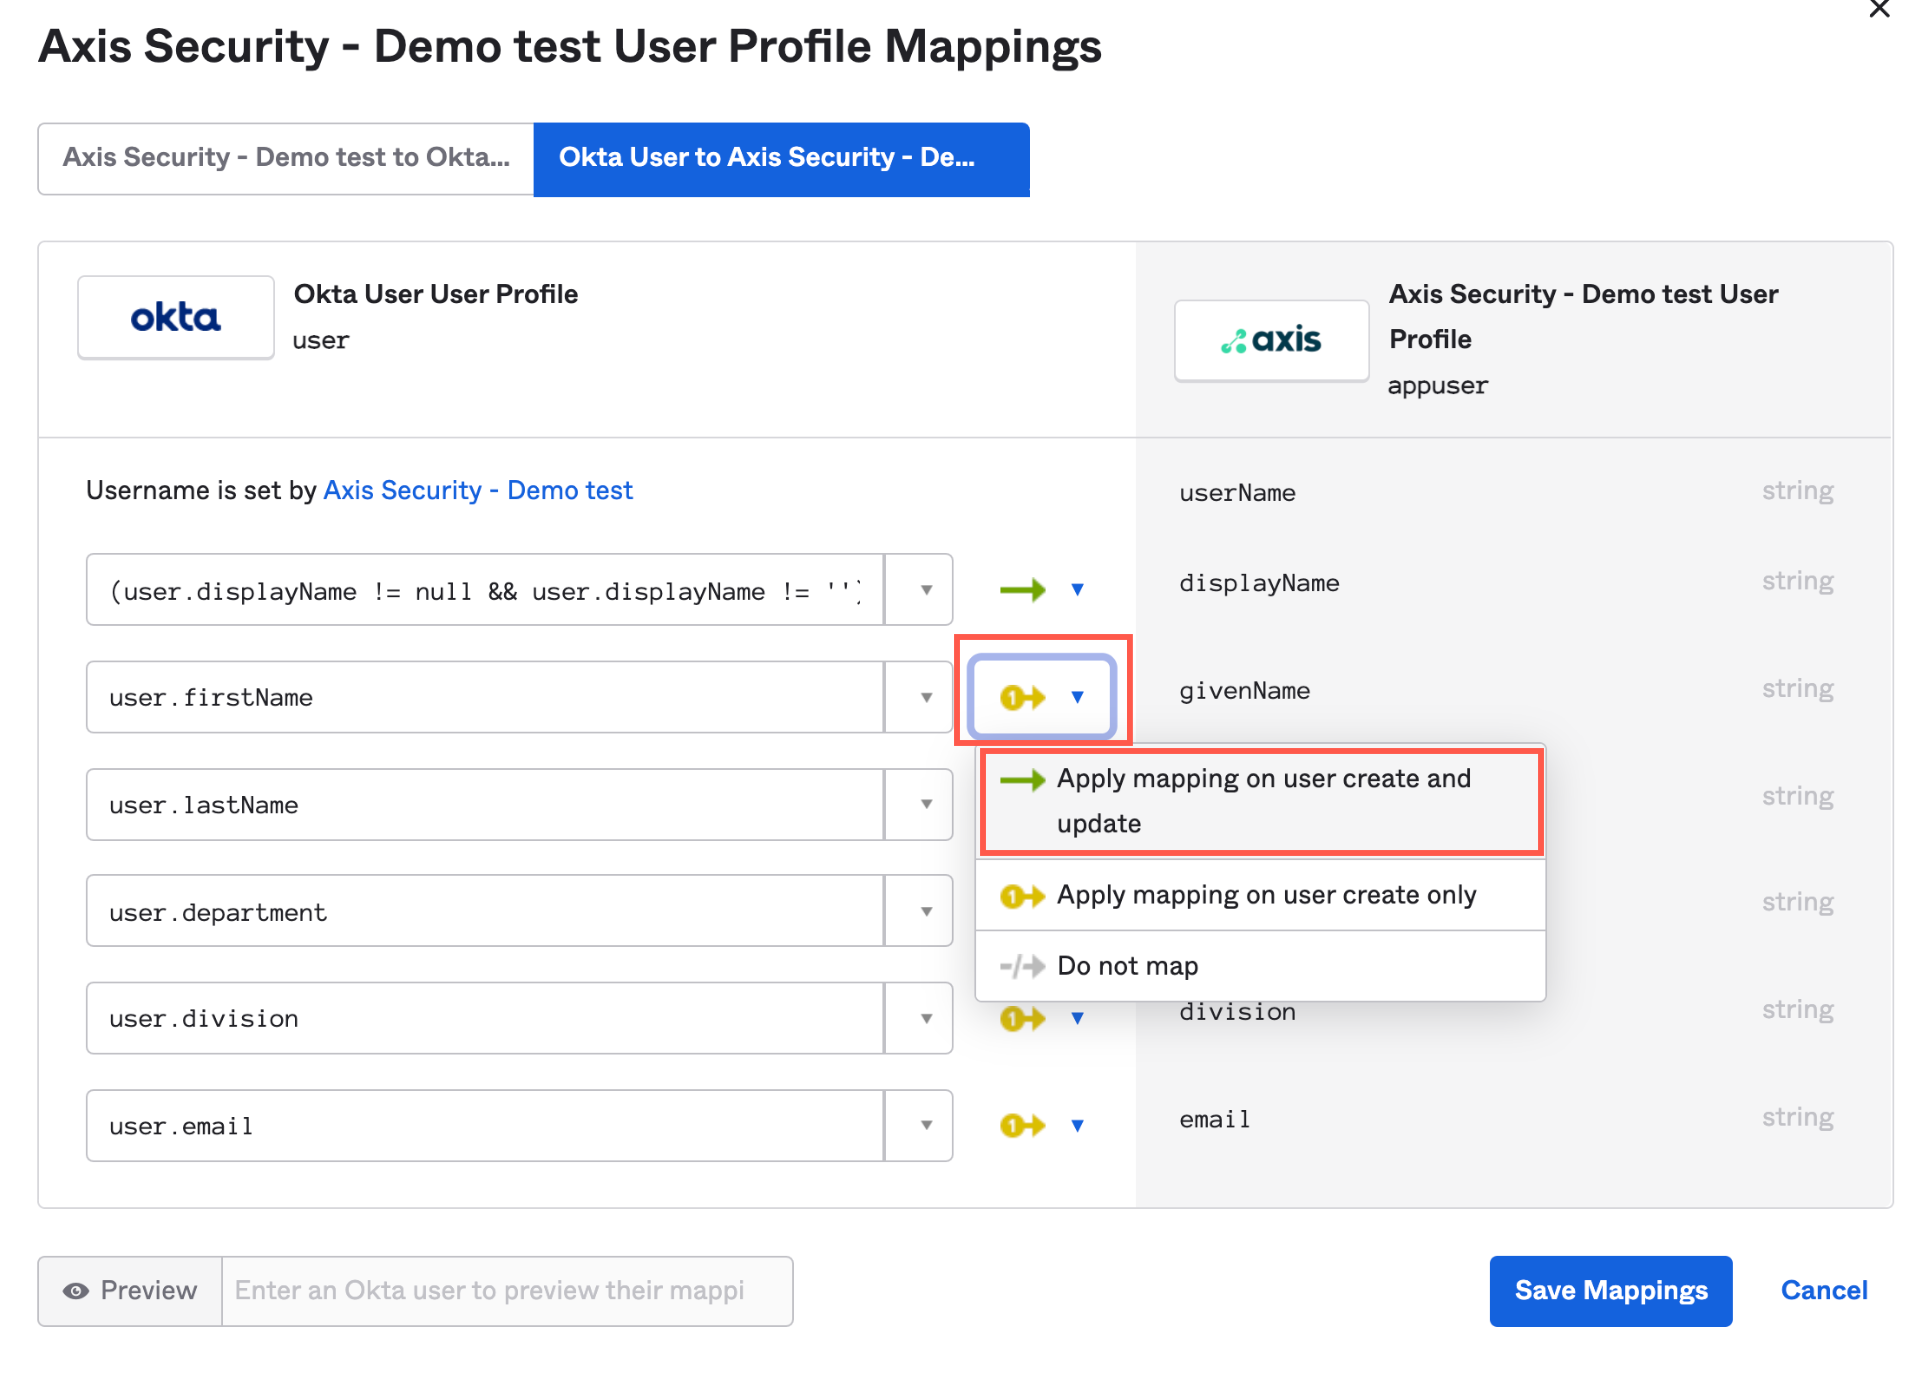
- Map the following attributes (from Okta to Axis) using these expressions:
| Attribute | Expression |
|---|---|
| displayName | (user.displayName != null && user.displayName != '') ? user.displayName : String.append(user.firstName, " " + user.lastName) |
| givenName | user.firstName |
| familyName | user.lastName |
| department | user.department |
| division | user.division |
| user.email |
- Click Save Mappings.
- Click Apply update now.
- Next step: Create a Read Only Administrator in Okta.
Step 2: Creating a Read Only Administrator in Okta
The API token receives the same permissions as the administrator who created it. Therefore, we recommend creating a read only administrator.
- In the Okta Admin Console, select Security-> Administrators.
- Click Add Administrator.
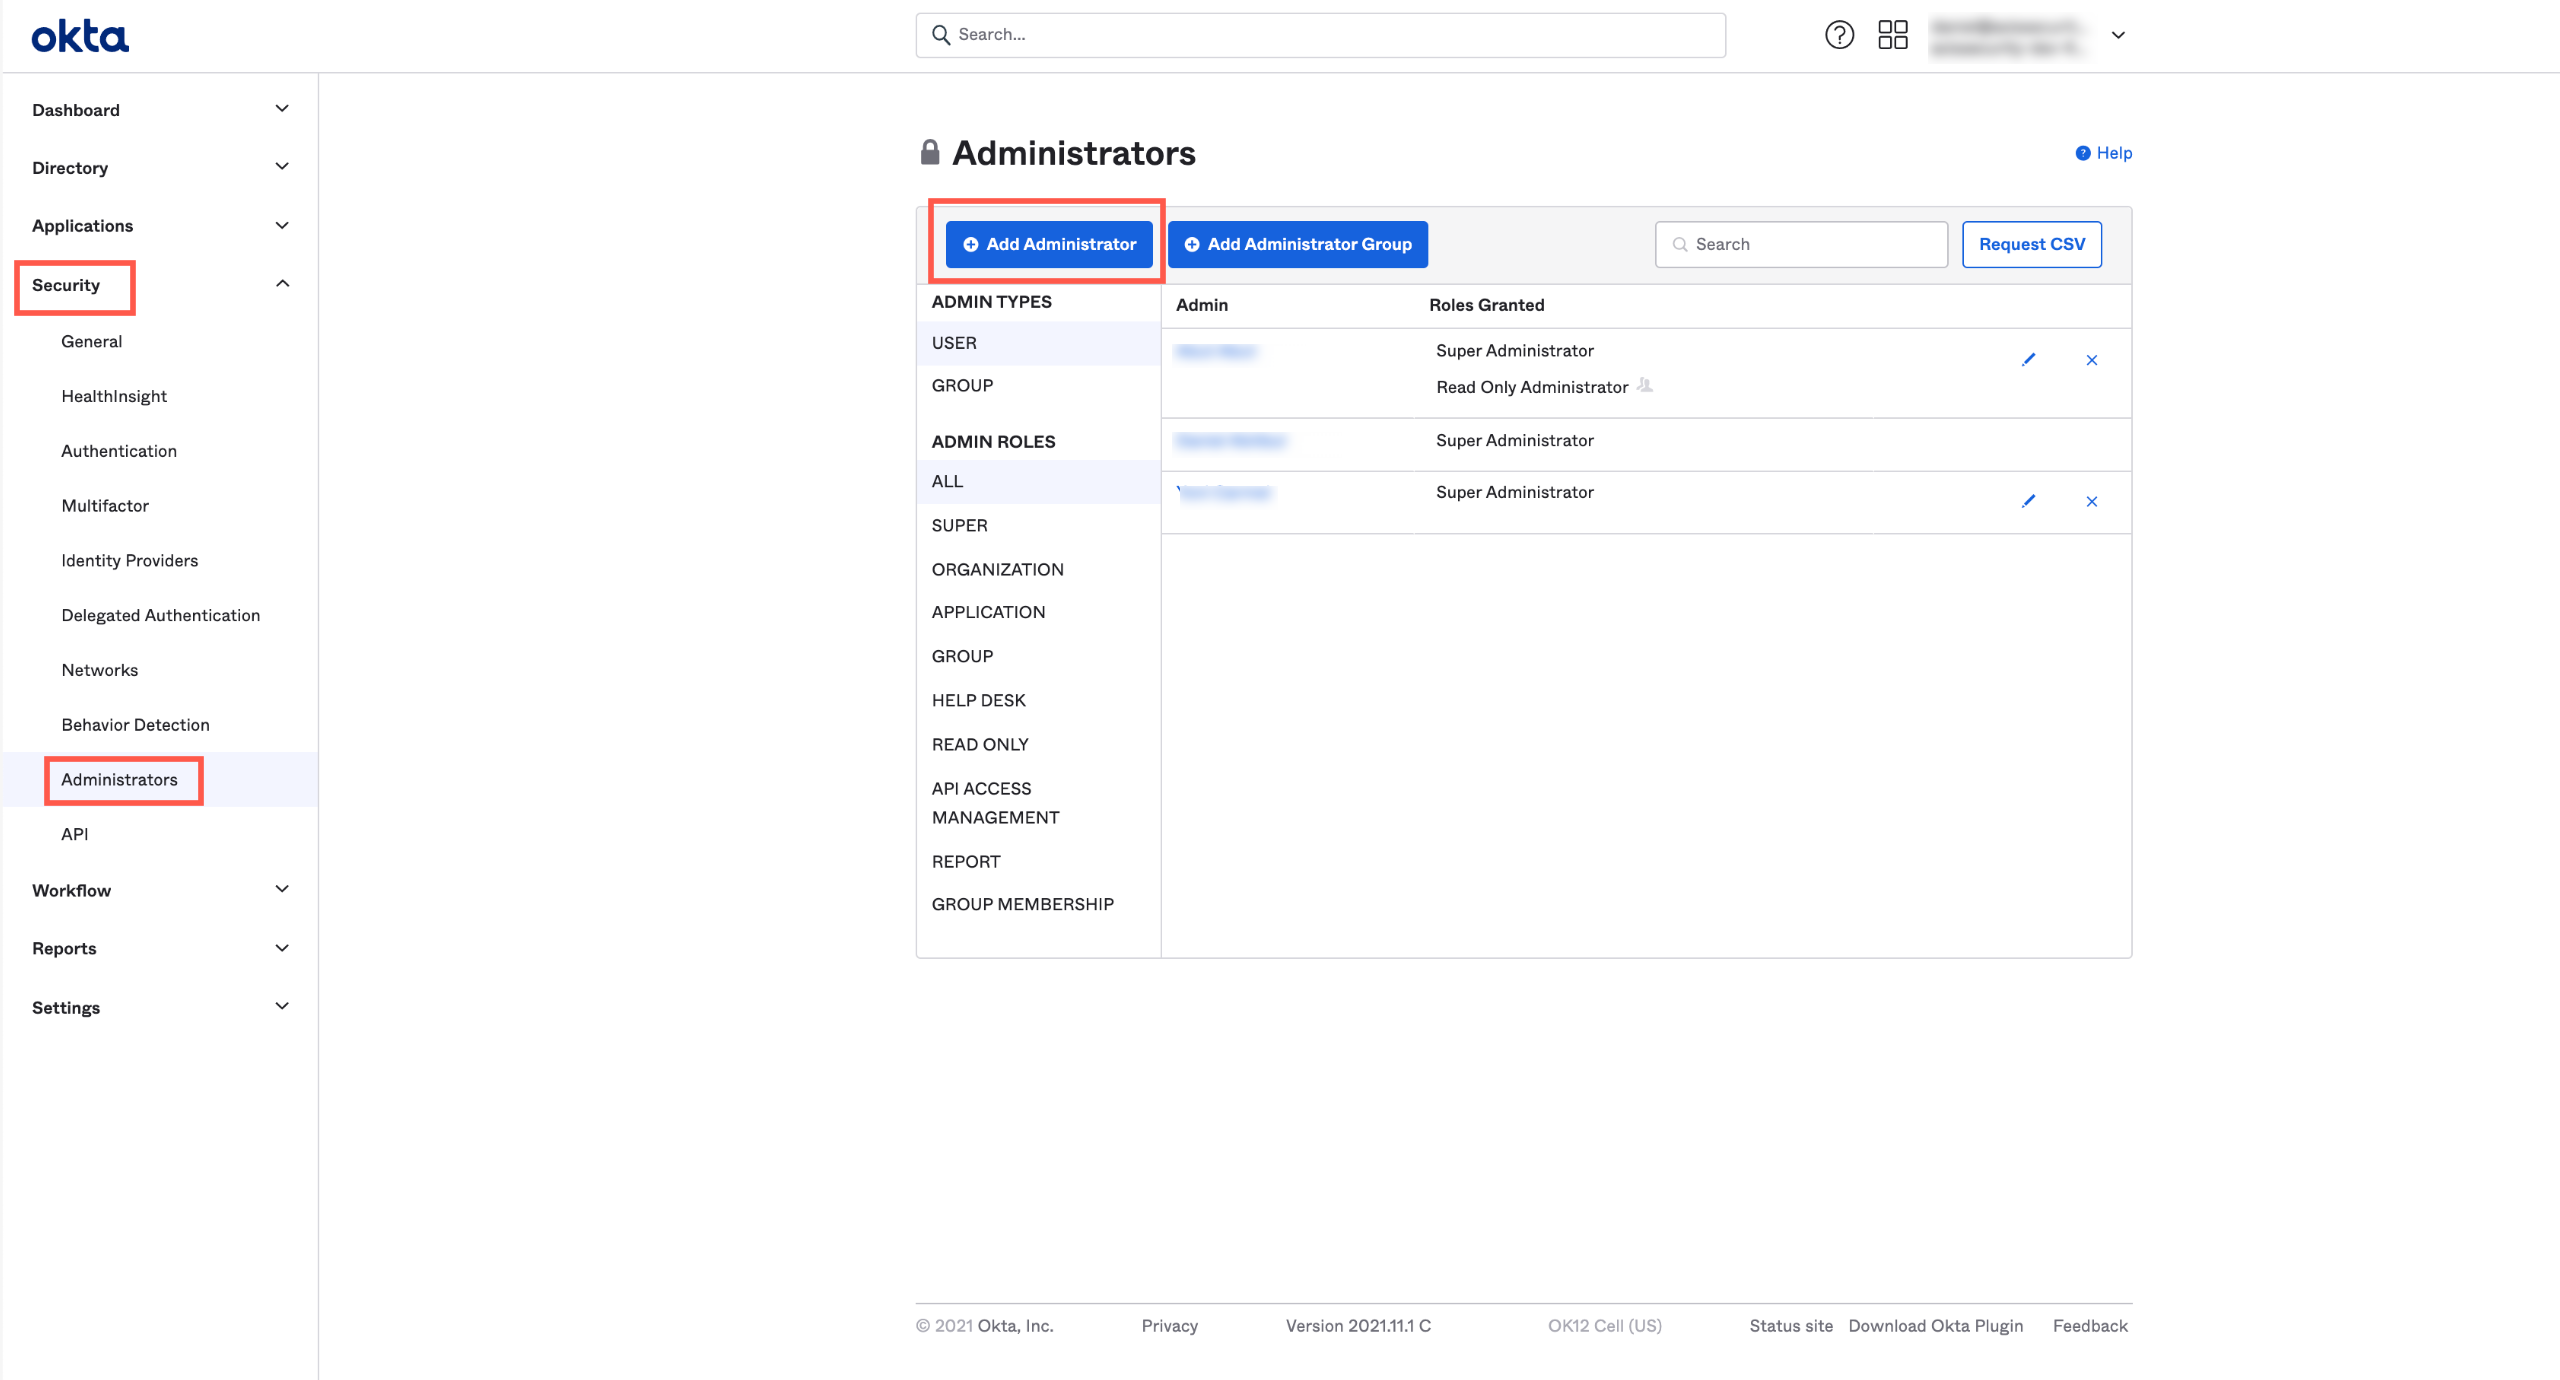
The Add Administrators dialog opens.
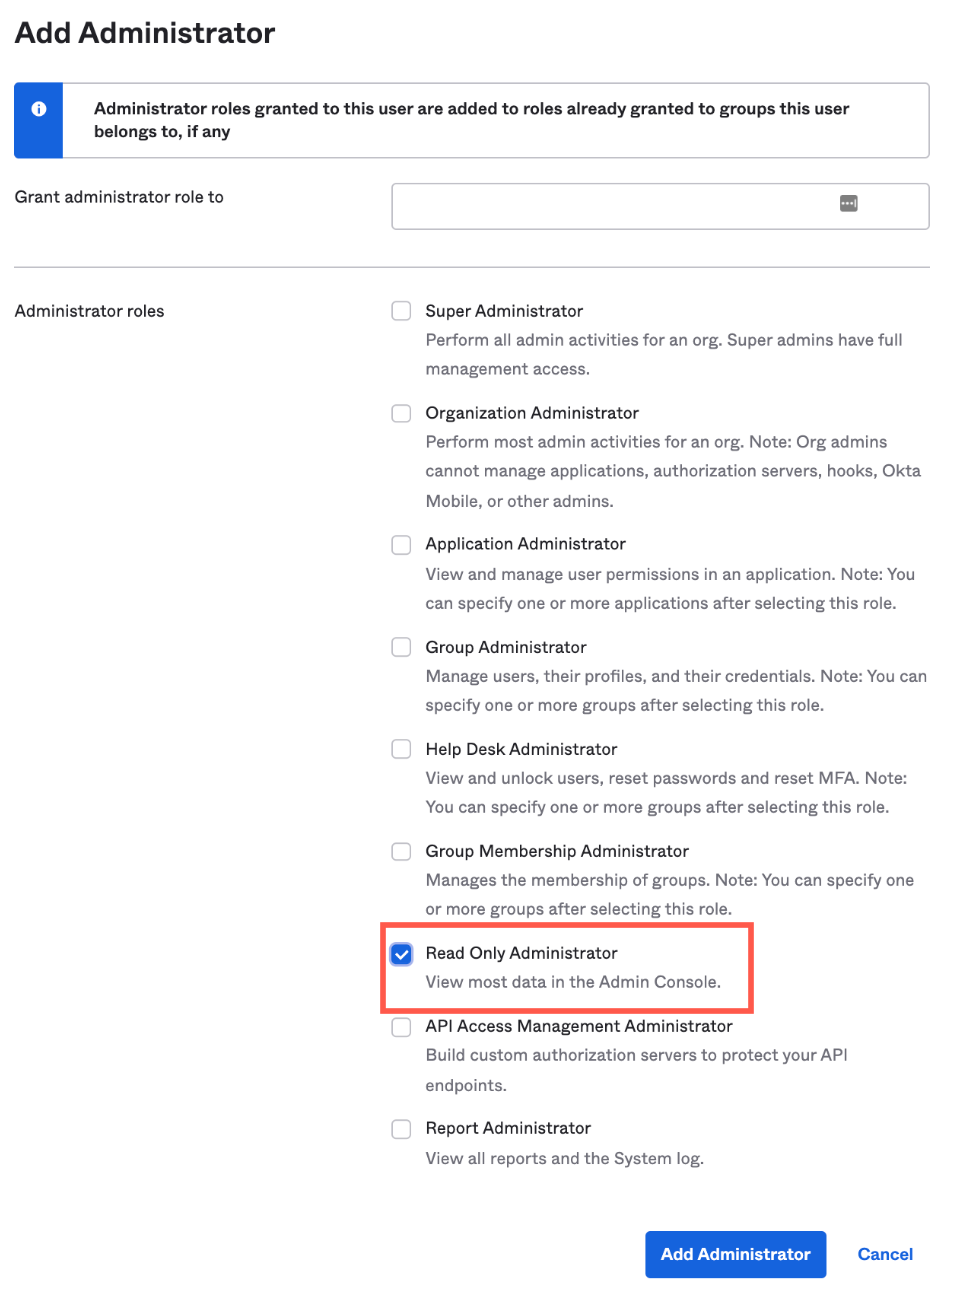
- Select Read Only Administrator.
- Click Add Administrator.
- Log out and log in to Okta as the Read Only Administrator.
- Next step: Get the application ID in Okta.
Step 3: Getting the Application ID in Okta
- Go to the Axis Security application in Okta.
- Copy the application ID from the URL.

- Paste the application ID in a text editor. You will use it to create the API integration in Axis Security in step 5: Integrating Okta API into Axis Security.
- Next step: Create a new token in Okta.
Step 4: Creating a New Token in Okta
- In the Okta Admin Console, navigate to Security -> API.
- Click Create Token.
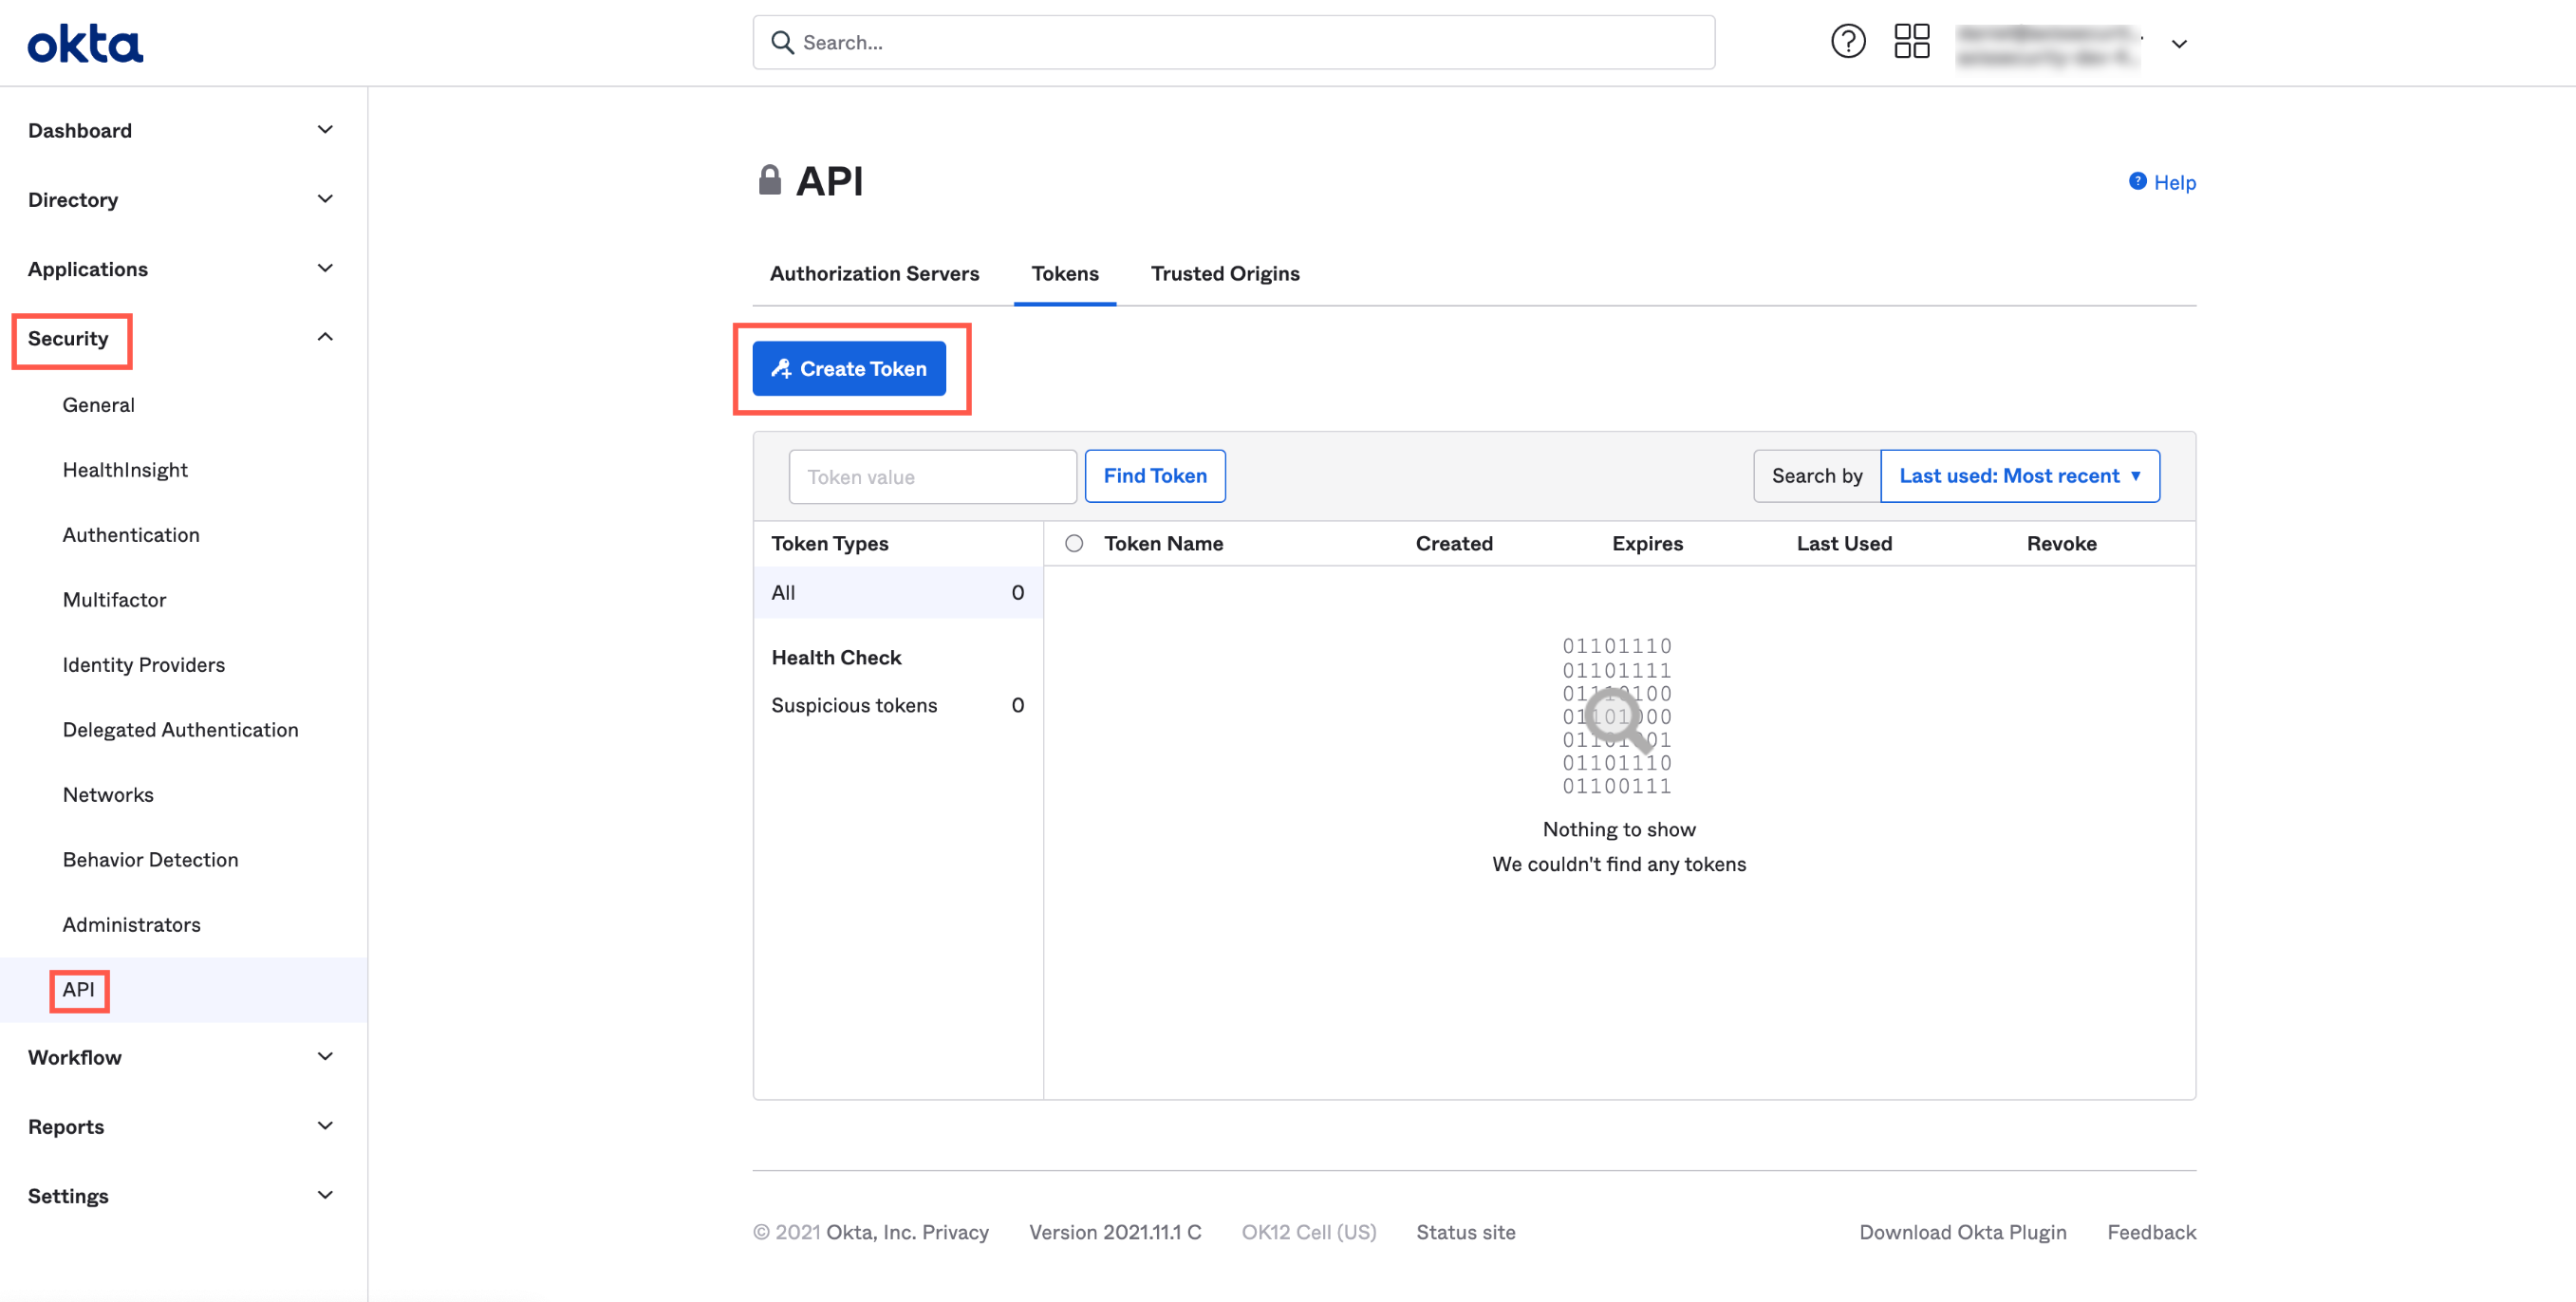
The Create Token dialog appears.
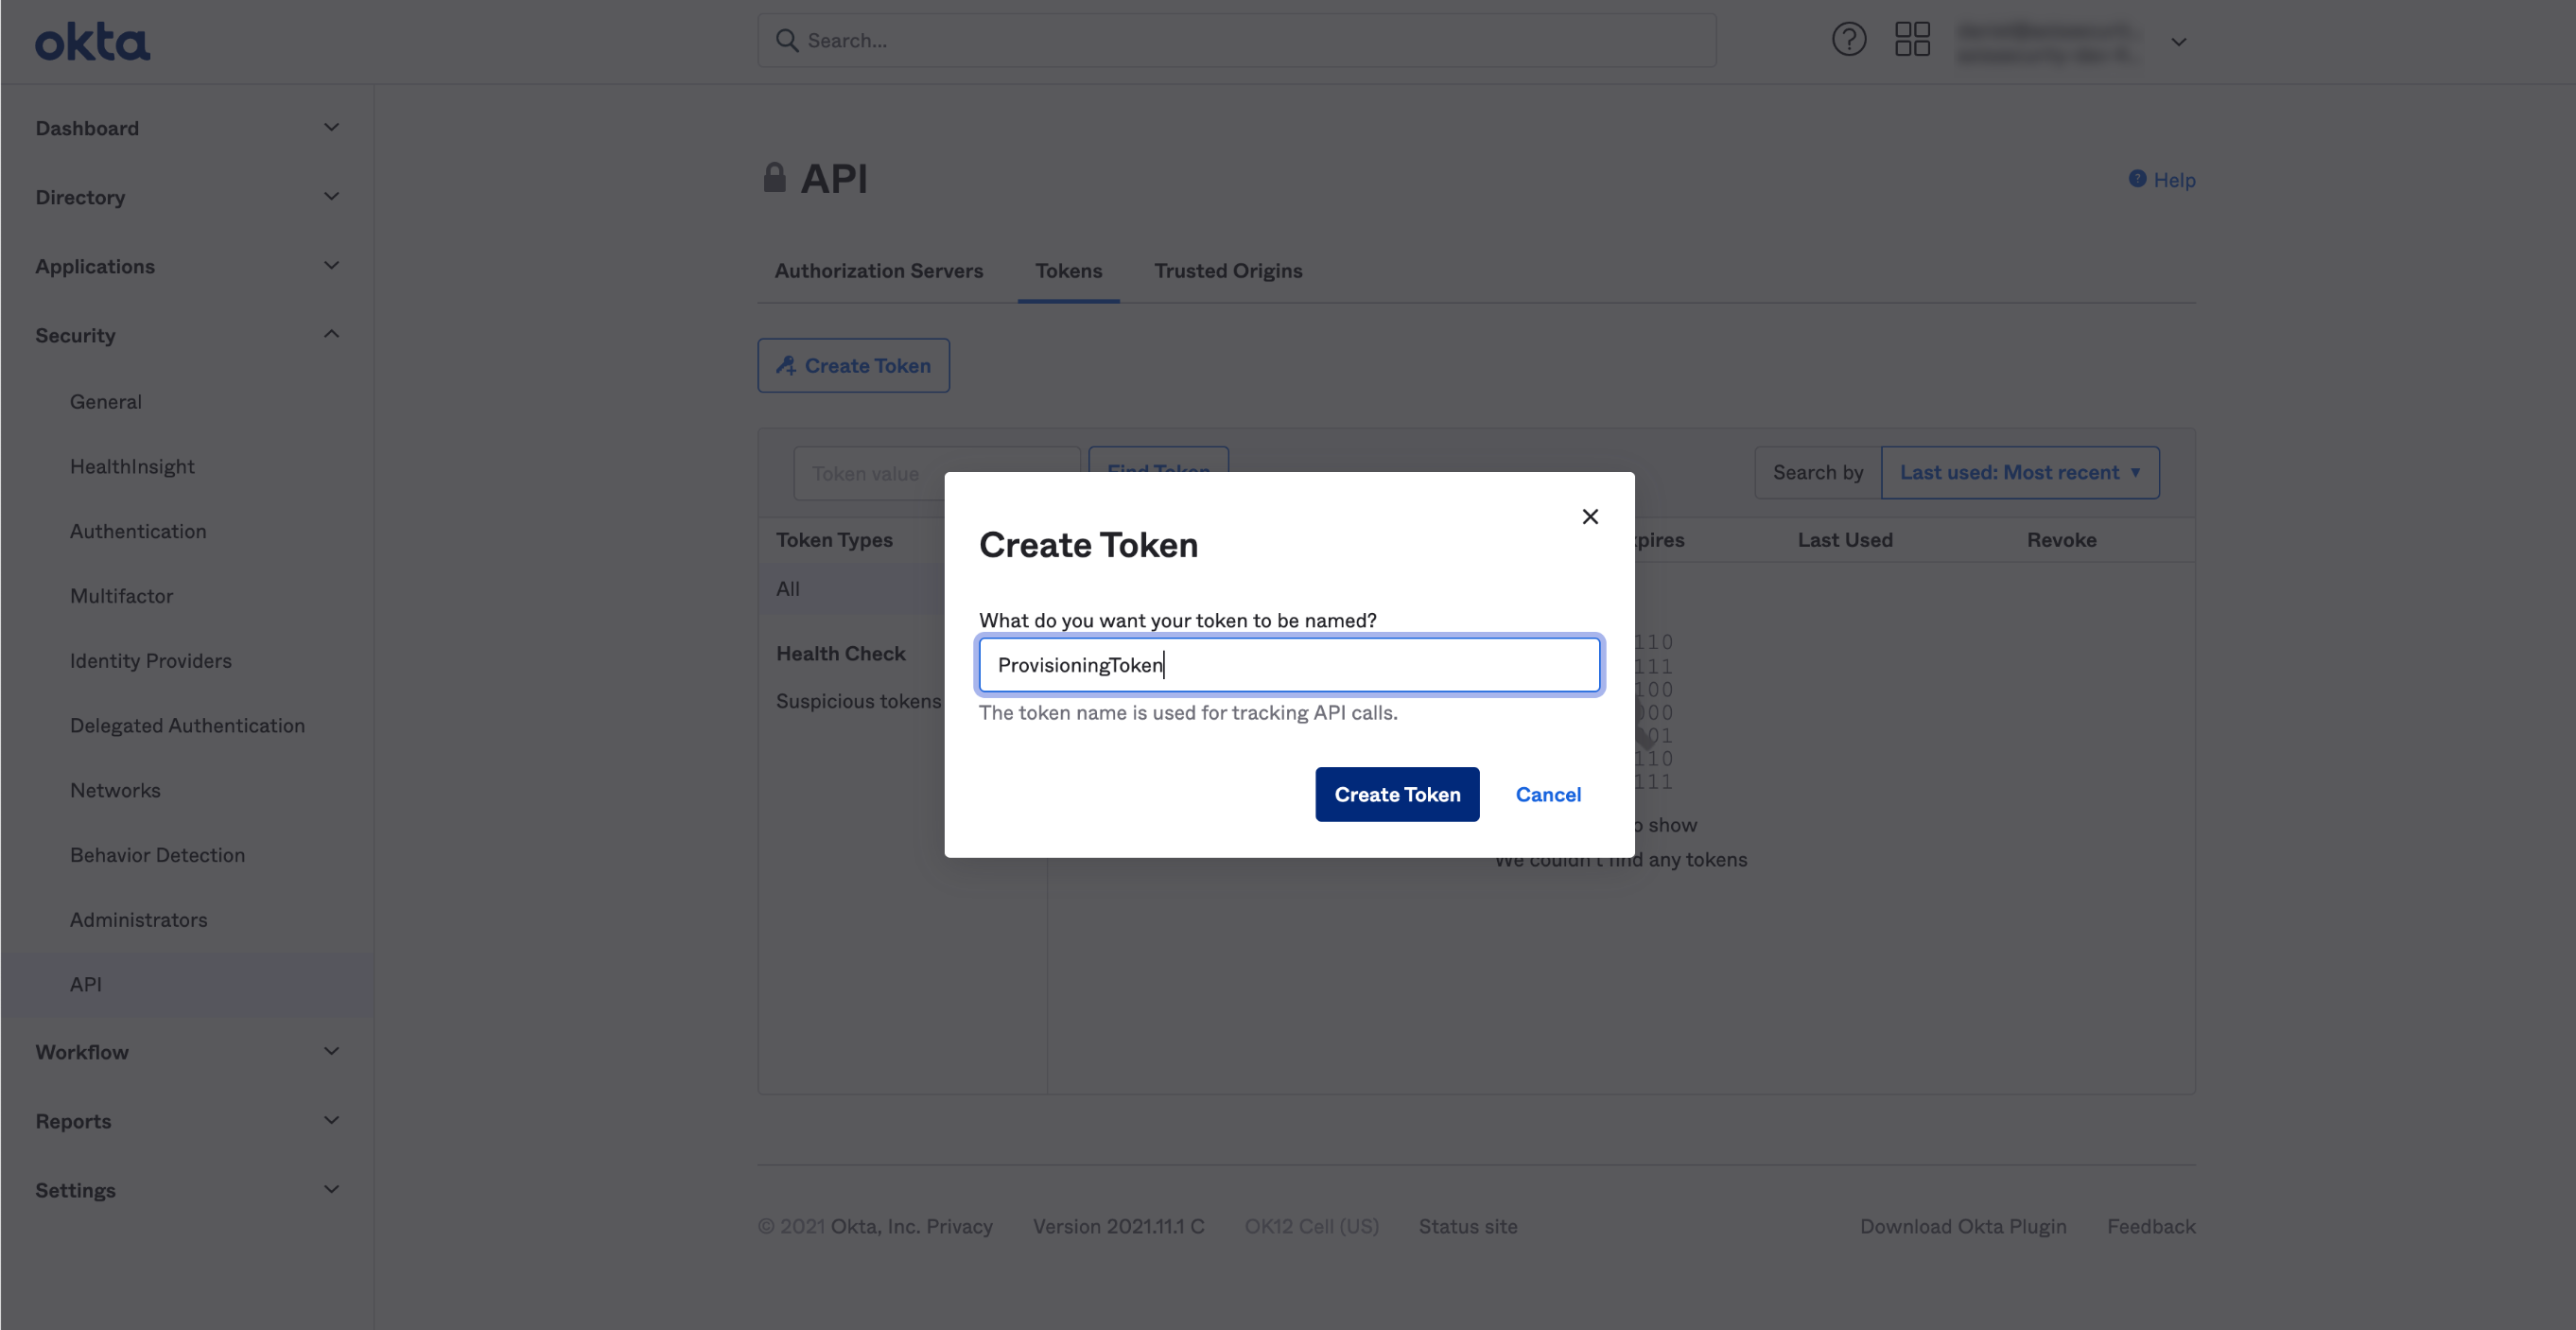
- Add a name for the token.
- Click Create Token.
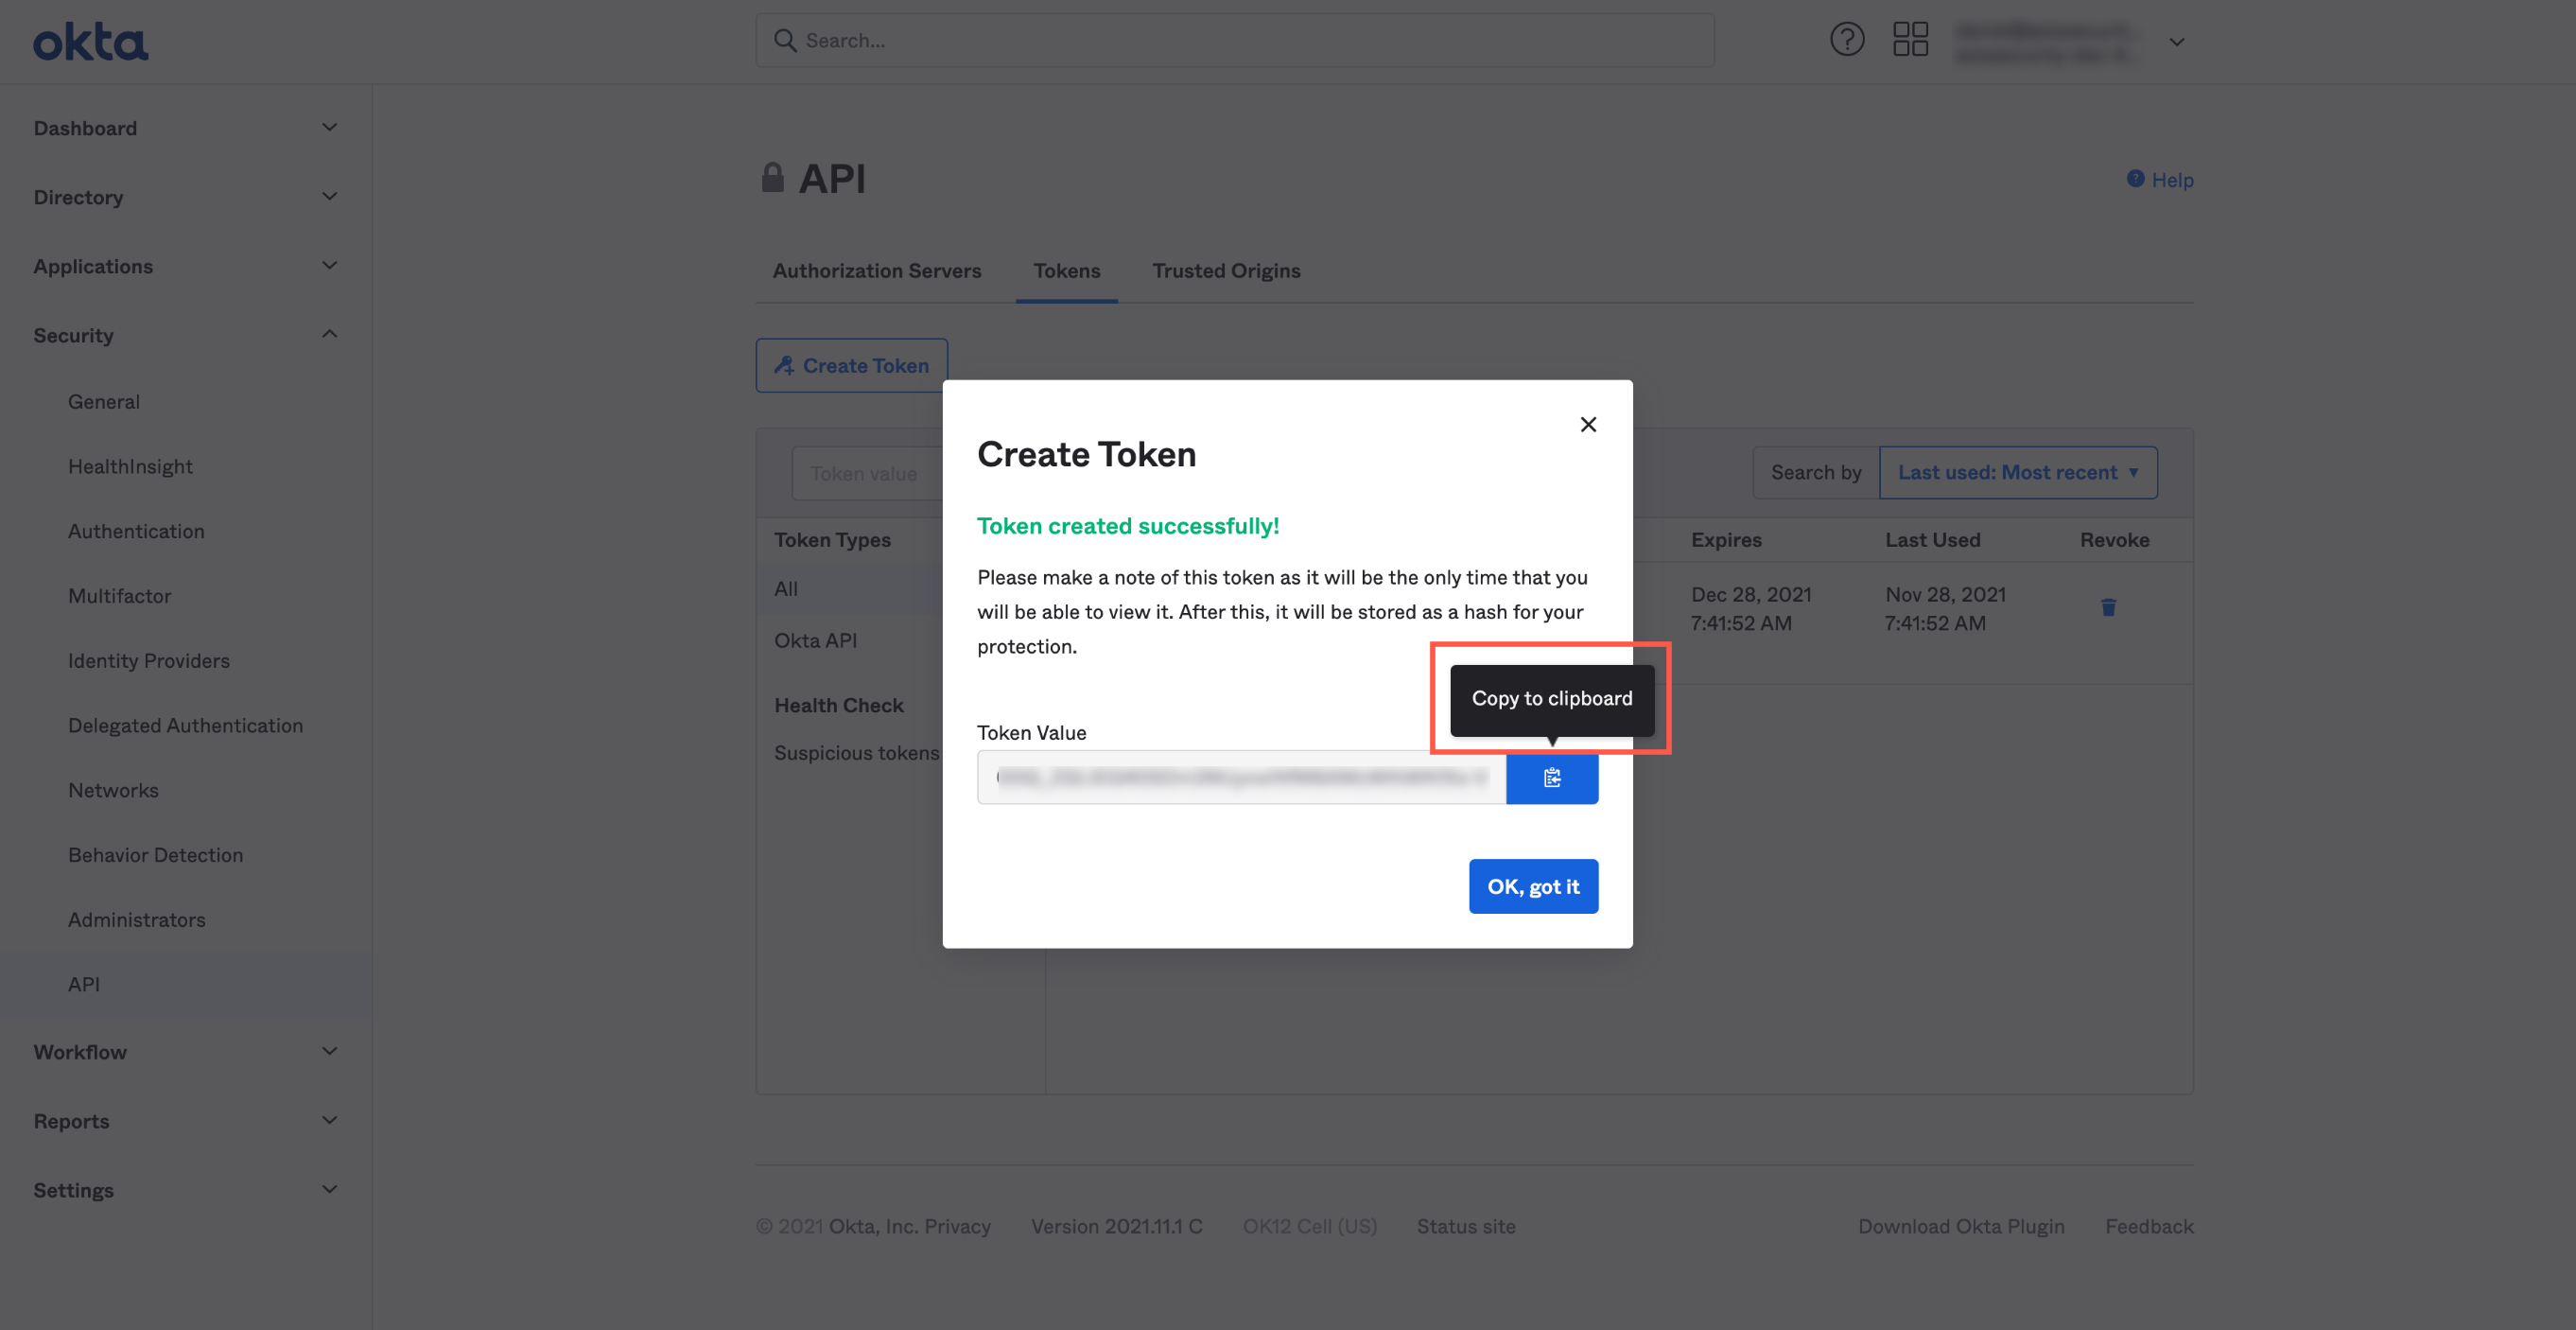
- Click the Copy to clipboard icon to the right of the token value.
- Click OK, got it.
- Paste the token value in a text editor. You will use it to create the API integration in Axis Security in step 5: Integrating Okta API into Axis Security.
- Next step: Integrate Okta API into Axis Security.
Step 5: Integrating the Okta API into Axis
- In the Management Console, go to Settings -> Partner Integrations.
- Click New Integration.
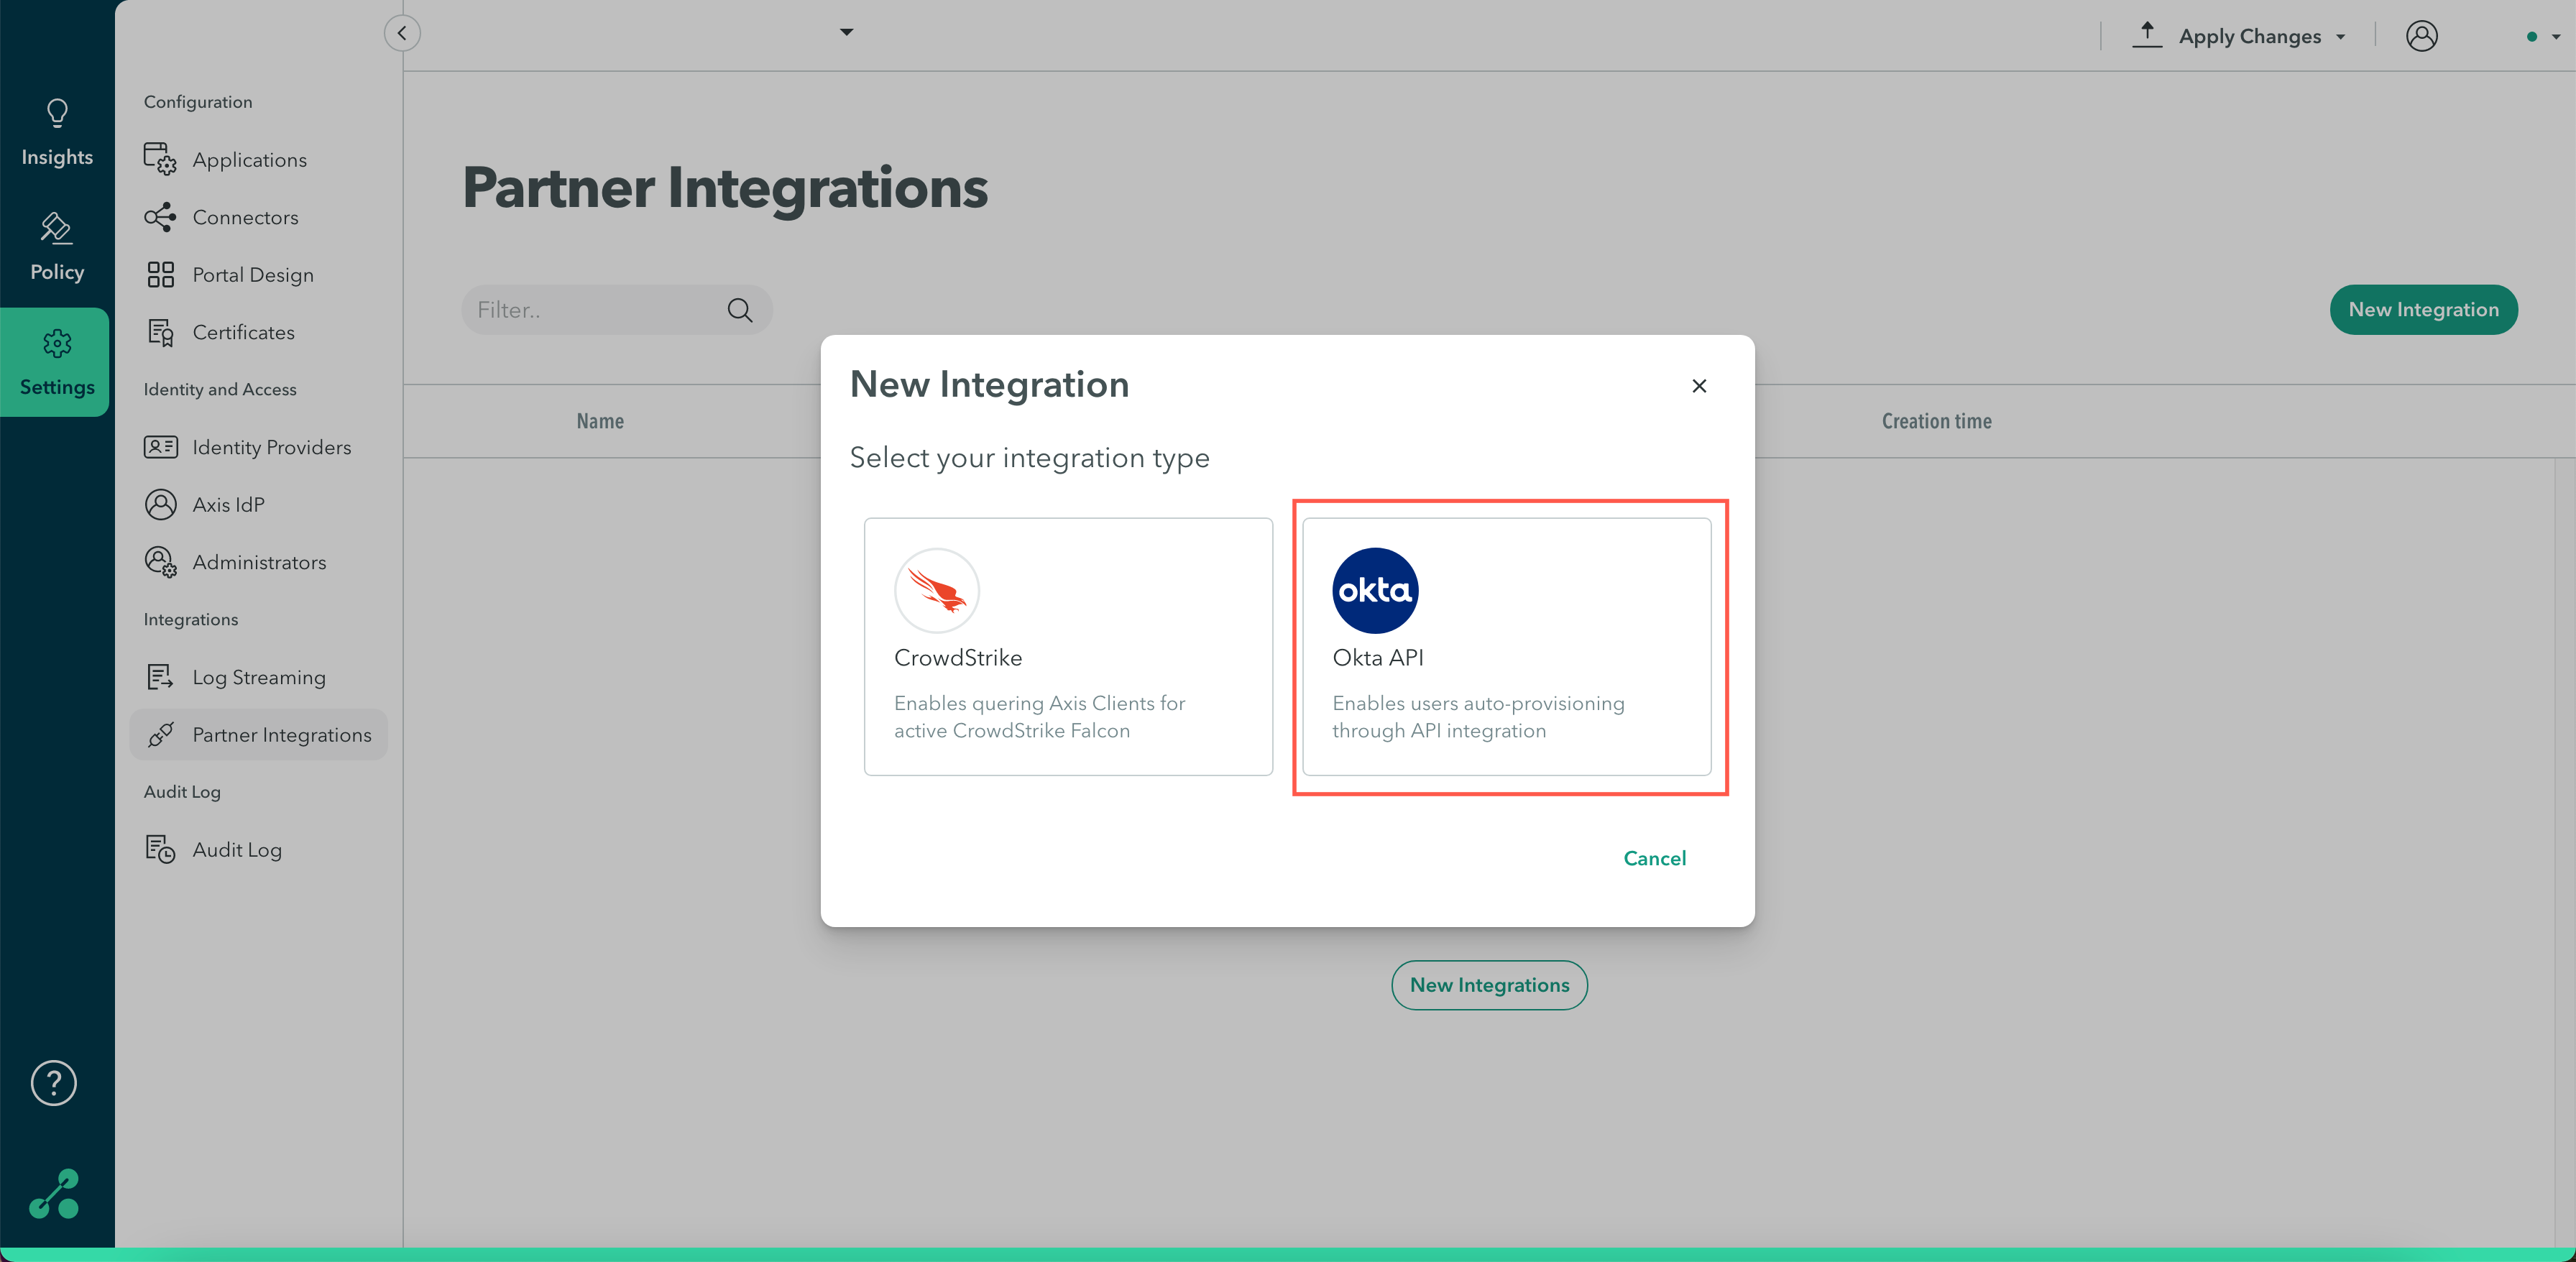
- Select Okta API.
- Enter a name that identifies the integration and a description (optional).
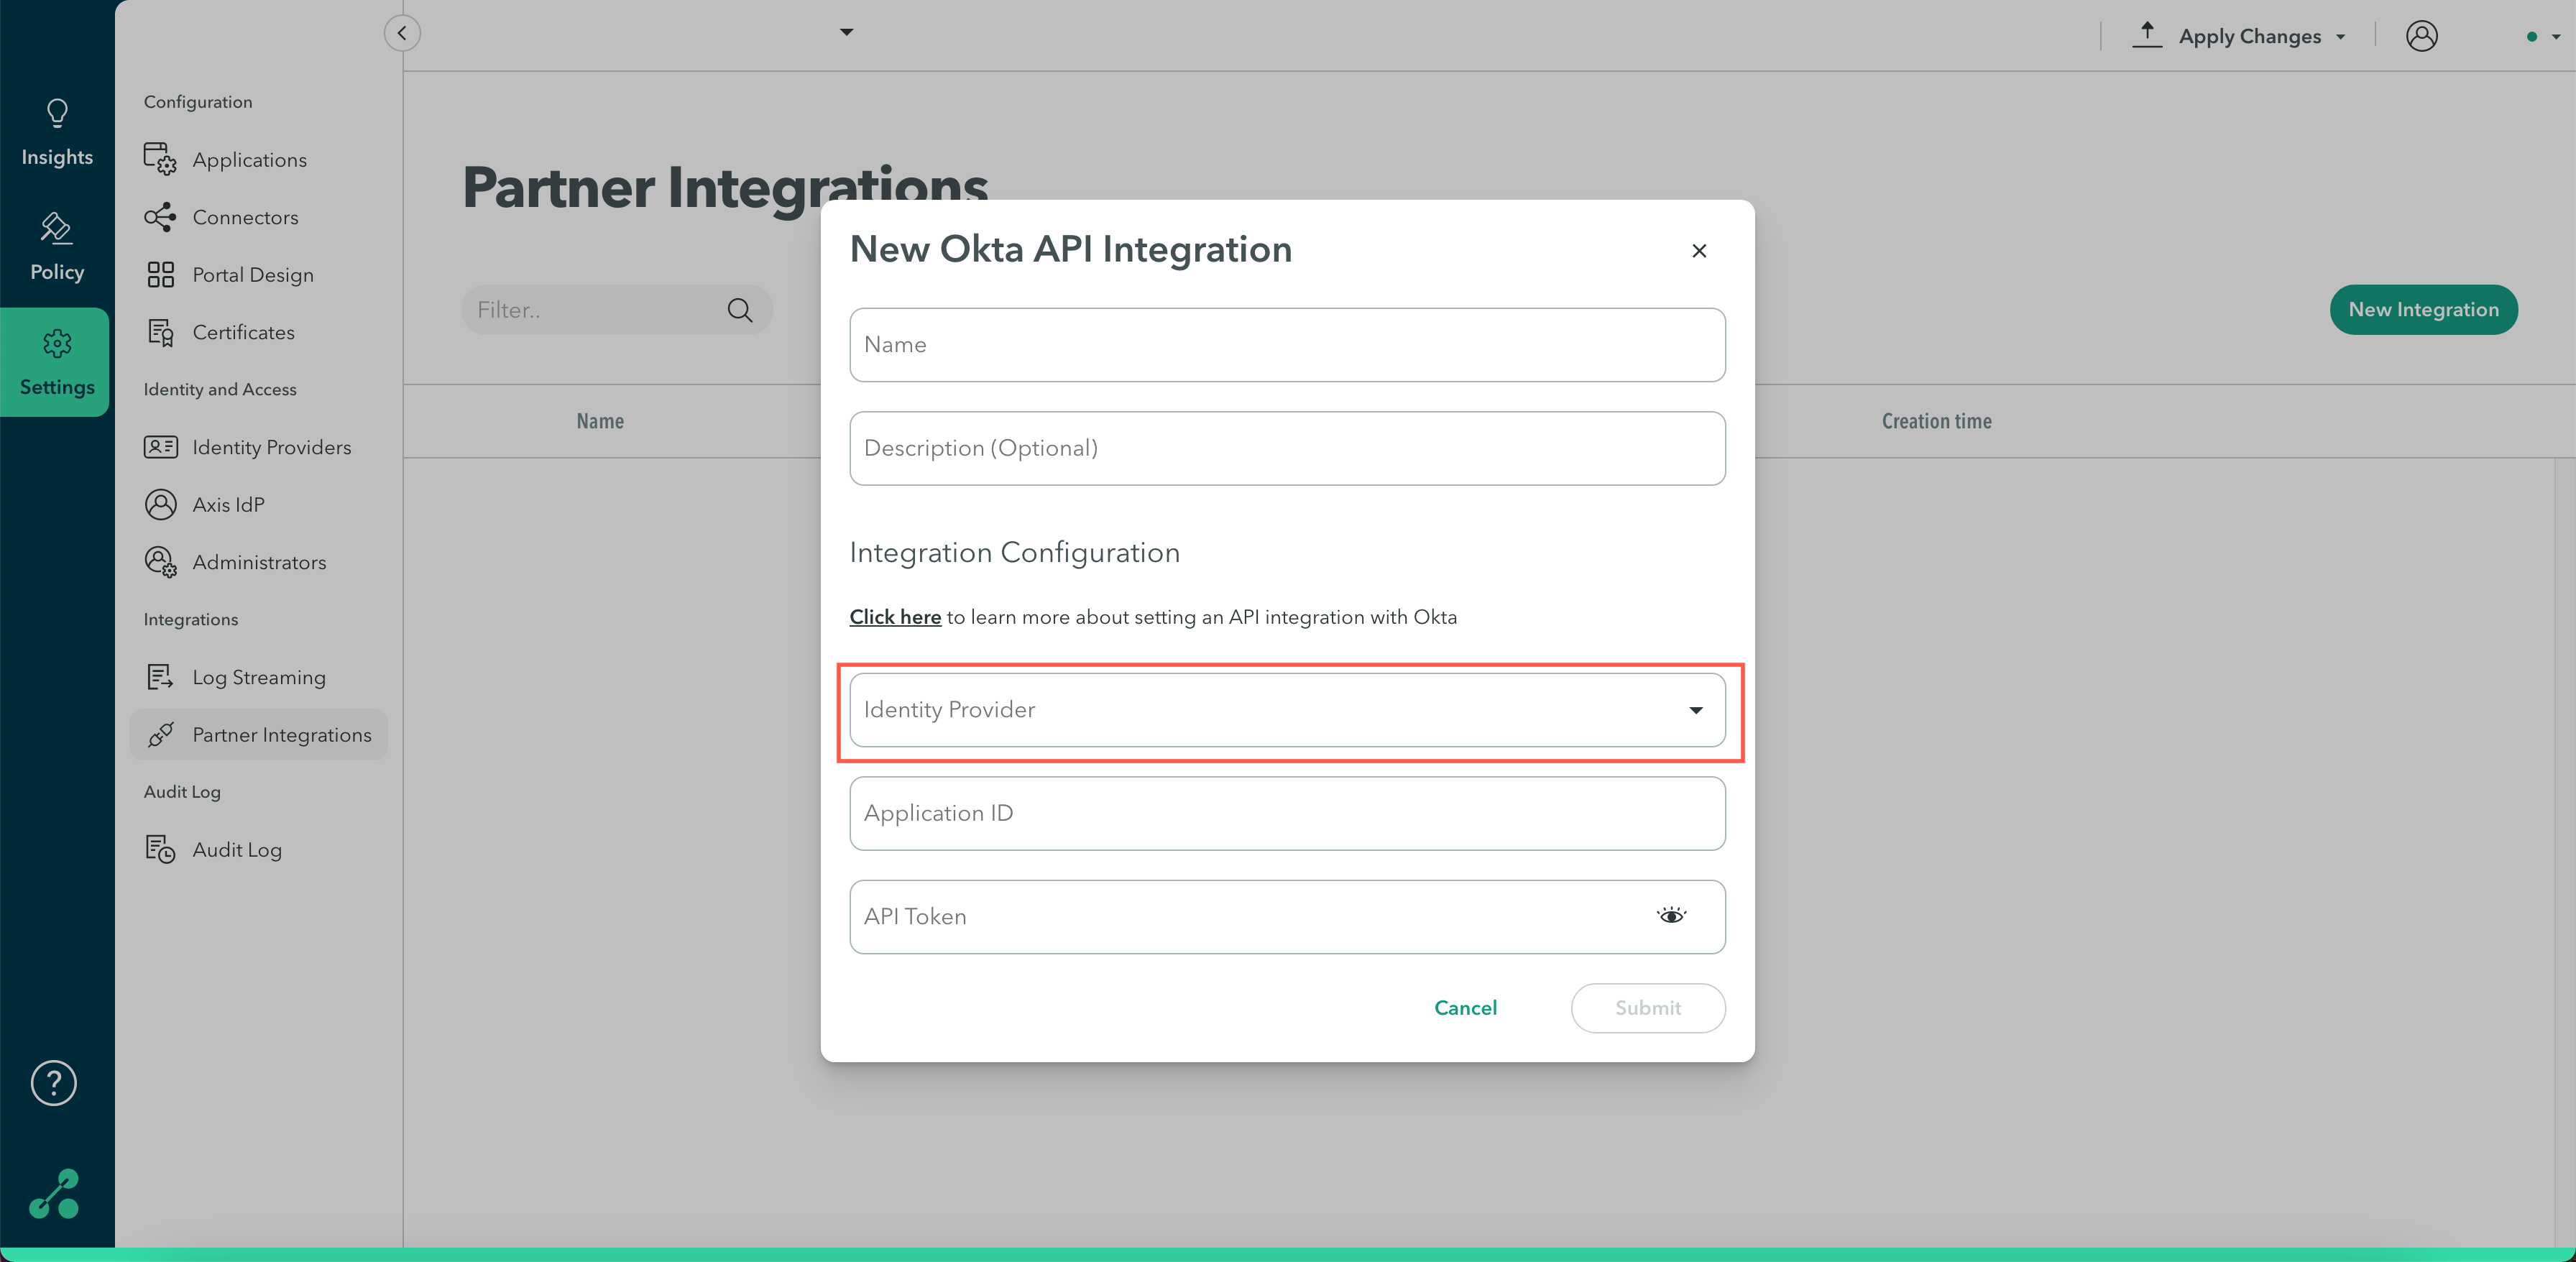
Integration Configuration
- Click the Identity Provider drop-down menu and select the Okta IdP instance with the users that you want to auto-provision.
- Enter the Application ID obtained in step 3.
- Enter the API Token value obtained in step 4.
- Click Submit.
- Push changes by clicking Apply Changes, Review your changes, and then Commit Changes. Note: The integration will not take effect until you push changes.
- Next step: Check the integration.
Step 6: Checking the Integration
To check if the integration is working:
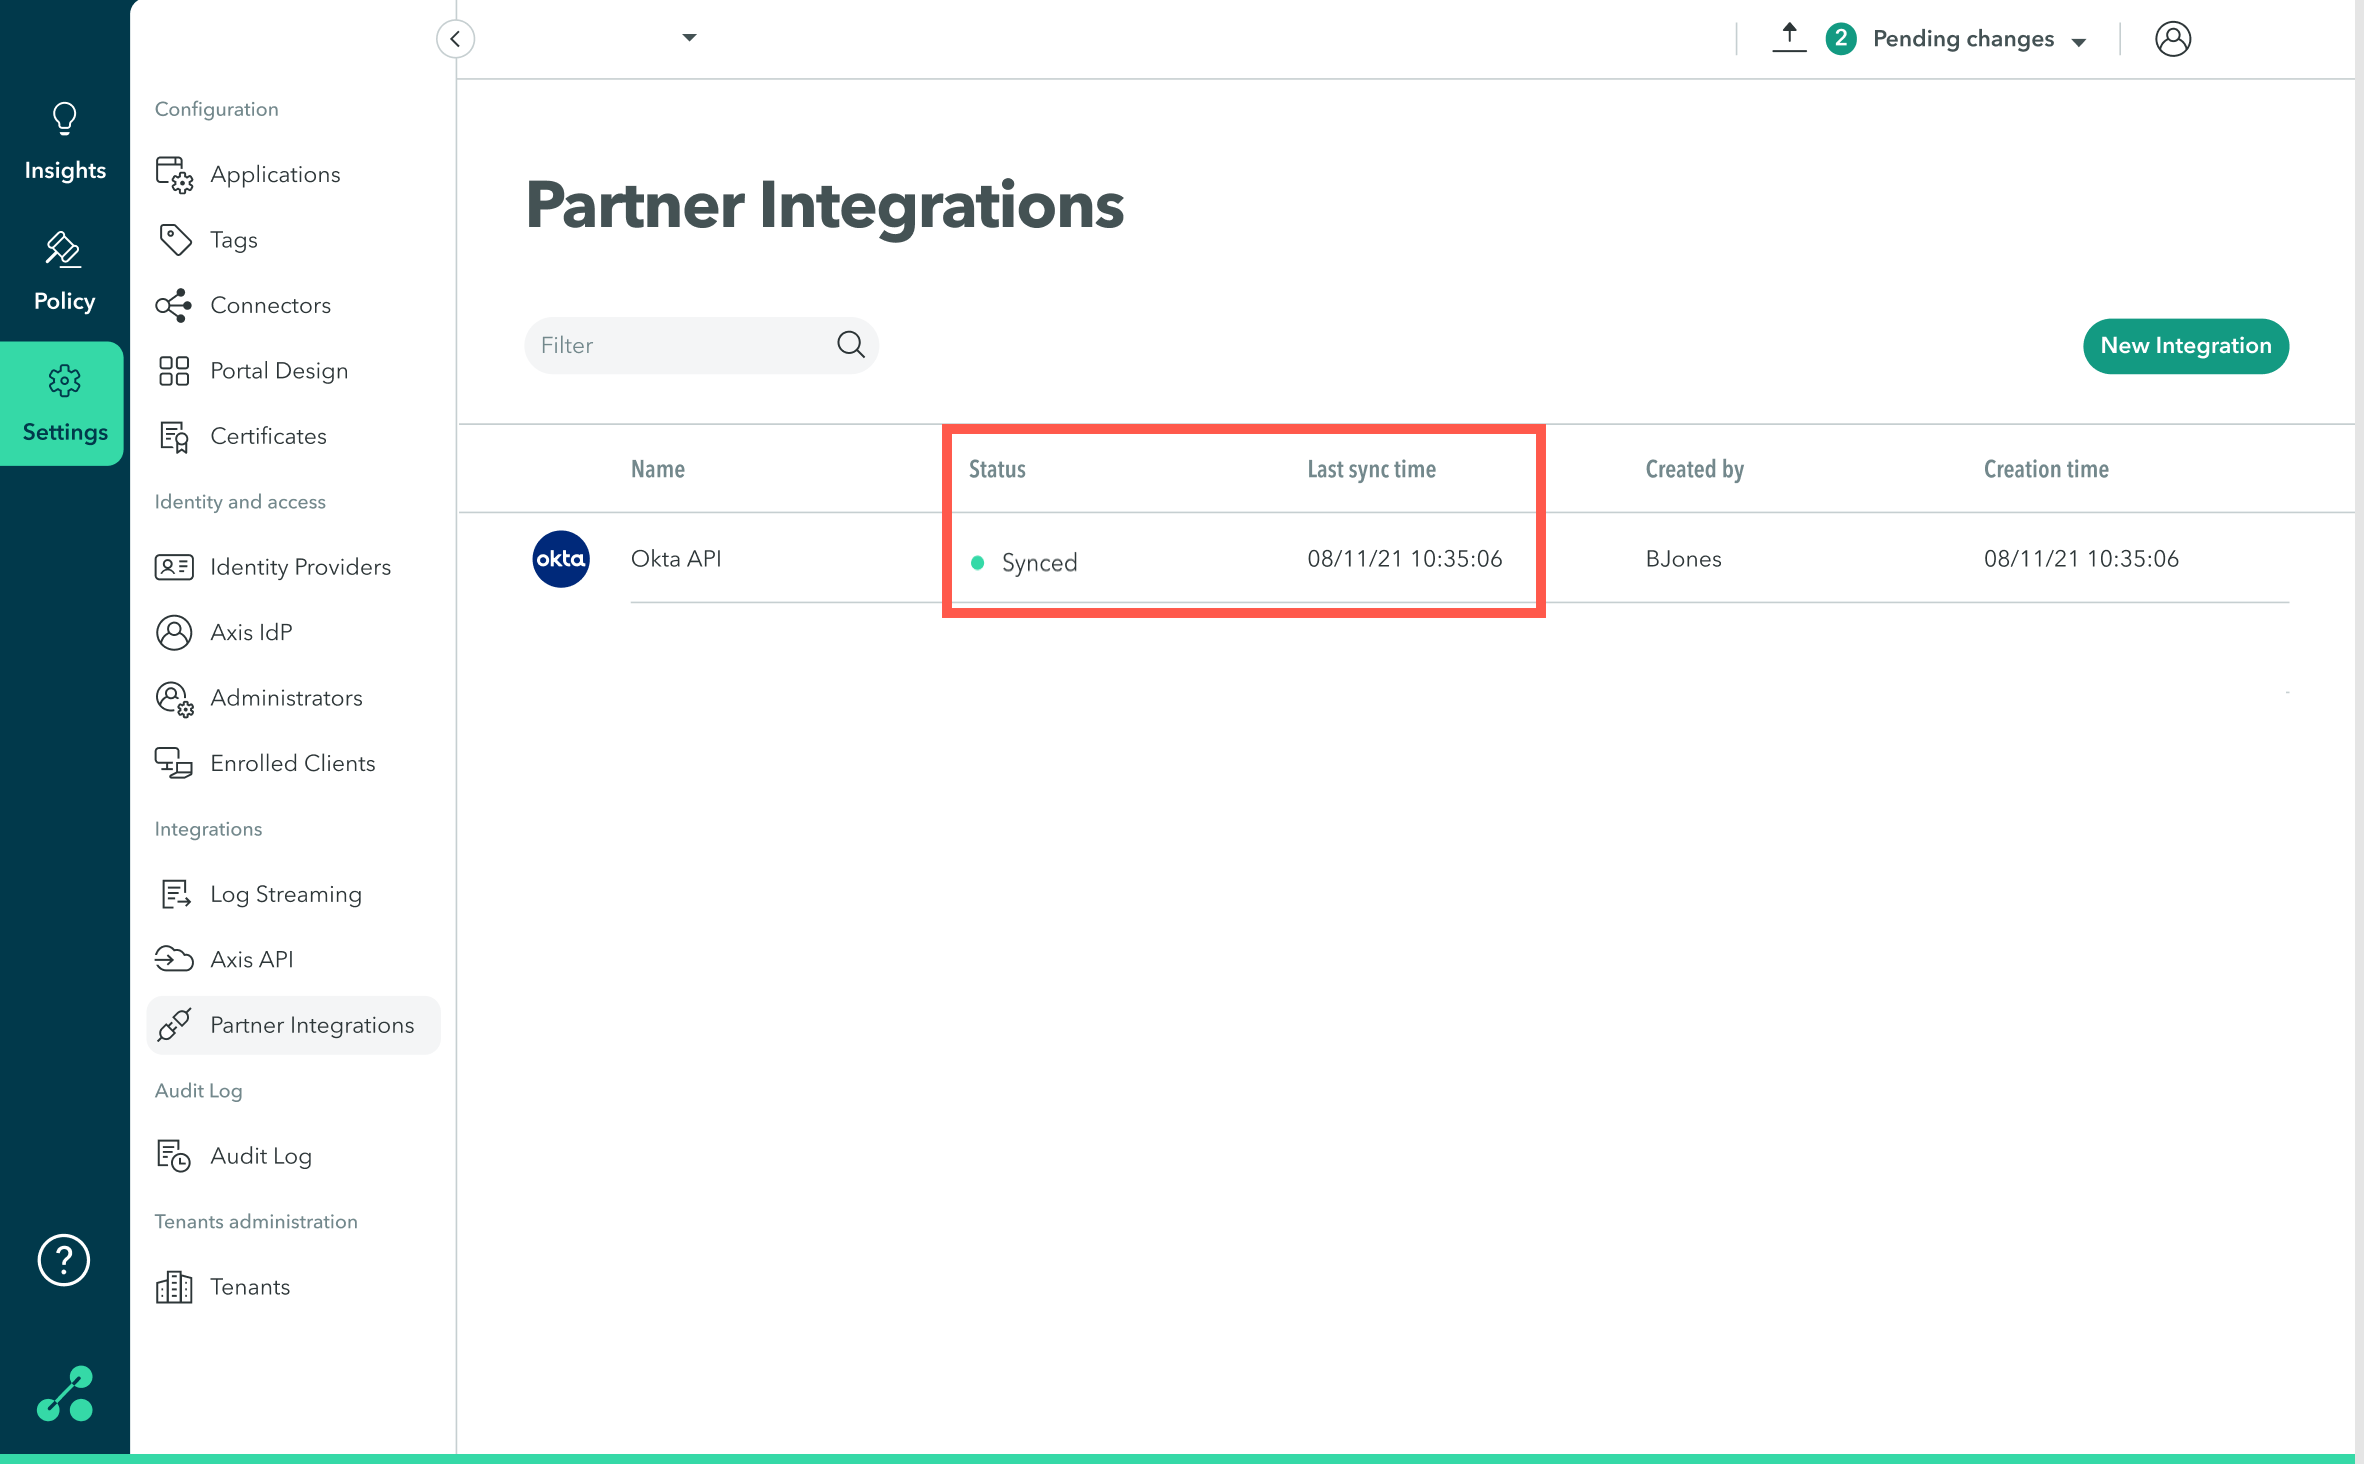
- Go to Settings-> Partner Integrations.
- Next to the Okta integration, view Status and Last sync time.
Note:
For troubleshooting integration sync issues, refer to the Troubleshooting section at the end.
Troubleshooting the Okta API Integration
Q: Why can’t I deploy the Okta API integration?
A1: There is no Okta IdP configured for the tenant
Check the Axis Management Console to see if an Okta IdP is configured for the tenant:
- In the Management Console, navigate to Settings-> Identity Providers.
- In the Identity Providers screen check whether there is an Okta IdP.
- If there is no Okta IdP configured, follow the steps described here to create an Okta IdP.
Note:
Make sure not to enable SCIM.
A2: SCIM is enabled
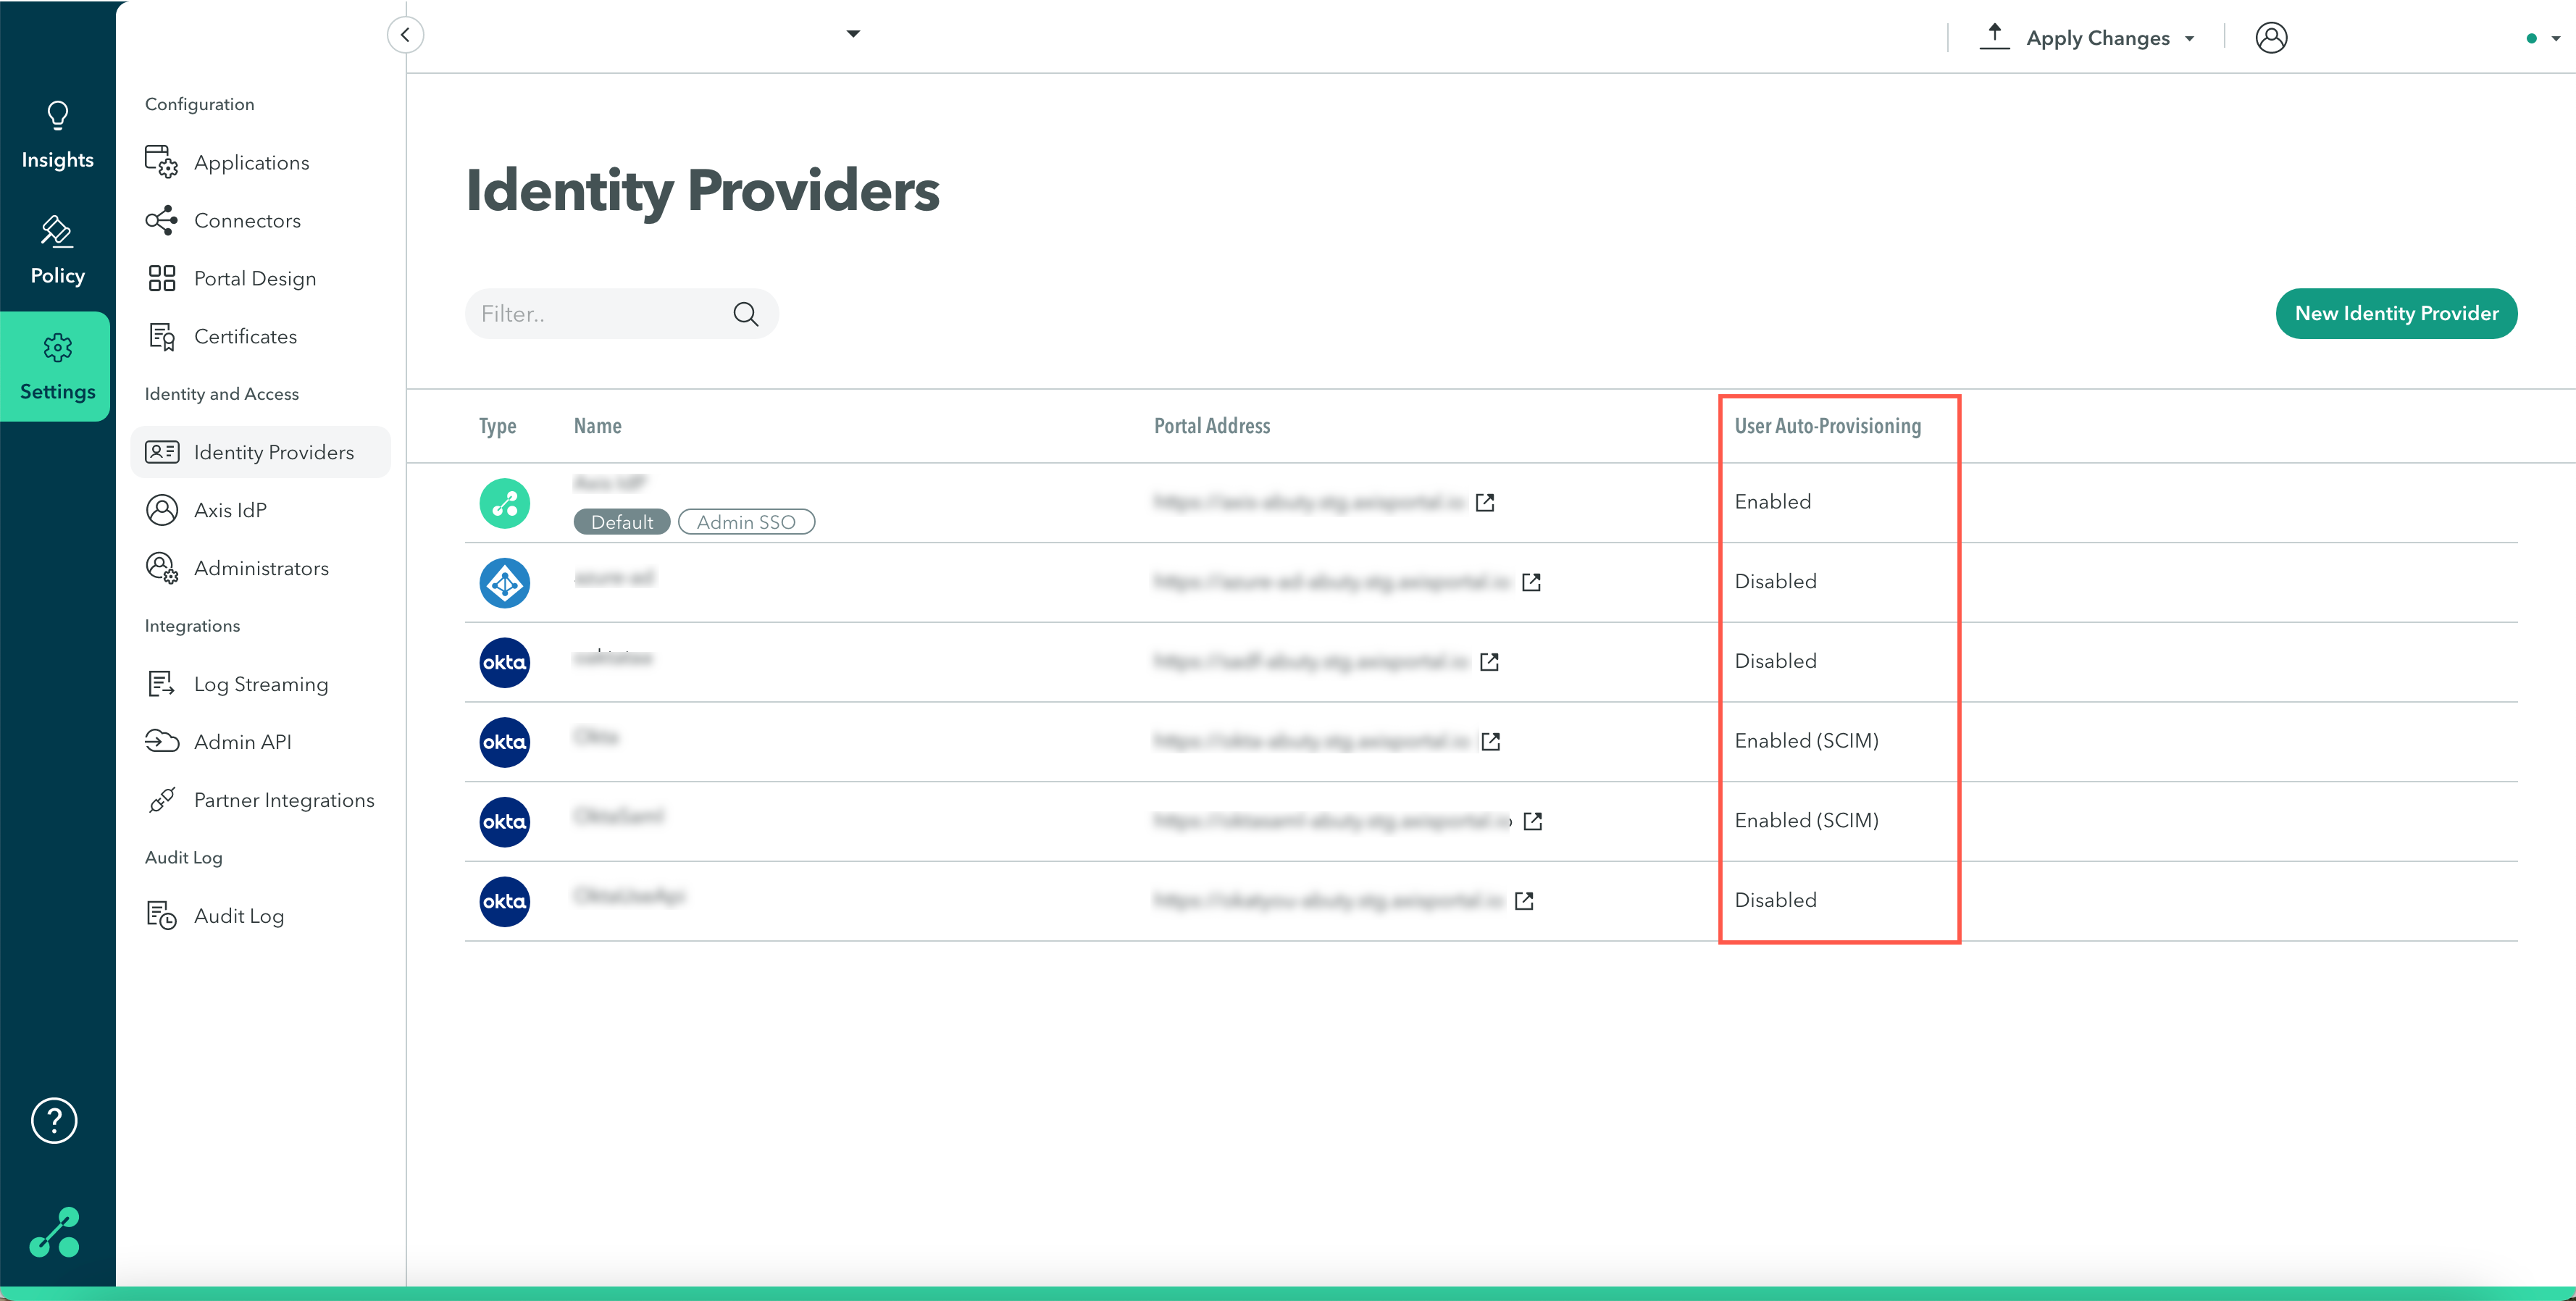
To integrate an Okta API, SCIM must be disabled in the Okta IdP.
You can see whether SCIM is enabled in the Identity Providers window, under User Auto-Provisioning.
To disable SCIM by revoking the Auto-Provisioning Token:
- In the Management Console navigate to Settings-> Identity Providers.
- Next to the Okta IdP for which you wish to provision users, click Edit.
- In the Edit Identity Provider window navigate to Service provider metadata.
- Under User Auto-Provisioning (SCIM) click Revoke Auto-Provisioning Token.
- Click Ok.
A3: An Okta API integration is already configured for your tenant
Each tenant can have only one Okta API integration.
To view your tenant's integrations:
- In the Management Console, go to Settings-> Partner Integrations.
- Check whether there is an existing Okta API integration.
Q: Why are The Okta and Axis Directories Not Syncing?
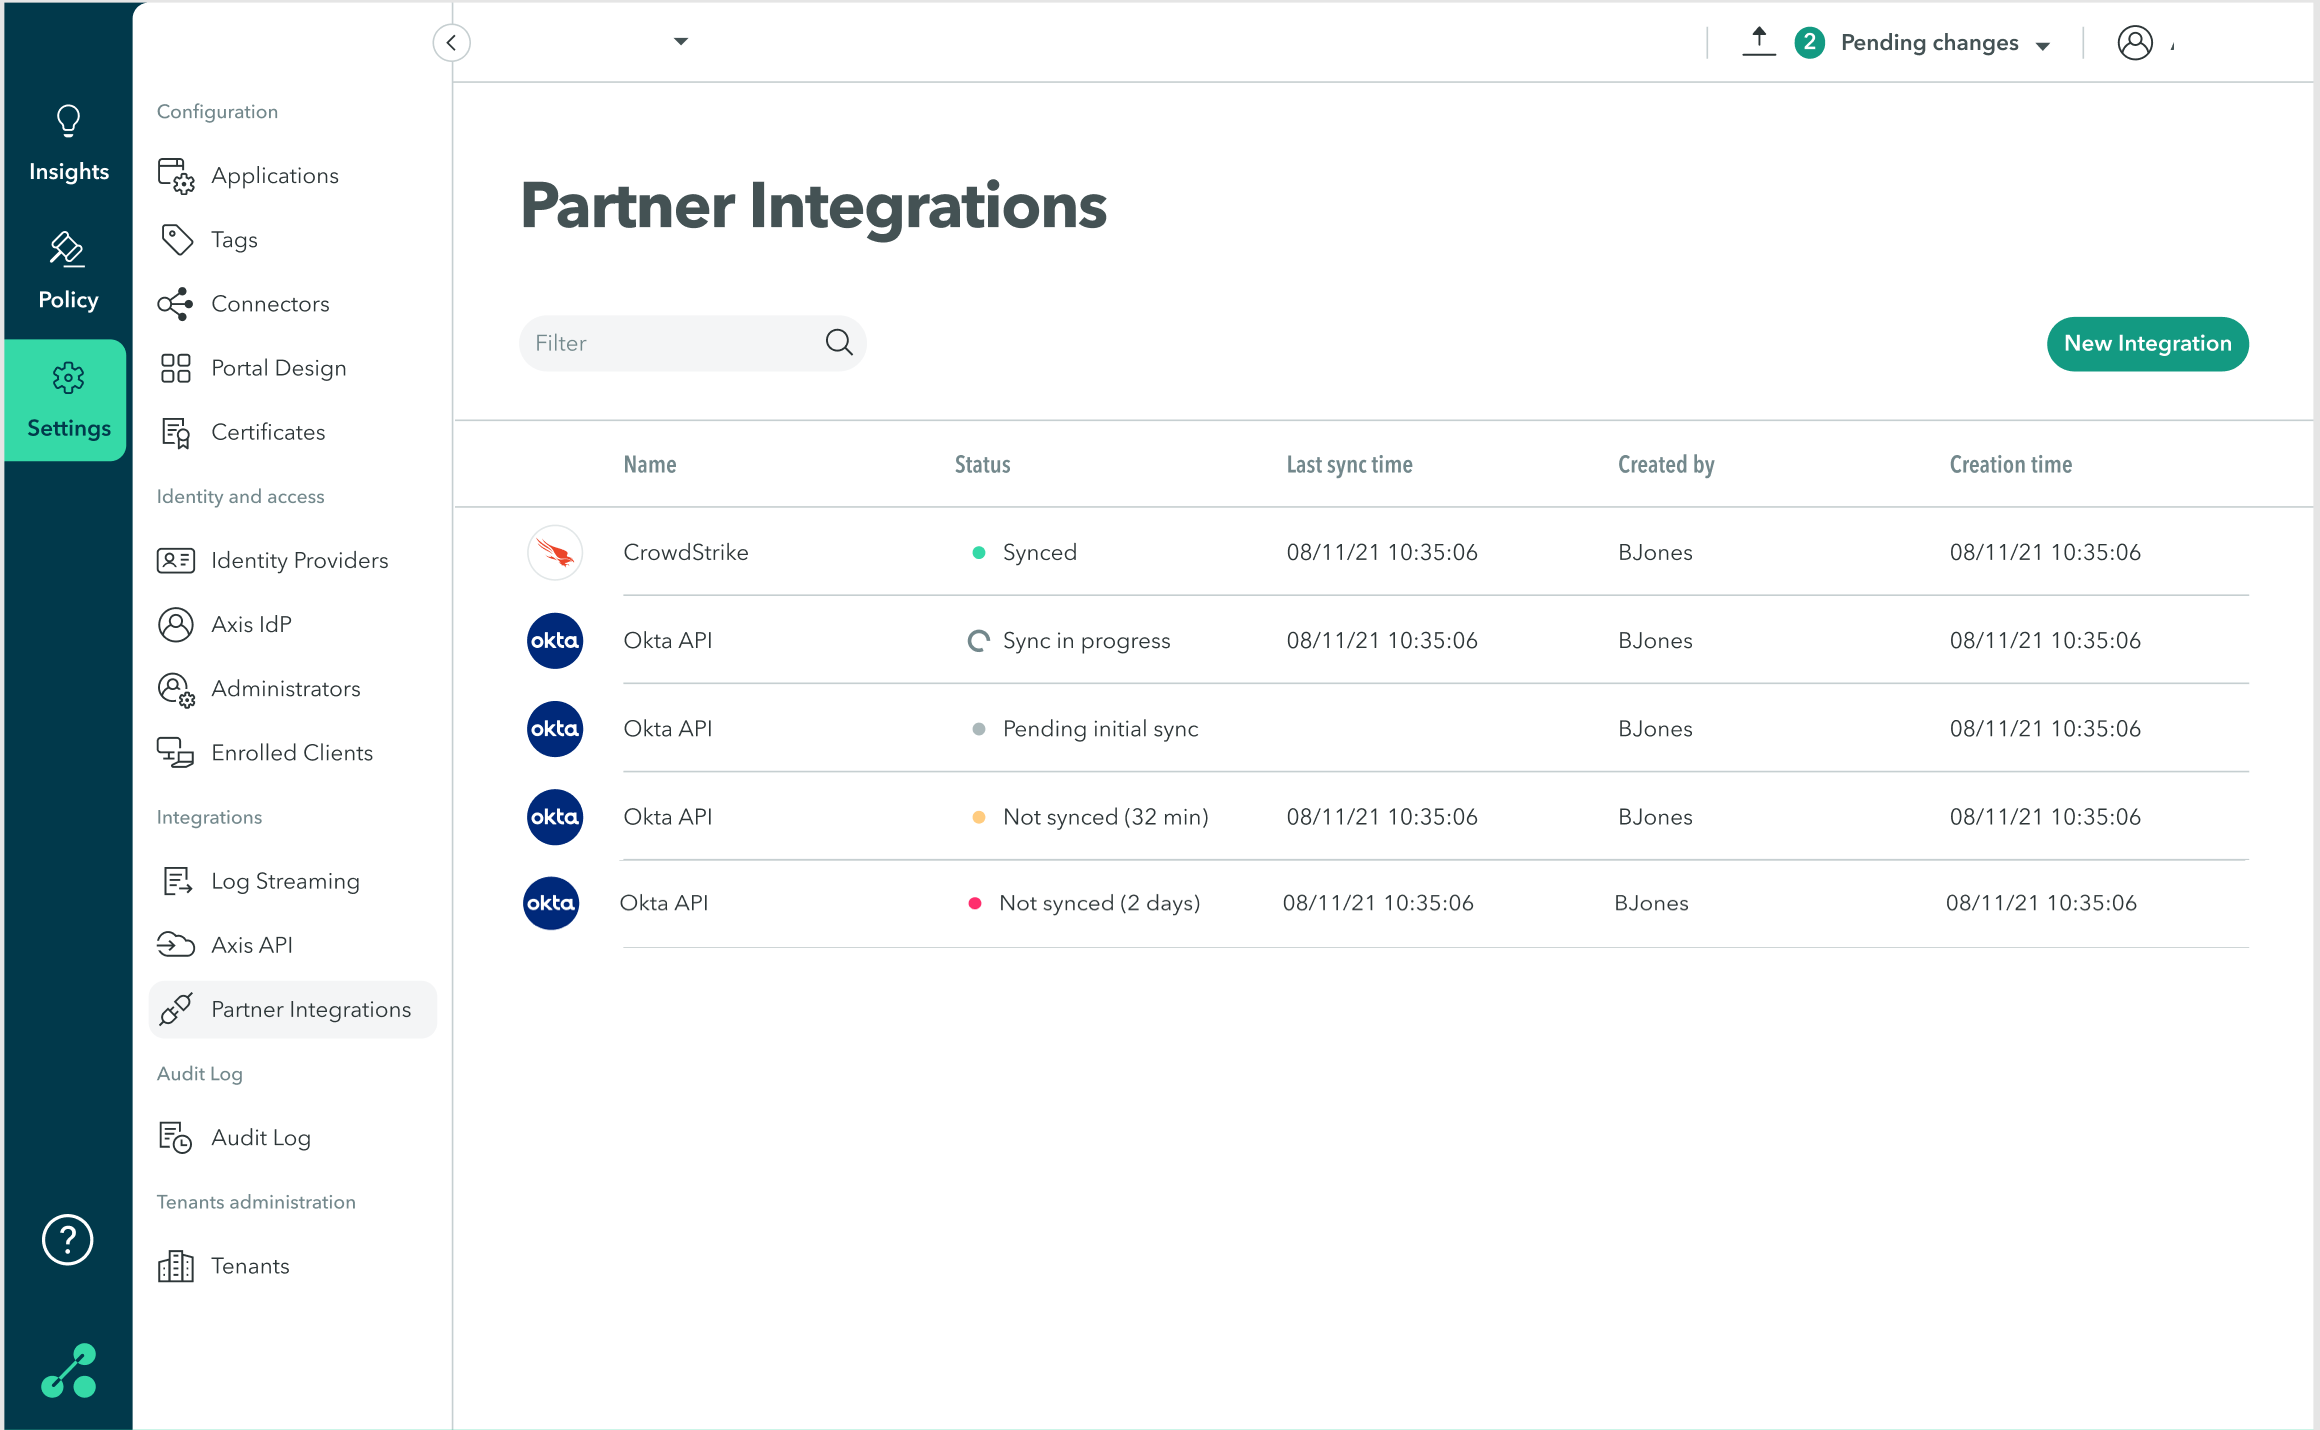
The Partner Integrations table provides the following sync status information:
| Status | Description |
|---|---|
| Synced | Integration has synced successfully |
| Sync in progress | Integration is currently syncing |
| Pending initial sync | Integration has not synced yet |
| Not synced | Integration has not synced recently, there may be a temporary sync issue. Indicates the time since the last successful sync. |
A1: This Okta domain is already provisioning users to Axis
If the Okta domain is already configured to provision users using Okta API in any tenant in Axis it will not sync through the new integration.
A2: Changes have not been pulled yet
Okta API syncs changes to identities by pulling information from Okta in set intervals. You can check when the last sync occurred by following the instructions in Step 6: Checking the integration.
Contact Axis Support: [email protected] for information about your sync intervals.
A3: Problems with attribute mapping
Invalid attribute mapping can be the cause of problems syncing changes. Follow the instructions in Step 1: Editing the Axis Application User Profile in Okta to make sure attributes were entered and mapped correctly.
A4: Invalid Application ID or token
- Follow the instructions in Step 3: Getting the Application ID in Okta to ensure the application ID was copied correctly and Step 4: Creating a New Token in Okta to generate a new token.
- Check to see if there is an active token from Axis.
- If there is no token, delete the integration and create a new one.
Updated over 2 years ago
