Adding Policy Rules
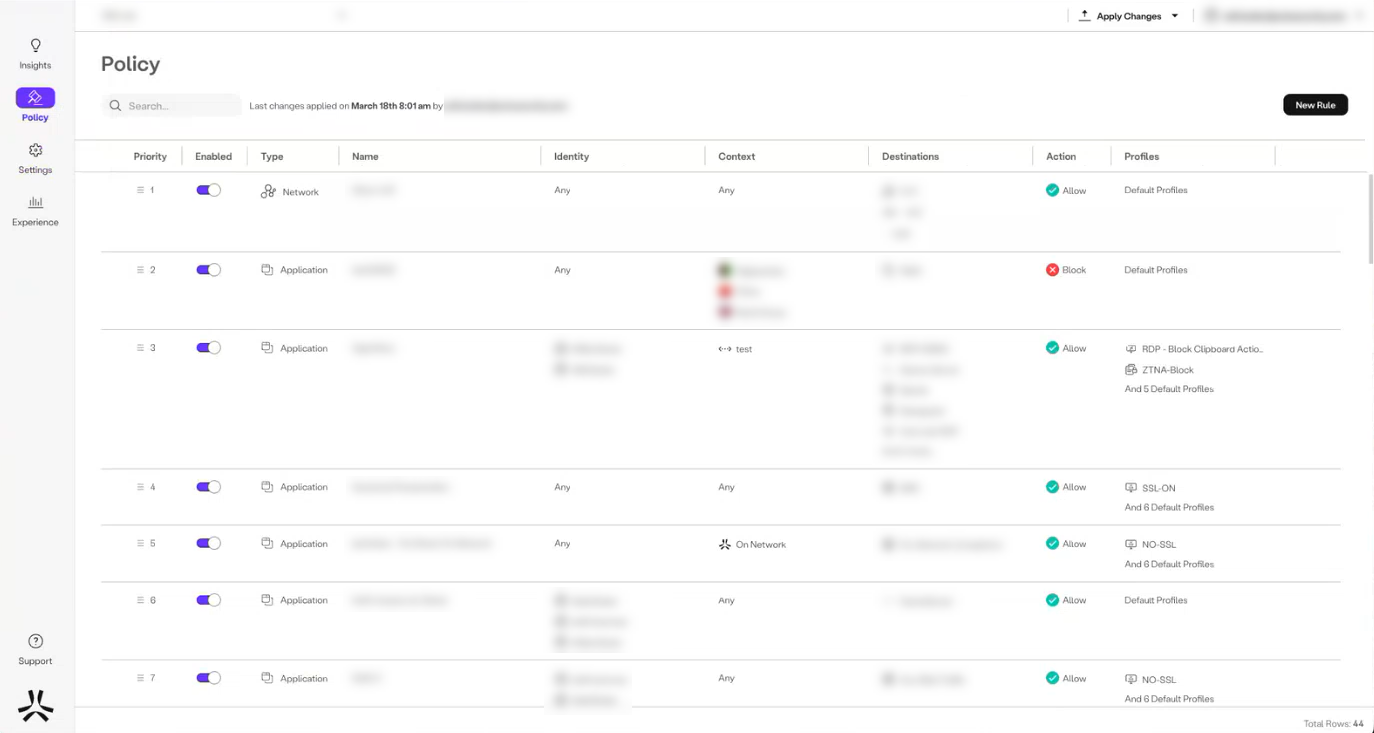
The Policy Screen
Axis evaluates Policy Rules to specific Destinations (Applications or Application Tags) on a first-match principle. For instance, when a user attempts to access a specific application, Axis begins evaluating all of the configured policies starting with the first rule in a set of policy rules. As soon as it finds a policy that matches the criteria that were specified in a rule, it enforces that policy rule and disregards all other rules that follow, including any lower-priority or conflicting rules. If no rule was matched, the default rule is chosen which is always set to "Block".
Adding a Rule
A rule consists of a set of policy objects called Conditions.
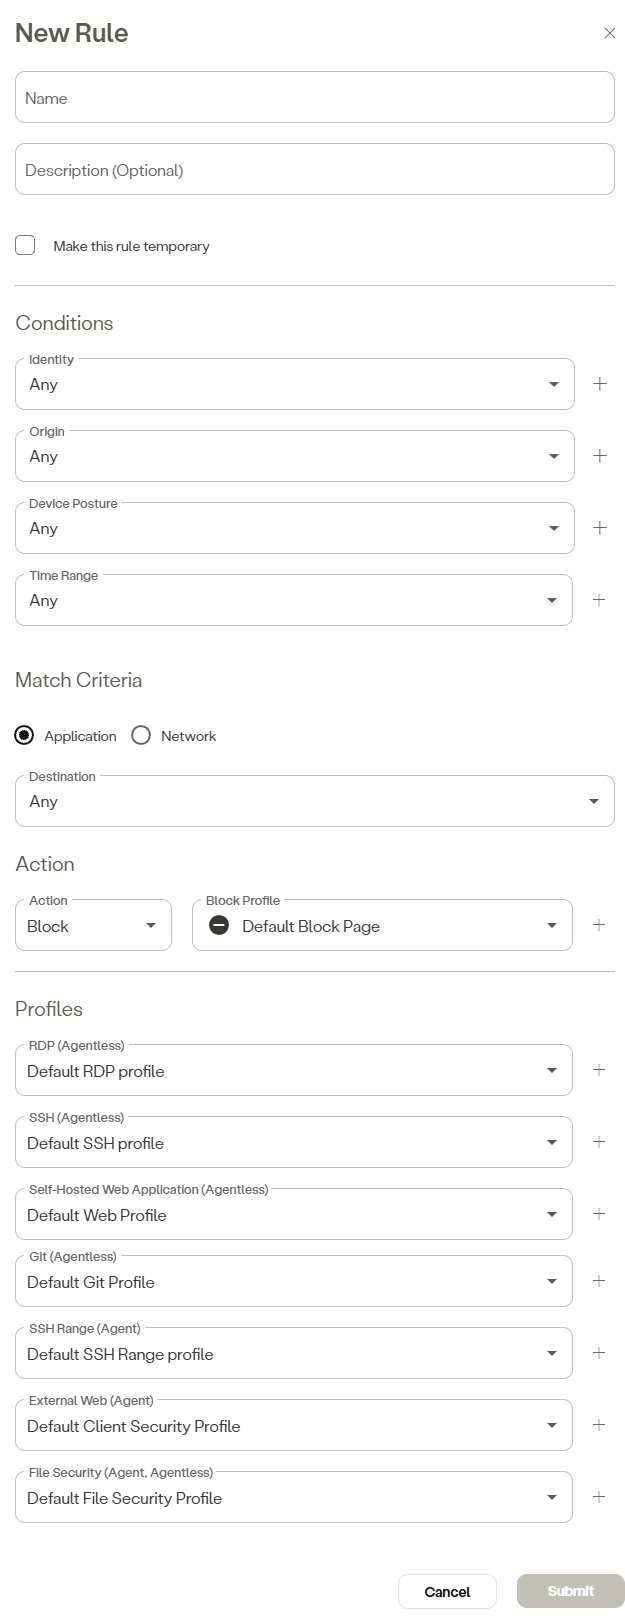
To add a rule, complete the following steps:
-
In the management console, go to Policy -> Rules -> New Rule.
-
Enter the rule name in the Name field.
-
(Optional) Enter a description in the Description field.
-
Click the box next to Make this rule temporary if you want to create a temporary rule. Select a date and time range.
-
In the Conditions section, configure the following as necessary:
- Identity—Select an identity from the drop-down menu or click the add icon to use an Okta identity, Axis IdP identity, custom SAML Query, or identity group.
- Origin—Select an origin from the drop-down menu or click the add icon to add an IP range or location that users can access. Select a geolocation to restrict users restrict from only accessing resources from a location. For example, Germany.
- Device Posture—Select a device posture from the drop-down menu or click add to add an Atmos Agent Posture or a Client Certificate. For information on Atmos Agent Posture, see Atmos Agent Device Prerequisites. To have a condition that is applied to Mac and Windows OS on the same rule:
- Apply an “OR” condition between the Mac and Windows OS since there will never be an “AND” condition.
- Create a rule that is Windows-specific and another rule that is Mac-specific.
- Combine rules by choosing both.
- Time Range—Select a time range from the drop-down menu or click the add icon to add a new time range. Configure a time range that users can access a protected resource.
- Configure the Match Criteria parameters as follows:
- To configure the rule as an Application rule, complete the following steps:
- In the Match Criteria section, select Application.
- In the Destination field, select an option from the drop-down menu.
- To configure the rule as an Network rule, complete the following steps:
- In the Match Criteria section, select Network.
- In the Protocol field, select an option from the drop-down menu.
- Enter the source IP in the Source field, select a preset source IP from the drop down menu.
- Enter the source port range in the Source Ports field, or select a preset range from the drop down menu.
- Enter a destination IP in the Network Destination field.
- Enter the destination port range in the Destination Ports field, or select a preset range from the drop down menu.
- To configure the rule as an Application rule, complete the following steps:
- Under the Action section, select whether the rule blocks or allows access.
- In the Profiles section, complete either of the following steps: select a profile from the drop-down menu or click add to add a profile, for the corresponding profile fields as applicable.
- For a Network rule:
- Select a client security profile in the the External Web (Agent) field, or click the corresponding plus icon to add a client security profile.
- Select a file security profile in the File Security (Agent, Agentless) field.
- For an Application rule:
- Select a RDP profile from the drop-down menu in the RDP (Agent) field.
- Select a SSH profile from the drop-down menu in the SSH (Agent) field.
- Select a web profile from the drop-down menu in the Self-Hosted Web Application (Agent) field.
- Select a Git profile from the drop-down menu in the Git (Agent) field.
- Select a SSH range profile from the drop-down menu in the SSH Range (Agentless) field.
- Select a client security profile from the drop-down menu in the External Web (Agent) field.
- Select a file security profile from the drop-down menu in the File Security (Agent, Agentless) field.
- For a Network rule:
- Click Submit.
NoteTo commit your changes, navigate to the top-right menu, click Apply Changes, then select Commit Changes.
Updated 16 days ago