About Identity Management
Overview
A User Identity is an element that contains details identifying an individual based on certain attributes, for example, an email account or a phone number. The identity is authenticated by Identity Providers (IdPs) and Axis Security authorizes access to applications based on the authentication.
You can use one of the following methods to integrate Axis Security and an IdP:
- Security Assertion Markup Language (SAML)
- System for Cross-domain Identity Management (SCIM).
- To add a user or a group to a policy rule, they must first be added to the system as identity objects in the identity management screen in the Management Console.
The following topics describe user management, authentication, and provisioning:
- Authentication Using SAML
- Authentication and user provisioning using SCIM
- Provisioned Identity Objects (SCIM) vs. SAML queries
- Adding an identity object
Authentication Using SAML
SAML is an open standard allowing IdPs to pass authorization credentials to service providers (SP) and based on those credentials, the SP authorizes access to applications. The IdP sends authentication information (for example, indicating Bob Jones is in our system and here is his email), and based on the authentication, the SP (Axis Security) authorizes access to applications.
SAML is a protocol for authorizing a user's connection to an application. Axis Security talks to an IdP using a SAML query. The IdP authenticates users and sends their identity information (for instance: email, first name, last name, user group) to Axis Security. In a SAML query, the user can enter any value they choose to authenticate, and the response will only include that information (e.g. email).
Authentication and User Provisioning Using SCIM
SCIM is an open standard designed to manage user identity information. The IdP has a database of users and their attributes and it pushes the information and any changes to the attributes or permissions to Axis Security. Once users are provisioned to the IdP (Axis IdP and Okta IdP are supported), when adding a user or group to an identity object, the information can be auto-filled. In addition, user provisioning allows for continuous enforcement in that the IdP pushes changes as they occur. Thus, for instance, a change in a user's permissions in the IdP is actively communicated to Axis Security, allowing Axis Security to immediately respond.
Provisioned Identity Objects (SCIM) vs. SAML Queries
Though they are significantly different, at their core, provisioned identity objects and SAML queries serve the same function: helping users connect to their IT resources.
However, they do differ in the following ways.
User provisioning overcomes the SAML query shortcomings by creating and using identity objects. In a SAML query, the user can enter any value they choose to create a user. In services based on user provisioning, the admin searches for a user from a prepopulated menu, and this ensures the right user's identity.
Another advantage in using user provisioning is that there cannot be any crossover between IdPs. This means that a user who was authenticated in Okta, for instance, cannot be authorized by Axis IdP.
Creating an Identity Object
This section includes the following topics:
- Adding an Identity object
- Adding a provisioned identity object or new SAML Query
- Adding a new identity group
Step 1: Adding an Identity Object
To add an identity object in the Management Console:
- Go to Policy -> Identities -> New Identity.
- Select one of the available methods:
- Okta
- Axis IdP
- Custom SAML Query
- Azure Active Directory
Note
Axis provides an internal IdP, the Axis IdP, to manage identity information and authentication for Axis users. Admins can use the Axis IdP authentication and authorization capabilities to test and validate policy rules and their application before deployment.
Step 2: Add provisioned identity object (Okta, Axis IdP, Azure AD) or Create a Custom SAML Query
Select one of the following options to provision an identity object or to create a SAML Query.
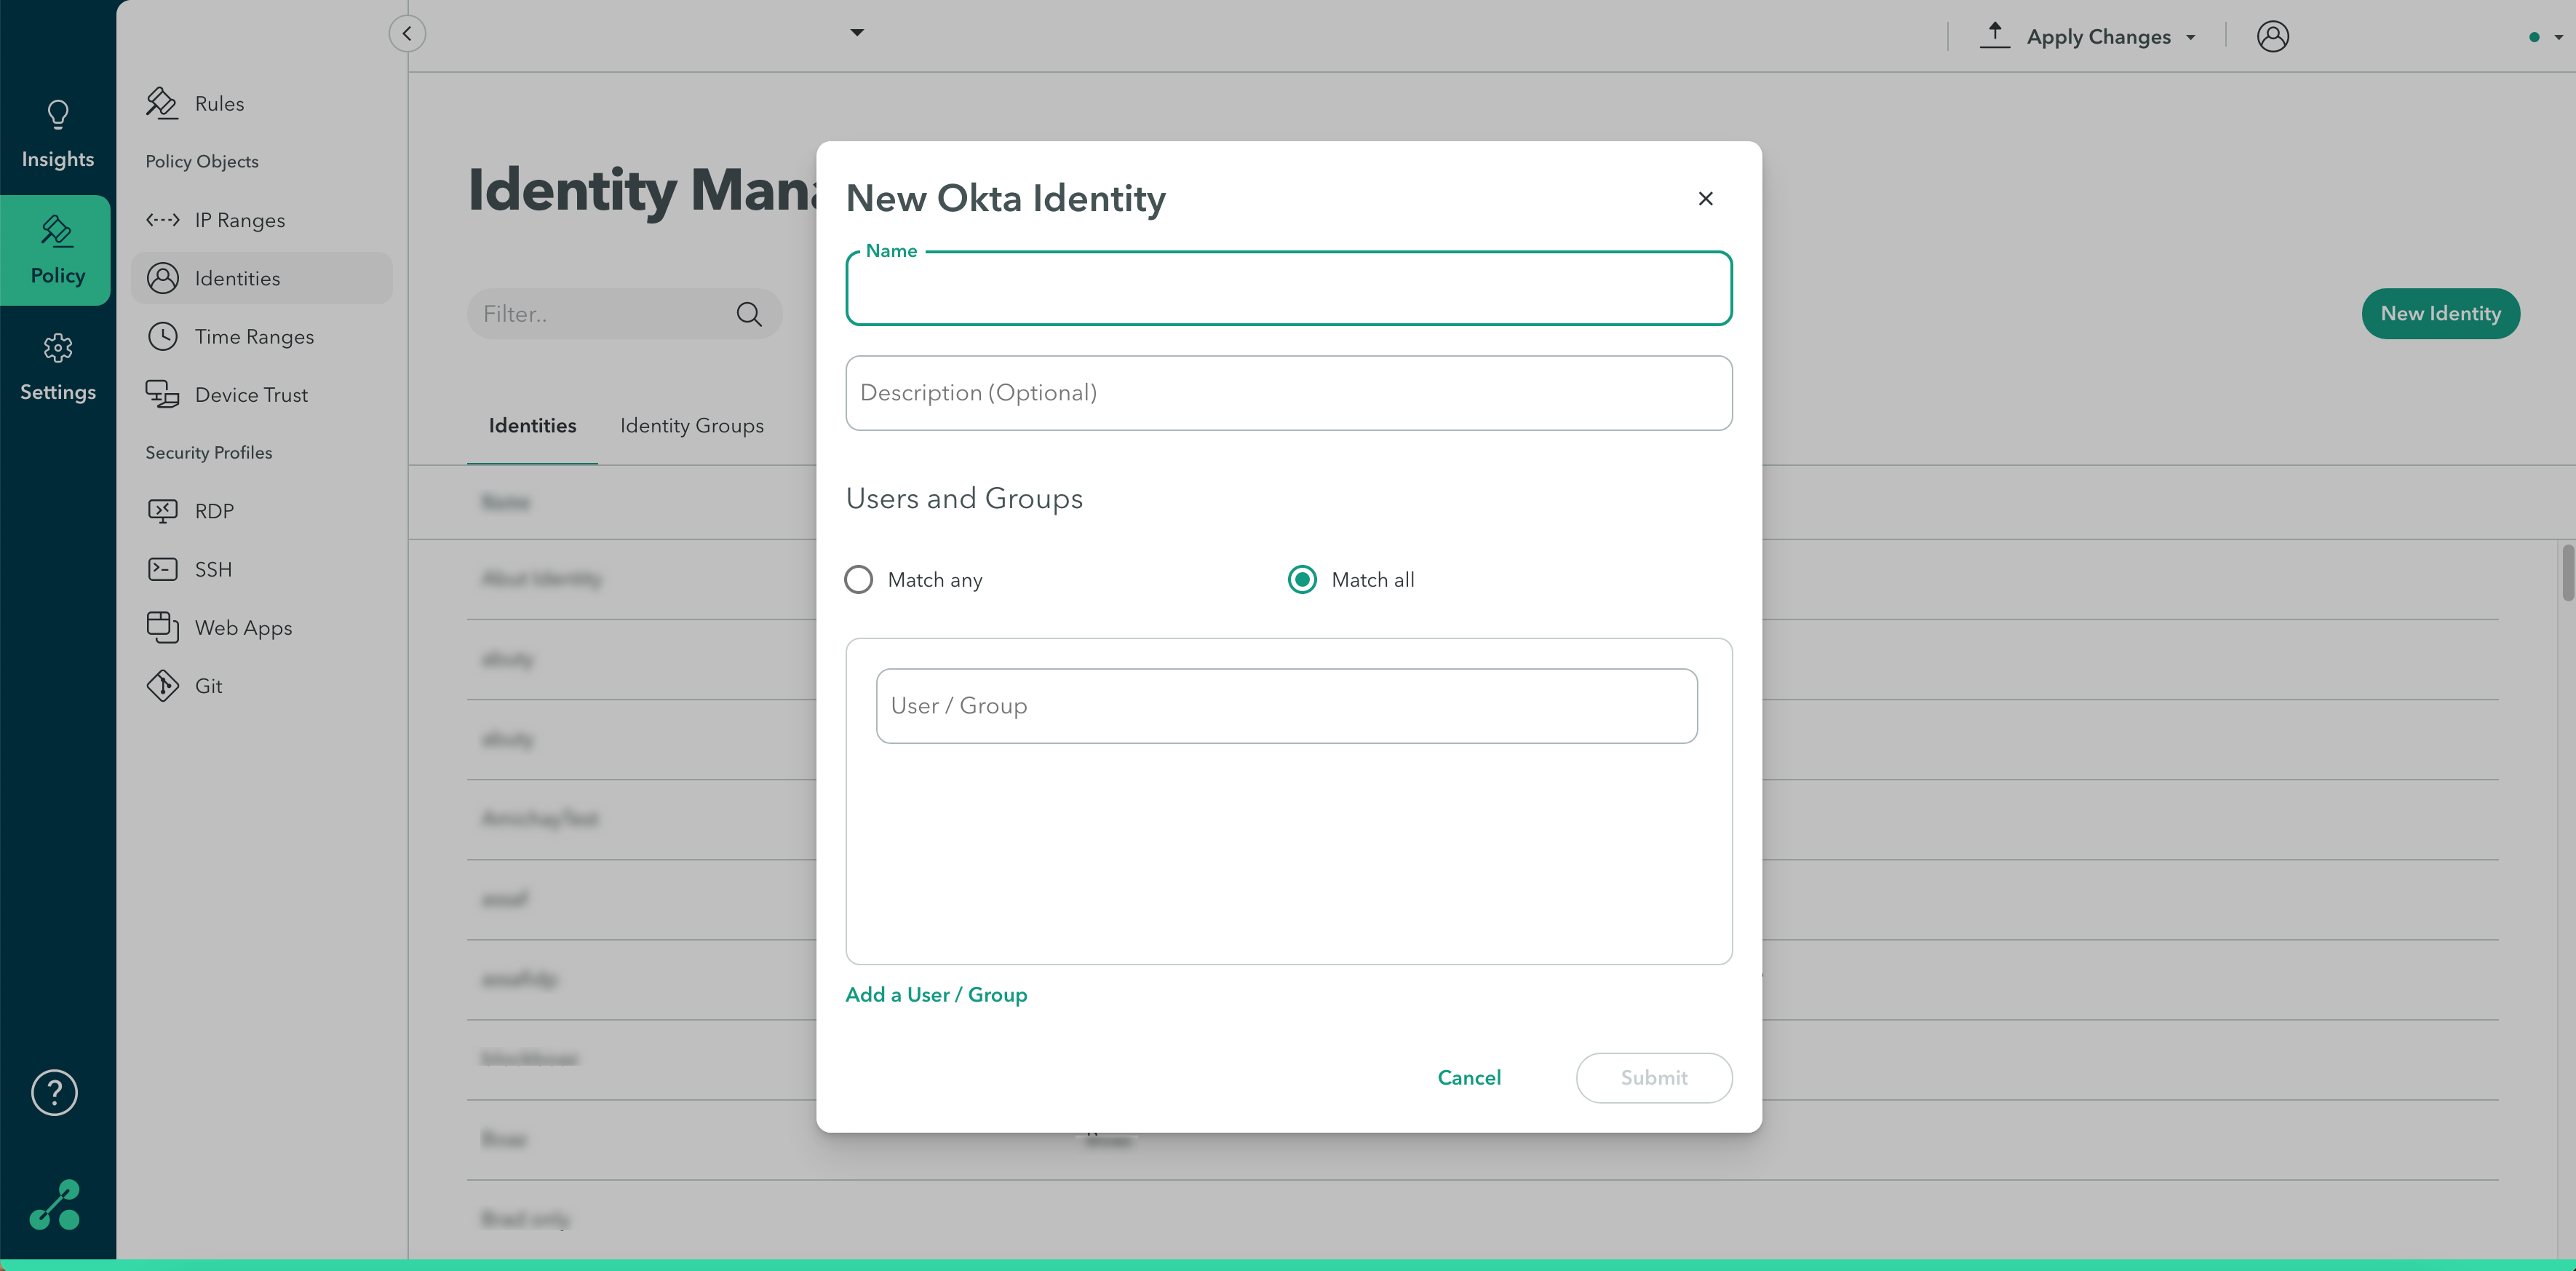
Option A: Provisioning Users using an Okta Identity Object
To provision users using an Okta identity object:
- In the Name Field, enter a name for the new identity.
(Optional) In the Description field, enter a description

- In the Users and Groups section, select whether you want the attributes to match all or match any.
- Start typing in the user/group field to add users.
- Click Add User/Group to add a user or user group.
- Click Submit.
- Click Apply Changes in the top-right menu, then click Commit changes.
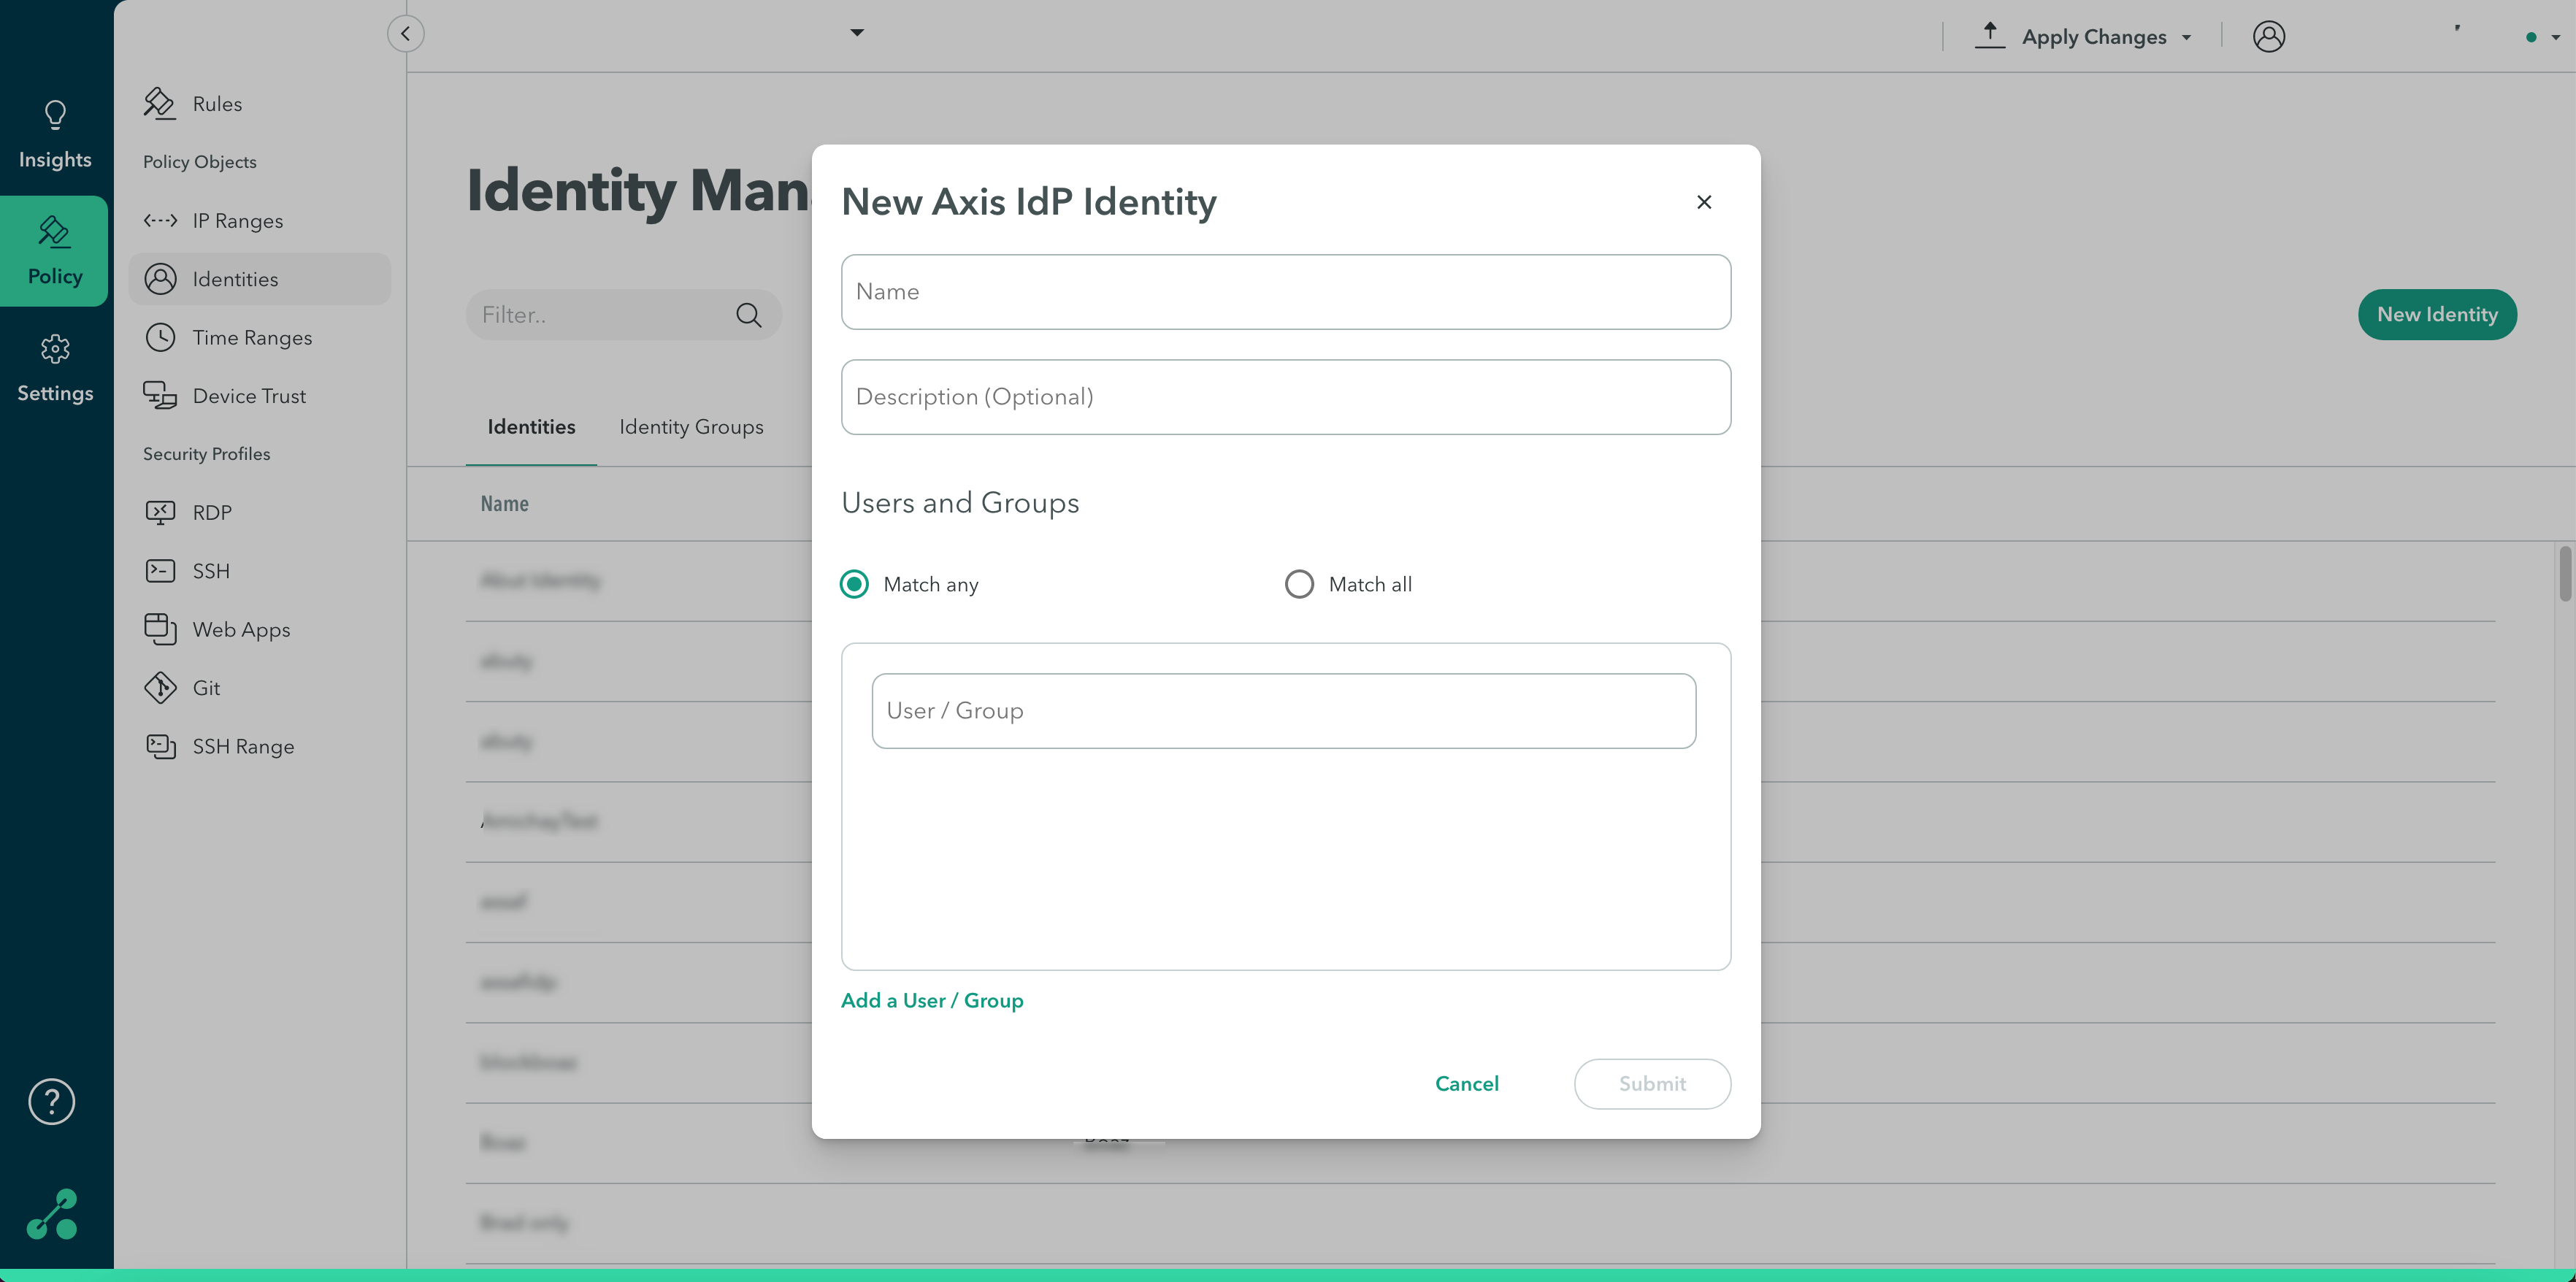
Option B: Provisioning Users with an Axis IdP Identity Object
To provision users with an Axis IdP Identity Object:
- In the Name field, enter a name for the new identity
(Optional) In the Description field, enter a description.

- In the Users and Groups section, select whether you want the attributes to match all or match any.
- Start typing in the user/group field to add users.
- Click Add User/Group to add a user or user group.
- Click Submit.
- Click Apply Changes in the top-right menu, then click Commit changes.
Option C: Provisioning Users with Azure Active Directory
To provision users with Azure Active Directory:
- In the Name field, enter a name for the new identity
(Optional) In the Description field, enter a description. - In the Users and Groups section, select whether you want the attributes to match all or match any.
- Start typing in the user/group field to add users.
- Click Add User/Group to add a user or user group.
- Click Submit.
- Click Apply Changes in the top-right menu, then click Commit changes.
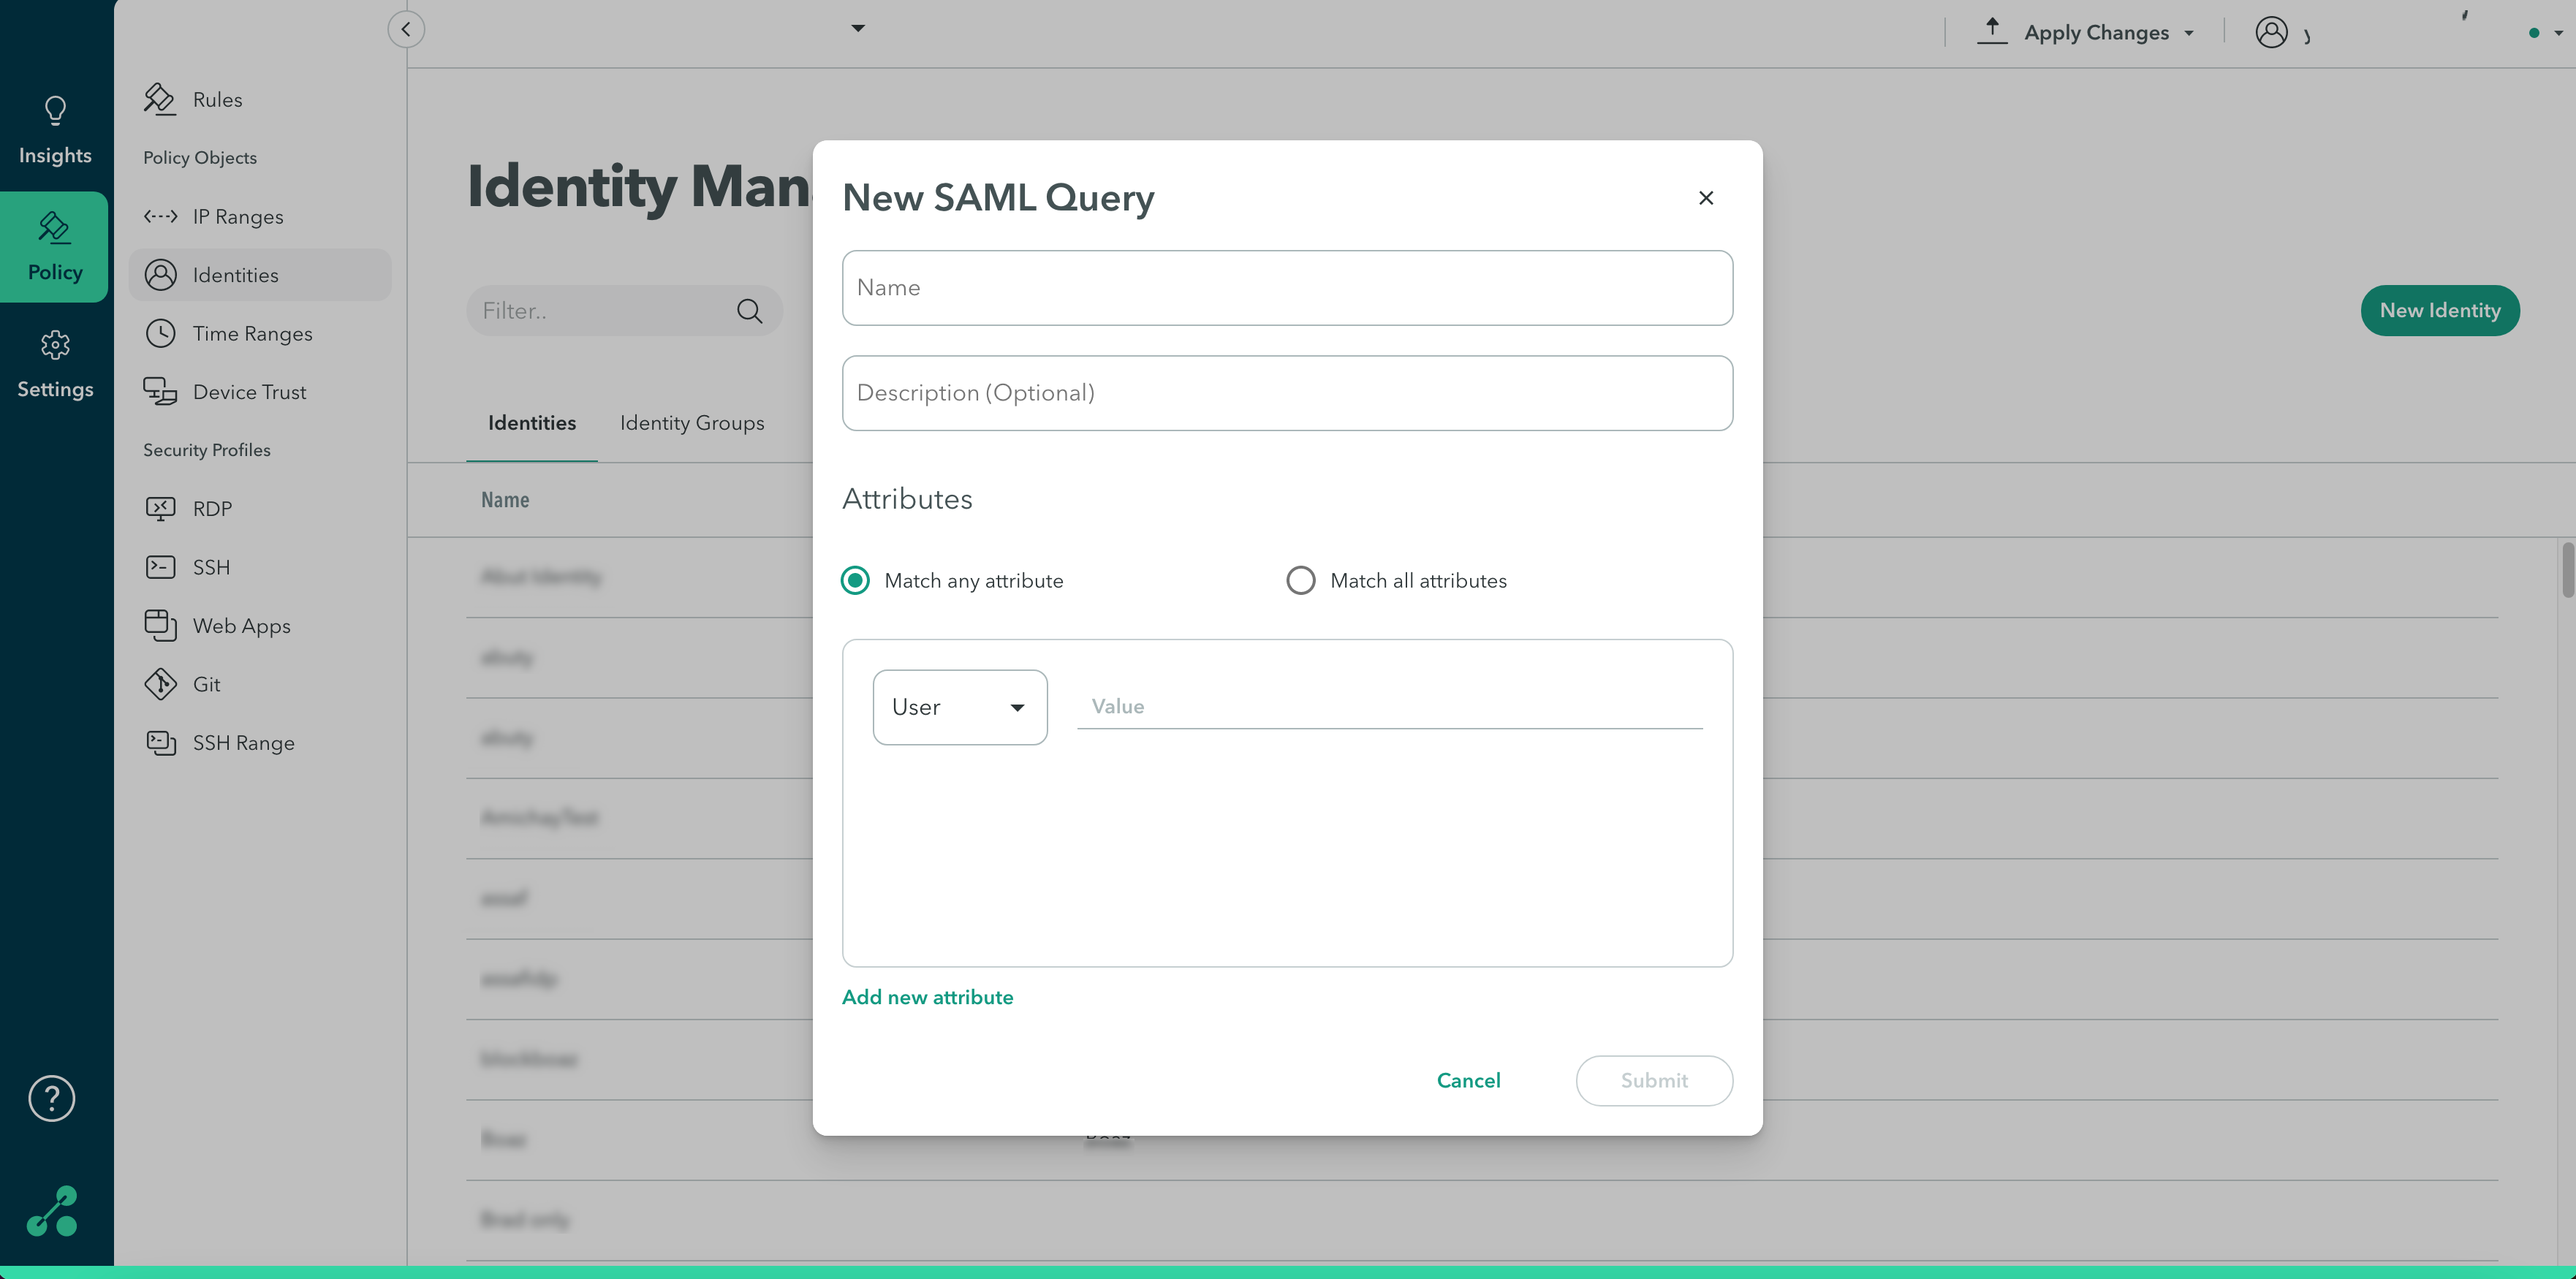
Option D: Provisioning Users with a Custom SAML Query
To provision users with a custom SAML Query Identity Object:
In the Name field, enter a name for the new identity
(Optional) In the Description field, enter a description.

- In the Users and Groups section, select whether you want the attributes to match all or match any.
- Start typing in the user/group field to add users.
- Click Add User/Group to add a user or user group.
- Click Submit.
- Click Apply Changes in the top-right menu, then click Commit changes.
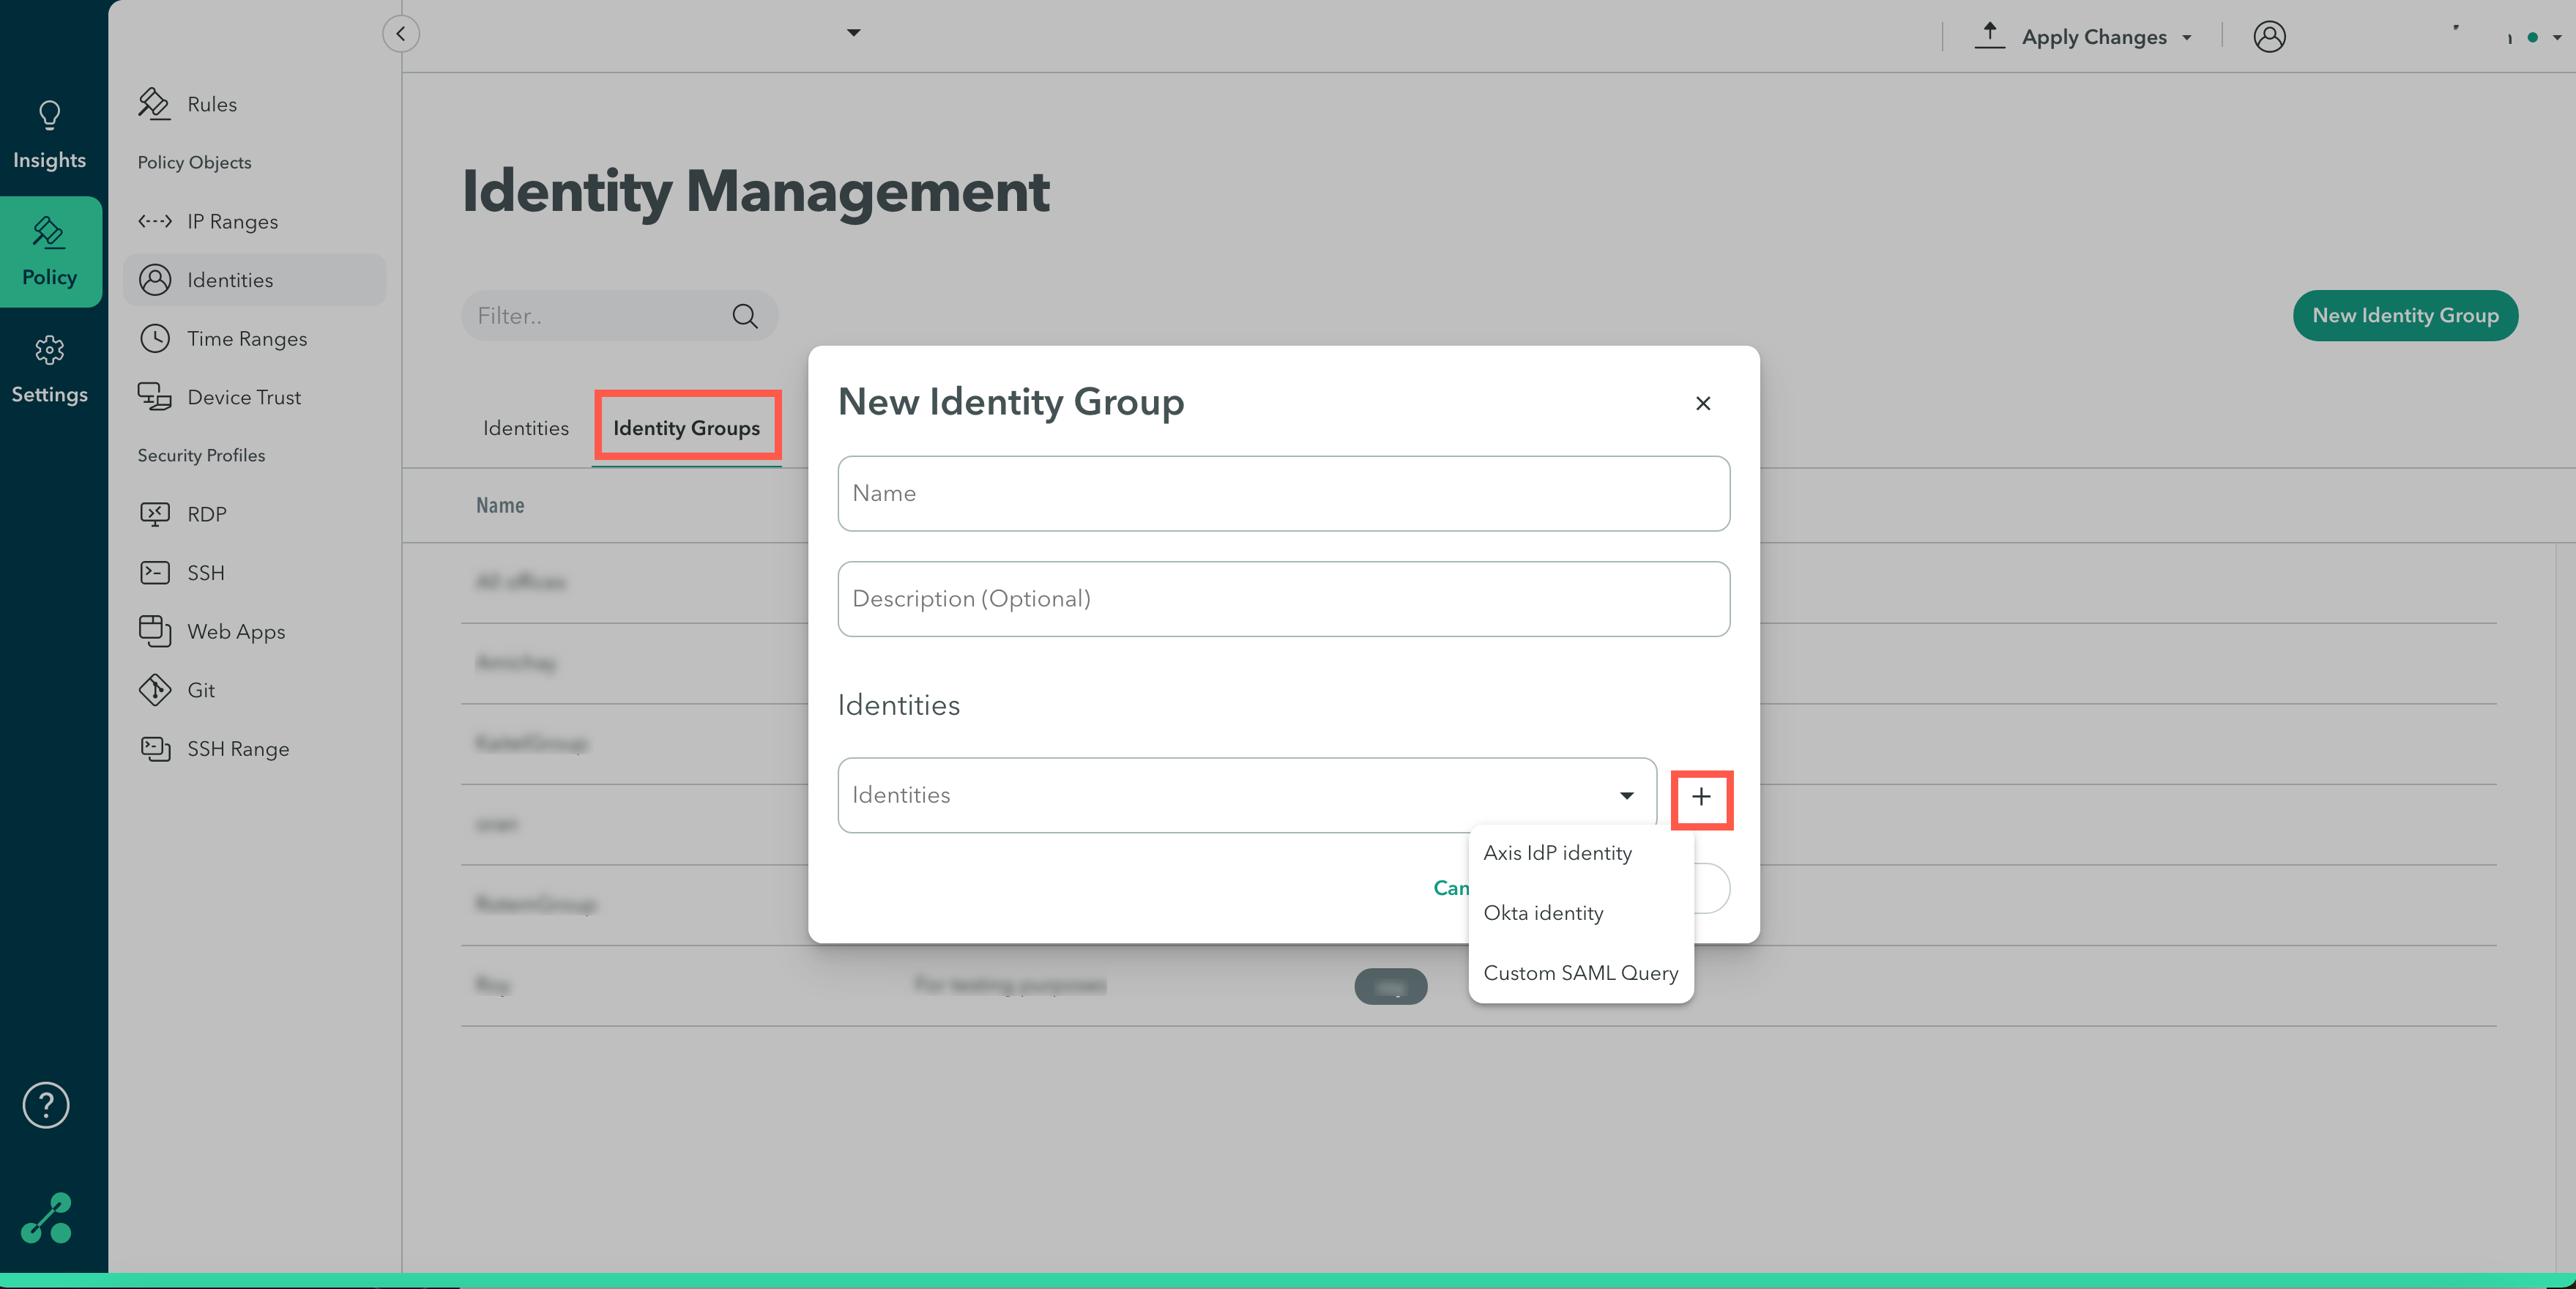
Step 3: Adding a New Identity Group
An identity group is composed of 2 or more users and it enables the admin to perform actions or invoke policy rules on a group of users instead of a single user.
- In the Management Console, go to the Policy-> Identity Management
- In the Identity Management screen, click Identity Groups.

- In the Name field, enter a name for the new group.
- (Optional) In the Description field, enter a description.
- In Identities, click the Identities drop-down menu to select users or click the plus sign to add a new identity in Okta, Axis IdP, or a Custom SAML query.
Updated over 3 years ago
